Inspired by this month's style theme for the
Fiesta Movement, I wonder what styles are out of your comfort zone? Bold patterns? Hats? Harem pants?
Have you seen those little challenges they post monthly? It's cool what Fiesta Agents have been doing, taking on challenges outside their respective comfort zones. Last month I went outside my comfort zone and sewed up some harem pants, and I'd say they were a hit! I wear them at least once a week (which is tight rotation considering my closet).
I don't do hats. Maybe that's next. What clothing item would you like to find within your comfort zone?
I love this skirt. I didn't know how much I would wear it because of the bold pattern, but it gets just as much play as the other skirts in my wardrobe. It's been amazing to wear this fall. My legs don't freeze to Otter Pop status.
This skirt (as mentioned in the
original post) has a super power. It's a full-coverage wrap skirt. It's not going to show off my lady bits with a small gust of wind. NO. It's going to take 15+ mile an hour winds to achieve that.
When you've got winds that crazy, you don't want to be wearing any kind of skirt anyway.

Now let's make ourselves a maxi wrap skirt that won't give you a red-faced Marilyn moment, shall we?
Full-Coverage Maxi Wrap Skirt Tutorial
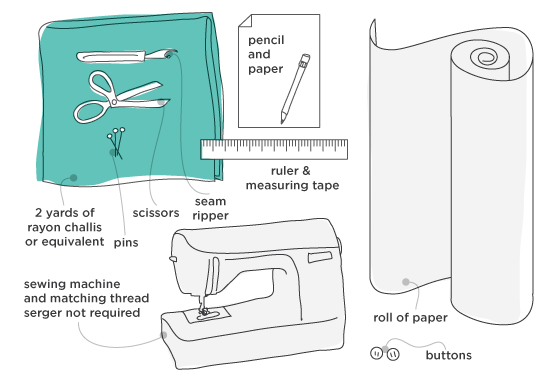
Supplies
- 2 yards rayon challis
- pins
- scissors (paper and fabric)
- seam ripper
- ruler
- measuring tape
- pencil
- paper
- large roll of paper
- sewing machine
- coordinating thread
- coordinating buttons
- iron
You could get away with any drapey fabric. A knit, a silk georgette or a cotton lawn. Rayon challis is going to give you a lot of drape and it's not terribly expensive.
If you don't have a large roll of butcher paper on-hand, several small sheets taped together will do. You'll still want a large-ish floor or table space to draft up your pattern.
Let's get drafting!
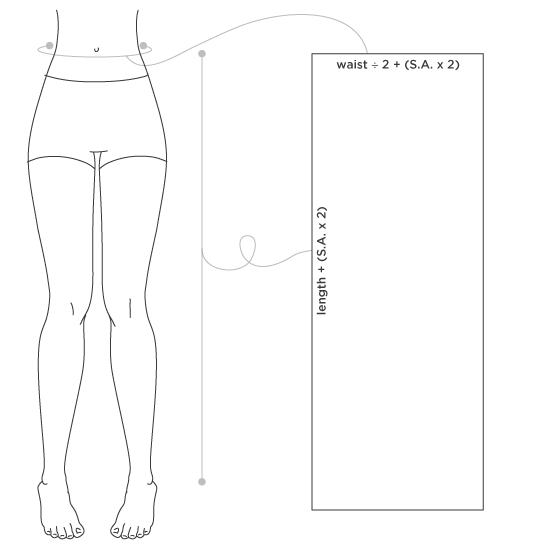
Take your measurements. See the above diagram for the rectangle you're going to make. Draw out your rectangle.
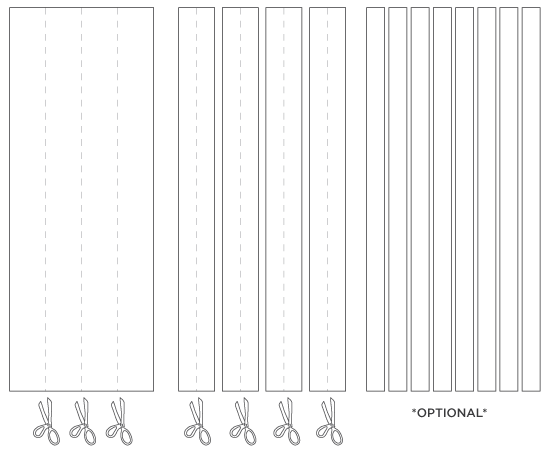
Now I want you to fold your paper into fourths hot-dog style. Cut the strips. It's optional to cut the strips into strips again, but recommended.
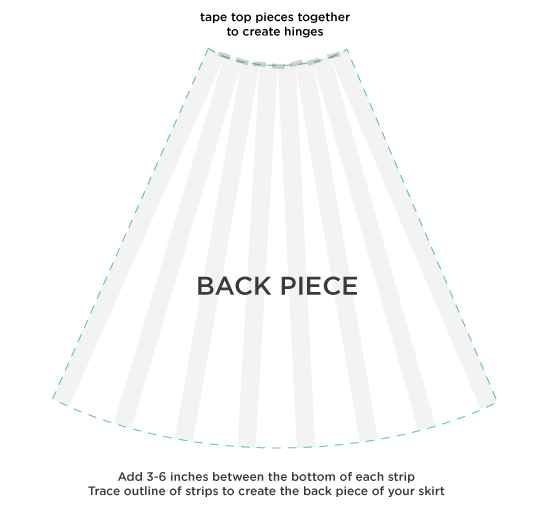
On a large sheet of paper, tape the top of the middle two strips together and spread the bottom of the strips about 3-6 inches apart. Add strips to the top with the same spread on the bottom. This will create an even curvature and proper drape for your wrap skirt.
Quickly measure your widest hip measurement and make sure that the hip on the drafted pattern is 2-3 inches bigger than your measurement. This will allow for a comfortable fit.
Trace and cut the outline of your back piece.
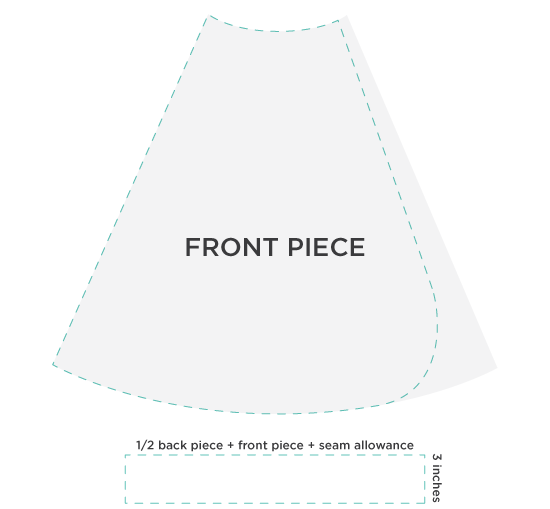
On another sheet of paper trace out the back piece. About 1-2 inches shy of the full width of the back piece, draw a line all the way down the skirt, curving into the bottom hem. This will be your front piece.
For the waist measurement, add half of the width of your back waist measurement, 1 full front piece measurement and two seam allowances. That will be the width of
half your waistband. Make it 3 inches tall.
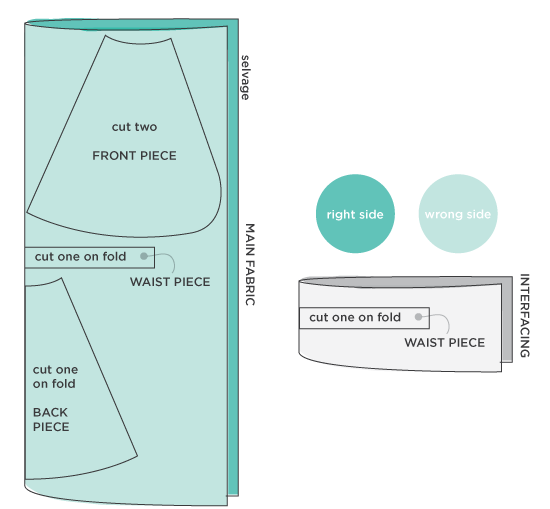
Fold the fabric in half, right sides together. Fold your back piece in half and cut one piece on the fold line. Cut two front pieces. If you can't fit the front piece on a folded fabric,
don't forget to reverse one of the panels.
Cut one waistband from the main fabric, one from the interfacing.
Iron interfacing onto the waistband.
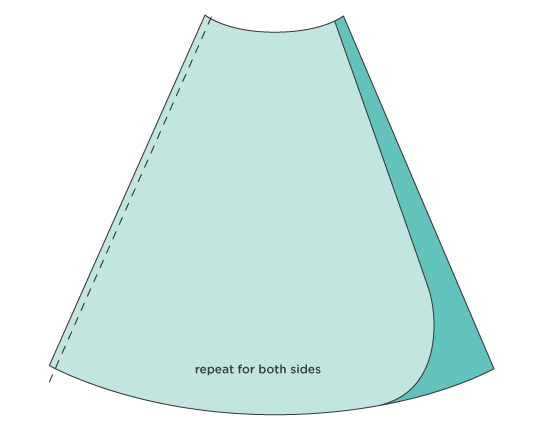
With right sides together, sew the straight side of the front piece to the back. Repeat for the other side.
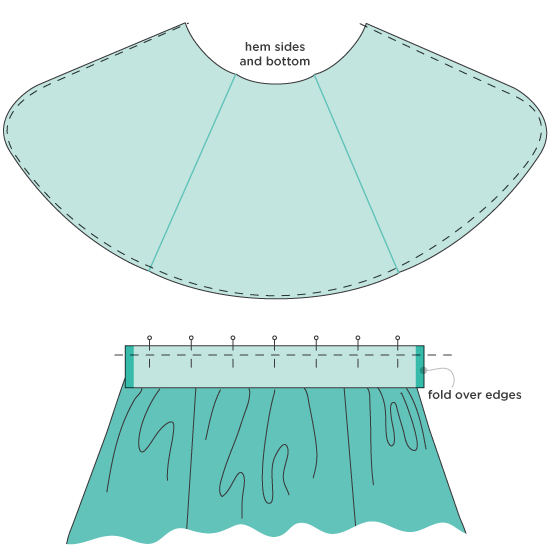
Open up your skirt and press seams. Hem the sides and bottom. A
rolled hem is easiest with the curved lines.
You'll also want to stay-stitch the waist (just baste stitch the opening of the waist before sewing the waistband on so it doesn't get distorted).
With right sides together, sew the waistband to the skirt. Having ends folded over on each side.
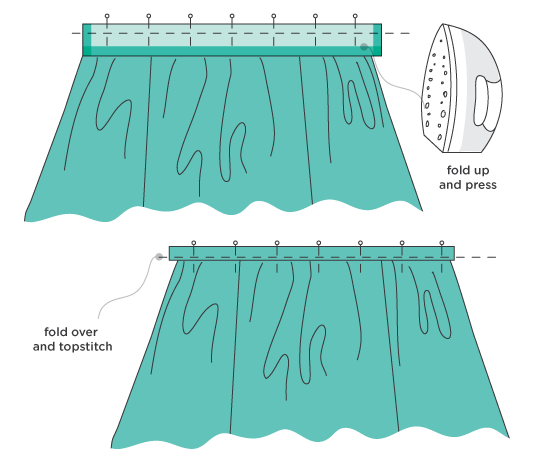
Fold the raw edge of the waistband up (I used 5/8 on all of my seams) and press with an iron. Then fold the waistband in half so the folded edge meets the inside of the skirt. Press flat and topstitch into place.
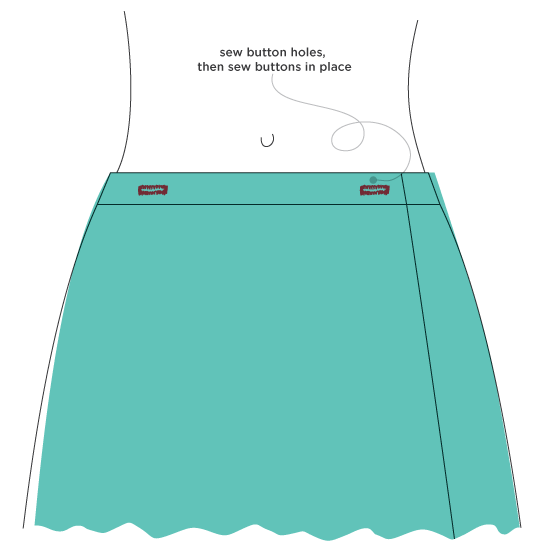
Try on your skirt and pin where the button holes are to go (they go on the top flap) where the skirt and the end of the waistband meet. Make sure button holes accommodate your buttons.
Sew buttons. Enjoy!
This is a sponsored post and I was compensated for my participation. The opinions expressed are my own.
This tutorial/freebie is free for personal use and should not be distributed/republished without my consent. Altering any files is NOT ALLOWED. If you would like to use this tutorial for commercial purposes, please email me. Thanks!
 I bought this stool from a neighbor for $10. Chris has wanted a stool for playing the guitar, but we haven't wanted to invest anything yet. When a neighbor posted that she was getting rid of it, I quickly snatched it up.
Chris was disgusted at the initial appearance of the stool. It had been well loved, the cushion was severely cracked and it had a layer of dust on top. All of the working parts moved smoothly, so it was just a matter of a simple face-lift. I've recovered a few stools in my day (1, 2), so I knew I could get it done in about 10 minutes. 15 minutes if you count stopping and taking pictures along the way.
I bought this stool from a neighbor for $10. Chris has wanted a stool for playing the guitar, but we haven't wanted to invest anything yet. When a neighbor posted that she was getting rid of it, I quickly snatched it up.
Chris was disgusted at the initial appearance of the stool. It had been well loved, the cushion was severely cracked and it had a layer of dust on top. All of the working parts moved smoothly, so it was just a matter of a simple face-lift. I've recovered a few stools in my day (1, 2), so I knew I could get it done in about 10 minutes. 15 minutes if you count stopping and taking pictures along the way.
 I already had the foam, leather and staples on-hand, so it was just a matter of finding 10 minutes to dedicate to finishing it off. I cut a rough circle of memory foam. I wasn't perfect about it because I knew I was going to smash the heck out of it anyway.
 Leather has some stretchy properties, so I only measured an extra 3 inches around the sides for the leather and cut.
 Not doing anything to the existing padding, I piled on the new padding and leather and started to staple it down.
 It's crucial to staple along opposite ends, first. Dividing the circle into quarters, then dividing again, and again, working all the way around switching off between stapling down horizontals and verticals.
 I ended up stapling all the way around using very little spacing between staples to keep the leather from pleating around the edges.
 Chris was impressed with the final piece, excited to practice his chords on it. But I've been using it in my studio for extra seating and animated gifs. It's such a useful little piece in our home.
 Don't you just love it when you find something with such great potential and it ends up being an easy fix?
 I would show you a real before and after, but no one needs to see me in my tights. You get the idea with the illustration above.
But I solved the problem this weekend. It's crazy easy. I'll show you how to lose that muffin top without diet, exercise! Is it witchery, you ask? Perhaps. Let's get started.
I would show you a real before and after, but no one needs to see me in my tights. You get the idea with the illustration above.
But I solved the problem this weekend. It's crazy easy. I'll show you how to lose that muffin top without diet, exercise! Is it witchery, you ask? Perhaps. Let's get started.

 Cut that nasty, too-tight-for-real-humans waistband off your tights. Snip! Snip!
 Measure you're waist and cut a length of elastic (I used a wide picot elastic, but any comfortable, stretchy elastic will do). Sew the ends together.
Do you see how enormous my true waistband looks compared to the tights waistband? It's bananapants.
Measure you're waist and cut a length of elastic (I used a wide picot elastic, but any comfortable, stretchy elastic will do). Sew the ends together.
Do you see how enormous my true waistband looks compared to the tights waistband? It's bananapants.
 Pin the elastic on top of the tights in quarters. Split the seam allowance along the back seam of your tights. Now you'll always have a front and back to your tights, too!
 Stretch the tights as you sew and sew a generous zig-zag stitch all the way around.
 Guaranteed, it won't be the prettiest of fixes. At least mine weren't. We're going for speed and function here since I never expect anyone to see me wearing just my tights!
I can't begin to describe how much more comfortable I felt on Sunday. And I had nice smooth lines under my wiggle skirt. Big win!
Guaranteed, it won't be the prettiest of fixes. At least mine weren't. We're going for speed and function here since I never expect anyone to see me wearing just my tights!
I can't begin to describe how much more comfortable I felt on Sunday. And I had nice smooth lines under my wiggle skirt. Big win!
 I bought the fabric on a trip to San Francisco a while back. I fell in love with the weight and texture of this rayon knit. It's soft, silky, thick with great stretch.
Originally I planned on a wiggle dress for this fabric, but the more I looked at it, the more it felt wrong. At $30 a yard, I only bought a yard of this. My options limited me, but in the end served me well.
I've been meaning to try out the
I bought the fabric on a trip to San Francisco a while back. I fell in love with the weight and texture of this rayon knit. It's soft, silky, thick with great stretch.
Originally I planned on a wiggle dress for this fabric, but the more I looked at it, the more it felt wrong. At $30 a yard, I only bought a yard of this. My options limited me, but in the end served me well.
I've been meaning to try out the  The short crop isn't a design that I would typically gravitate towards. However, the short bodice allowed for long sleeves!
Sleeves take up a deceivingly amount of fabric. If you ever want to make anything long sleeved, you'd better err on the side of 2 yards. I'm still kicking myself for not buying 2 or three yards of this fabric. But hey, financial responsibility is worth something, right? And I LOVE how this sweater turned out.
The short crop isn't a design that I would typically gravitate towards. However, the short bodice allowed for long sleeves!
Sleeves take up a deceivingly amount of fabric. If you ever want to make anything long sleeved, you'd better err on the side of 2 yards. I'm still kicking myself for not buying 2 or three yards of this fabric. But hey, financial responsibility is worth something, right? And I LOVE how this sweater turned out.
 It works perfectly over the few button ups I own, and it will be marvelous over my
  I didn't make any modifications to the pattern, I cut an XS exactly. I was thoroughly impressed how quickly and easily I sewed on the arms. The seam goes all the way out to the edge of the shoulder so the ease is minimal. I only used three pins to sew them in!
 Next time I have a little more fabric to spare, I'm definitely making the longer version of this top.
 This outfit was the perfect mom outfit yesterday. I was comfortable all day, felt amazing and looked polished. Perfect for lunching it with my mom, running errands and picking up kids from the bus stop.
 Outfit details:
 Anxiety sometimes gets the best of me and I slip into a dark corner where I feel that nothing I do (or will ever do) is enough. That's bunk.
I'm enough. I am awesomesauce.
You are, too!!
Anxiety sometimes gets the best of me and I slip into a dark corner where I feel that nothing I do (or will ever do) is enough. That's bunk.
I'm enough. I am awesomesauce.
You are, too!!
 The first 5 people to comment on this post will get a set of these tattoos (to keep and/or giveaway). Just tell me, who do you think is awesomesauce?
Below you can download the artwork to make your own, if you missed out. All artwork subject to the Terms of Use provided in download.
The first 5 people to comment on this post will get a set of these tattoos (to keep and/or giveaway). Just tell me, who do you think is awesomesauce?
Below you can download the artwork to make your own, if you missed out. All artwork subject to the Terms of Use provided in download.

 About 15 minutes later, I found myself roped into making Chris a case. He drafted and cut while I sewed.
Save for one wrong measurement, everything went very smoothly.
About 15 minutes later, I found myself roped into making Chris a case. He drafted and cut while I sewed.
Save for one wrong measurement, everything went very smoothly.
 The case is a little loose around the sides, but otherwise fits perfectly. As the leather stretches to conform to the phone, I'm sure we'll go back through and tighten up the gaps with more stitches. For now it works, though.
We used a 5mm industrial felt for the back to give it structure and to keep the case from slipping out of Chris's pocket. A coral garment-weight calf skin was used for the inner layer and a lambskin was used for the wallet layer. The leathers were thin enough that my machine went through the three layers without any hiccups. Because of the thin and flexible nature of the leather, I turned down and hemmed the edges to give the leather a little more stability. It worked like a charm.
The case is a little loose around the sides, but otherwise fits perfectly. As the leather stretches to conform to the phone, I'm sure we'll go back through and tighten up the gaps with more stitches. For now it works, though.
We used a 5mm industrial felt for the back to give it structure and to keep the case from slipping out of Chris's pocket. A coral garment-weight calf skin was used for the inner layer and a lambskin was used for the wallet layer. The leathers were thin enough that my machine went through the three layers without any hiccups. Because of the thin and flexible nature of the leather, I turned down and hemmed the edges to give the leather a little more stability. It worked like a charm.
 We bought a ton of this industrial felt. It's pretty neat. We've already made a laptop case and this phone case, but we have just shy of 3/4 of a yard left of the 40" wide material. I'm thinking some catch-all baskets will be next.
 I'm always trying to find appropriate quiet toys for Penelope and Felix to play with during our church services on Sundays. They can be the hardest 3 hours of the week if I don't come prepared with ample toys and snacks. Problem is, often times they get bored with the toys they typically play with. The idea struck for Sunday-only toys when I found these little cuties.
They were great last week, but we were missing scenery. The little pouch my friend made is perfect for housing all of the animals and any coordinating accessories so my mind set to work to make something collapsible that would fit inside the little pouch (isn't it too cute?!?).
I'm always trying to find appropriate quiet toys for Penelope and Felix to play with during our church services on Sundays. They can be the hardest 3 hours of the week if I don't come prepared with ample toys and snacks. Problem is, often times they get bored with the toys they typically play with. The idea struck for Sunday-only toys when I found these little cuties.
They were great last week, but we were missing scenery. The little pouch my friend made is perfect for housing all of the animals and any coordinating accessories so my mind set to work to make something collapsible that would fit inside the little pouch (isn't it too cute?!?).
 Making little cut-outs with Silhouette's chipboard did the trick! Designing the scenery was a breeze, too. It was a fun little mommy-daughter activity for us to decorate the scenery together.
I'm not sure I've seen this kind of excitement from her in a while.
Making little cut-outs with Silhouette's chipboard did the trick! Designing the scenery was a breeze, too. It was a fun little mommy-daughter activity for us to decorate the scenery together.
I'm not sure I've seen this kind of excitement from her in a while.
 Now my only hope is that I can hide these little goodies during the week. She wants to play with her toy scene all the time!
 Yesterday started a huge promotion over at Silhouette. They're offering huge discounts on not only the machines, but a whole pack of goodies. If you don't have a machine yet, I advise you get one with this promo. You'll get so many fun starter goodies you'll be crafting well into the thick of winter.
Use promo code MELISSA at checkout for this
Yesterday started a huge promotion over at Silhouette. They're offering huge discounts on not only the machines, but a whole pack of goodies. If you don't have a machine yet, I advise you get one with this promo. You'll get so many fun starter goodies you'll be crafting well into the thick of winter.
Use promo code MELISSA at checkout for this 
 The turbeanie feels much more feminine than a regular beanie, but so much less work than the oh-so-popluar turban headbands. I don't have to do my hair in order to make it look done!
One of the best parts? I have everything I need on-hand. I bet you do, too. Let's do wrap a turbeanie together!
The turbeanie feels much more feminine than a regular beanie, but so much less work than the oh-so-popluar turban headbands. I don't have to do my hair in order to make it look done!
One of the best parts? I have everything I need on-hand. I bet you do, too. Let's do wrap a turbeanie together!

 If you have an extra wide scarf, fold it in half.
 If you're going for a beanie look, tie your hair into loose piggy tails to keep your hair from going all over the place. You could alternatively tie this turban with a topknot or any other hairstyle.

 Pull both ends so the line at the nape of the neck is tight. Cross ends over.
 Cross ends again.
 This creates the popular turban look you see in headbands everywhere.
 Take the ends to the back and cross over to the front.
 tuck remaining tails into the fabric. Be sure to keep any corners on the inside of the folds of fabric.
 Adjust the turban as needed.
 I guess my desire for making a pretty cake overcame the desire to make it fun for Penelope. I'm ashamed to admit this, but I do that all the time. I crowd her out so she ends up watching or getting bored and going to her studio to craft.
Hanging out with the kids Thursday opened my eyes to two (okay more than that, but I'll only mention two here) shortcomings of mine as a mom. I take over our creative projects and I rarely get the kids out of the house. My mom took us to galleries, museums, symphonies at least once a week growing up.
Time for some resolutions.
I guess my desire for making a pretty cake overcame the desire to make it fun for Penelope. I'm ashamed to admit this, but I do that all the time. I crowd her out so she ends up watching or getting bored and going to her studio to craft.
Hanging out with the kids Thursday opened my eyes to two (okay more than that, but I'll only mention two here) shortcomings of mine as a mom. I take over our creative projects and I rarely get the kids out of the house. My mom took us to galleries, museums, symphonies at least once a week growing up.
Time for some resolutions.
 Back to the cake. I used what I had on hand, which worked perfectly for
  I also filled the middle tier of the cake with blackberry preserves. I could've done the ganache in the middle, but I love how the dark chocolate lattice work could be mistaken for a spider's web.
 This quite possibly beats out the delicious cake served at our wedding. And that was an amazing cake.
Chris and his brother kept sneaking bites throughout the evening and next morning. Between the 5 of us, we devoured the cake in a matter of hours. I felt triumphant.
This quite possibly beats out the delicious cake served at our wedding. And that was an amazing cake.
Chris and his brother kept sneaking bites throughout the evening and next morning. Between the 5 of us, we devoured the cake in a matter of hours. I felt triumphant.

 The top is
  I cut my pattern longer in the front and the back for a perfect-for-leggings (
 The sheer top is making me wish I had sewn this baby up during the summer. At least I'll be prepared with more seasonably appropriate clothes next summer!
 Drafting the leggings weren't nearly as complicated as I thought when Miranda posted her
  If I saw this shirt on the rack at a clothing store, I probably would have passed it up for something with more design elements. It's given me new insight as to what things I could be making and wearing. I know I'll get a ton of use out of this basic top.
 I'm not sure if this blue is my color, but I'm loving the way it pairs with the black pin-dots.
 Outfit Details
 I didn't make a pattern for her (I kinda wish I did, I love how it turned out). We ended up wrapping the leather around her phone and punching and sewing as we went.
 We used a large leather scrap scored from an upholstery shop years ago. It's thin, but stiff. Perfect for a durable case that will hopefully last years.
The rustic styling and minimal details play into Brooke's style well.
We used a large leather scrap scored from an upholstery shop years ago. It's thin, but stiff. Perfect for a durable case that will hopefully last years.
The rustic styling and minimal details play into Brooke's style well.
 I love the simplicity of this case.
 And the one line of stitching down the side is a really neat detail, IMHO. ;)
 Our little "experiment" was a total win. I couldn't help but get even more excited and anxious to get my new phone and case!!
 I love how these ink transfers are grainy, organic and grungy. The grunge is really fun for this season.
We used to make these kinds of prints all the time in college. I did basically an entire series with oil ink transfers. See my
I love how these ink transfers are grainy, organic and grungy. The grunge is really fun for this season.
We used to make these kinds of prints all the time in college. I did basically an entire series with oil ink transfers. See my  Supplies
 With a dime-sized portion of ink, spread it evenly on your printing plate.
 Place paper front-side down and draw your desired design on the back. Put one finger down on the corner of your sheet to keep the paper in place, but don't hold it down anywhere else! You'll get giant blobs of ink on the paper if you touch the paper with anything!
Your image will be reversed, so plan text and images accordingly.
Place paper front-side down and draw your desired design on the back. Put one finger down on the corner of your sheet to keep the paper in place, but don't hold it down anywhere else! You'll get giant blobs of ink on the paper if you touch the paper with anything!
Your image will be reversed, so plan text and images accordingly.
 Repeat over an over! After each transfer you may need to even out the ink or add more if it's quick to dry.
 However, the plain teal and patch leather pockets didn't seem exciting enough. I've long wanted to do some serious block printing on a garment piece (
 The front and sleeves were printed in a cross-hatch pattern and the back was printed with a simple triangle pattern (previously used
  I used brown leather suede scraps scored from Michael Levine back in LA. It's the softest, nicest suede I've ever felt, and because it's garment weight, it doesn't make the dress boxy or bulky at the hip.
 I see the flaws in my printing (so many little white blobs everywhere), but it creates a certain vibe.
 I've seen boxy fit dresses and tops go down the runway at NYFW lately, it makes me glad that I cut it a bit on the boxy side. It's comfortable without, but I can go with the belt for a more structured look.
 This is my new g0-to dress. I think I'll be making a few of these in the future.
Outfit details
This is my new g0-to dress. I think I'll be making a few of these in the future.
Outfit details
 On a related note, it snowed last week!! The first snow of the year had the biggest snow flakes I had ever seen. None of it stuck around for more than 24 hours, but it was quite the awakening that our carefree summer has ended. I still have a lot of weeding and yard prep to do before the real snow hits. And by real, it's rumored that our neighborhood will get in the range of 10 feet this year. Chris and Penelope are beyond thrilled that they have their skis and gear all ready to rock and roll.
 A few weeks ago I organized all of my holiday gear in boxes (a first!) so now it's time to invest in some fun decor to fill those boxes.
Today I'm sharing with you an
A few weeks ago I organized all of my holiday gear in boxes (a first!) so now it's time to invest in some fun decor to fill those boxes.
Today I'm sharing with you an 
 Draw out your image backwards. Anything that gets drawn on the styrofoam, even lightly, will show up on your final print, so be deliberate!
 Spread about a dime sized portion of ink on your printing plate and spread it evenly on the plate with your brayer. Roll ink onto the styrofoam plate.
 Place styrofoam plate print-side down on your desired surface. Press with the side of your fist, but not too hard. If you press with your fingers, you may get strange mis-prints the next time you use the foam.
 Repeat with lots of different inks on lots of different papers!
 Frame your artwork or cut out and string up with baker's twine for a festive holiday banner.