I can finally (and proudly) say that our living room is complete. As complete as it's going to get in this house. Would you like a tour? Here we go.

First of all, I HATE the color of our walls. Seriously, what genius picks out a slightly pinkish, yellowish off-white? It's got to be either true white in my opinion or something completely different. In my dream home, I'd love to have glossy white everything. Okay, continuing on. . .

We upgraded our couch from our last place (
the Urban Outfitters One). It was cute, but hardly comfortable as a living room/family room couch. I was 4 1/2 months pregnant at the time, so I was NOT going to tolerate an uncomfortable couch. THIS, my friends, was a huge splurge for us. It's a Notuzzi limited edition, top-grain leather couch in mushroom. We thought about black, but ultimately the mushroom was a more interesting color. This was our Christmas present last year & we love it. It's the perfect kind of soft leather so you're not slipping around all over the place - it's soft, cool & not sticky. The shape was something that took us a LONG time to find. How come it's nearly impossible to find a leather couch with straight lines? I can't stand the overstuffed look (sure it's comfy), and I'm not into the rounded tight '90s contemporary look that was the only other option.
After looking for a couch for over a month, it was between this one &
Ikea's Karlstad. This one was a little more expensive, but we liked the leather a lot more than the Ikea one. We bought it at
Sofa Mart in Draper.

The TV was another splurge. Until last October we'd survived our entire marriage without a TV. We had a projector, which was perfect in our small 1 bedroom San Francisco apartment, but not very ideal for a little girl that wanted to watch her shows
right now (it was a 5-10 minute process to set up the projector & get it going). Chris & I debated back and forth about what size TV we should get. He wanted a 60", I wanted a 40". We compromised at 55". We got this 780p Plasma LG TV brand new (never been opened) for $500 off of craigslist. We saw it in stores for $1300.
Along with the TV, we needed a console. We didn't want to spend an arm & a leg for it & we wanted it to fit our speakers neatly in there. Ideally I would've found a beautiful sideboard with cabinets that were the perfect dimensions, but that was out of our budget. We used the
Tryde plans from knock-off-wood to make our own custom console. Chris built it, I stained it, all for just over $100. I'd love to add doors to the console to hide the cords & electronics, but that's a project for another day. In the mean time, we've trained Penelope to avoid those electronics.

The rug we had at our previous place & inherited from my parents when they relocated to Charlotte. The coffee table we had previously, too.
The coffee table previously had a chest that nested inside the frame. We found it was muffling the audio from the speakers so we picked up some wood planks & nested them in the chest's place. This was the compromise between Chris shoving it to the wall (or tossing it out). Chris seriously questions the need for a coffee table. Am I the only one who
needs one?
That modern chair you see in the background was from
the thrift store &
the pillow was hand made. Lamp was
thrifted & DIYed.

Originally I stained the planks the same color as the console, but it was looking too dark & monotone for me. Also, Penelope had her way with the surface, so I sanded it down a bit to show more of the wood grain. I like it much better now.The natural wood grain is really pretty & has sort of an industrial look about it. I found
these blocks at House 8810 & had to buy them for Penelope. They're adorable toys & look fancy & fun on our coffee table.

The peace sign we've had for a while - we got at a white elephant exchange. The succulent I found at Lowe's as well as the cork round. The Giraffe was a
thrifty & chic find.

I found two of these matching stool table thingies at the thrift store. They had disgusting laminate on top, so I turned the wood over, sanded & painted a cheery orange. They're really low profile & very minimal in our small living room. The bowl was found at a thrift store, too.

I love my
Studio on Fire print! The above print is a father & son letterpress collaboration. It's sweet & a steal at $30.

This is artwork done by me. The square frame and matte on the bottom were passed down from my great grandmother. It's so old you can tell the glass was hand blown. This is our engagement photo - my mother-in-law shot for us & I cross processed. I love this picture.

The above drawing is a Sunday doodle of mine & the clock I found at a housewares swap several months ago.

These pieces are mine. I framed them in my framing class in college. The large frame was found at a thrift store.

The embroidered pillow cover I scored years ago at Ikea for 99¢, the
fish scale pillow I made & the yellow ikat pillow I purchased from
Moxie Mandie. The Ikea pillow is looking a bit worn, I plan on replacing it with another handmade pillow with a graphic print. I've got my eye on a few Ikea fabrics.

The shoe basket I scored at a thrift store,
the pillow I made from
Proud Mary fabric, the chair was scored at Ikea's as is section & the lamp & curtain were also ikea.
The mirror was scored at a thrift store.

This is the entry way; also part of our living room. The bench I scored a while ago at a thrift store (I still need to get it reupholstered)
the shoes & jacket were thrifted & purses were either thrifted or won on giveaways. I spray painted the hooks white & the artwork is this year's
Seesaw designs letterpressed calendar.
Here are the totals (including the cost of things I had on hand before moving here):
- couch - $1400
- tv - $500
- console - $110
- coffee table - $45
- poang chair - $75
- arthur umanoff chair - $8
- pillows - $40
- tufted bench - $15
- artwork & frames - $150
- side tables - $4
- lamps - $30
- tchotchkes & plants - $50
Grand Total: $2427
Looking at this list makes me feel like I've spent a TON of money on this room, but a lot of these things we've collected over the last 5+ years. Mostly the artwork. Honestly if we were to have paid full price for everything, this would be a $4000+ room. Good artwork adds up so does good/unique furniture. I consider myself pretty proud of this space. I'm definitely proud to show this off as the first room people see. Well, besides the awful paint. I guess I should be thankful it's not lavender or lime green.
 Like I said - the cut in the leg was just outdated. they were too short to be cool bell bottoms & MUCH too wide to be worn with flats. I felt like I had stubby legs when I tried them on. Do you ever feel that way with pants?
 Hello, missing button! I love these slanted pockets & the cheery blue stitching. Not necessarily anything that's on trend, but I like those little details.
 I didn't do much besides take in the bottoms. I took my super skinnies & laid them wrong side out on top of these pants & marked lines just outside of the super skinnies to mark the tapering. I took in about 4 inches on the bottoms. YIKES. I feel like the skinny really lengthens my leg. One of the many reasons why the skinny jean trend can never go out.
 After I was done adjusting the bottom & adding the button, I noticed that the back felt a little loose & a bit too low for me. So I added two darts (the denim was thin enough) on either side of the back seam. That made all the difference in the world! The fit of these jeans is perfect. They're my new go-to pant. Now I don't feel bad that I don't fit into my pre-Felix skinnies.
 These are quite possibly my new favorite skinnies.


 Just kidding. I've always wanted one, though! In church we talked about respecting & taking care of our bodies so I sent all the little kiddos (I teach about 30 kids once a month) home with their very own temporary tattoo as a fun reminder. The kids LOVED it. SCORE!
 I designed this little tat using
 Truly, I wish I could decorate my entire house from top to bottom with Jonathan Adler, but that's not going to happen in the foreseeable future. I have yet to discover my "money tree". While out & about last Saturday I found this flat white ceramic giraffe staring me down at the thrift store. It was $3. I had to have it & I think it looks absolutely adorable on our coffee table next to the peace sign (which we got as a white elephant gift - but I love it!).
Have you found any good deals lately? My aunt scored some
Truly, I wish I could decorate my entire house from top to bottom with Jonathan Adler, but that's not going to happen in the foreseeable future. I have yet to discover my "money tree". While out & about last Saturday I found this flat white ceramic giraffe staring me down at the thrift store. It was $3. I had to have it & I think it looks absolutely adorable on our coffee table next to the peace sign (which we got as a white elephant gift - but I love it!).
Have you found any good deals lately? My aunt scored some  This top was actually bought for Chris. Turns out I ordered him an XL girlie tee from threadless. WOOPS. Guess it's going in my closet now. I never would've considered ordering an XL, but I absolutely LOVE the fit. Size means nothing, fit is everything.


 Penelope LOVED her dino party and I loved planning it. We kept things super simple, but I got a little creative with the invites and favors.
 The download includes a fill-in-the-blank invitation. Instead of "Pen is turning THREE!", I changed it to "it's a dino PARTY!" in the same style. The bottom half has areas for date, time, place, rsvp, etc.
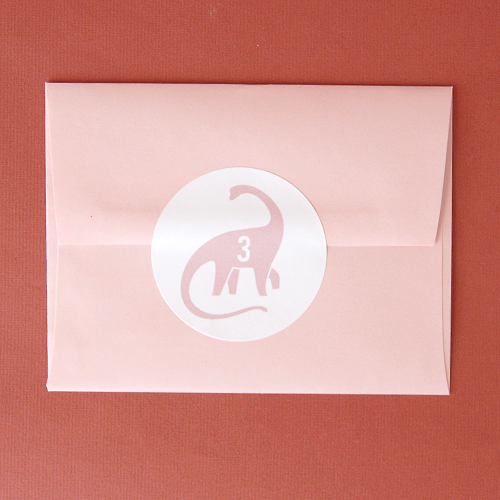 I included the dino sticker - ganged up for
  I included the dino eggs sticker - again compatable with the above Avery labels and the pouch printable. I would suggest printing on a light-weight (ideally 24lb laser) paper & cutting out by hand. For the pinked edges, use pinking shears or decorative scissors. Also, not pictured, I included a Thank You postcard for easy, matching thank yous!
There you have it! I hope someone will find this useful for an upcoming party! Click the button below to download the suite.
I included the dino eggs sticker - again compatable with the above Avery labels and the pouch printable. I would suggest printing on a light-weight (ideally 24lb laser) paper & cutting out by hand. For the pinked edges, use pinking shears or decorative scissors. Also, not pictured, I included a Thank You postcard for easy, matching thank yous!
There you have it! I hope someone will find this useful for an upcoming party! Click the button below to download the suite.

 We toured a couple of preschools this morning! She was so excited about "going to school". Since we were touring around, I thought I'd dress extra cute.


 I'm thrilled to part of
  I surely hope I'm not the only one that finds herself without headphones when headphones would certainly come in handy. This morning I whipped up a fringed pouch, using my
  I followed my instructions exactly, but this time using a thinner, more sewable leather. It took about 20 minutes to make from start to finish. I found the ball chain attached to my new Erin Templeton purse, so I just punched a hole in my pouch & attached the little chain. Alternatively you could attach the pouch with ribbon, jewelry chain or even just let the pouch roam aimlessly in the confines of your purse. These leather pouches wear really well with age.
I'm teaching at
I followed my instructions exactly, but this time using a thinner, more sewable leather. It took about 20 minutes to make from start to finish. I found the ball chain attached to my new Erin Templeton purse, so I just punched a hole in my pouch & attached the little chain. Alternatively you could attach the pouch with ribbon, jewelry chain or even just let the pouch roam aimlessly in the confines of your purse. These leather pouches wear really well with age.
I'm teaching at  Before I chucked the lamp, I had bought a new shade for it from DI for $2 in hopes that it would fit. Alas, it did not! It was too short & wide for the lamp's tall & skinny profile. Once the lamp was gone, though, I still had a great shade, but no lamp. I thought about buying a table lamp, but it just seemed that the room would be lacking some height in the corner. It was then I realized that I wanted to do a ceiling lamp. I still wanted to incorporate some orange in there somehow, so when we got to dyeing a few weeks ago, it only seemed natural that I dye my tan shade orange.
 I opted for an ombre because it's gorgeous & takes very little effort & dye bath in order to make it work. See, you need a bath as wide in diameter as your shade, & as tall as your shade. Since I didn't need it to go all the way up, that saved me a lot of time & boiled water.
 Finding the right fixture for making this shade a ceiling lamp was tricky. At least I thought. I planned on going to Lowe's & following an expert around while they imparted their complicated electrical knowledge. That didn't happen, or need to happen. I was able to find all the right stuff on one aisle & in about 3 minutes. I made Chris put it all together, though. I'm becoming DIY lazy in my old age.
 As soon as we hung the lamp, my problem was fixed! I feel so much more resolved about our living room decor! I have a couple more things to do before it's finished, finished, but I'll be sharing the rest of the details with you soon. What do you think? Would you have dyed your lamp shade? I'll surely be doing it again!!

 I loved working with
  I'm going to do more dyeing projects in the future & try some new techniques. It's fun how similar dyeing clothes is to watercolor. Batik - you're up next!!
Dye provided by
I'm going to do more dyeing projects in the future & try some new techniques. It's fun how similar dyeing clothes is to watercolor. Batik - you're up next!!
Dye provided by  I can't quite decide if this pattern is kitschy or cool. We'll go for cool for now.
 This kind of refashion is super easy & takes very little time to do.

 After I was done, the sleeves were still a bit too wide, so I made those minor adjustments & then wore immediately. I did this all while Chris & I caught up on the latest season of
  After we caught up on our shows, we went for a drive in the crazy, crazy rain. We had a lot of fun stalking homes on Zillow & discovering some new-to-me, let's-live-here neighborhoods. What did you do this weekend?


 Rebecca wanted something simple and traditional with some handmade touches. I designed some simple scrolling, hand-lettered their names & set the text with a go-to font of mine: Glypha.
 Rebecca & Scott liked this picture, but it didn't make the final cut to be in the invite, so we opted to incorporate this pic in the thank you postcard. I've mentioned this before:
  It was my brother-in-law's wedding yesterday. His wife chose the easiest colors for us to coordinate with: steel blue & olive green.


 I'll be back tomorrow sharing the invitations I designed for Scott & Rebecca.
 I took my sweet time lettering this one, but I love how it turned out. Typically I center all of my text, but due to the length of the quote, I decided to left justify it. This baby is en route to Australia. It's rather sweet. I might have to copy this for Felix & Penelope's room.

 I love this quote. This was commissioned by
  I didn't use any guides for this quote since it was rather short, but I did practice it a few times. In fact, the plain white version on rough watercolor paper is at home with me. I'm tempted to paint it & hang it in our kitchen or something. Our kitchen needs serious decor help.
If you're interested in calligraphy (digital or analog), feel free to shoot me an email! I'd be happy to do something for you.
I didn't use any guides for this quote since it was rather short, but I did practice it a few times. In fact, the plain white version on rough watercolor paper is at home with me. I'm tempted to paint it & hang it in our kitchen or something. Our kitchen needs serious decor help.
If you're interested in calligraphy (digital or analog), feel free to shoot me an email! I'd be happy to do something for you.  Funny, while losing myself in Pinterest last night, I stumbled across
  Laura found

 I can't wait for fall. It rained last night so I'm already busting out the fall color tones.


 I can't believe I can actually braid my hair now. It's getting really long, but I still have about 4 inches until I'm at my goal length. It's a little nuts that 4 years ago I buzzed it all off.
 Wore this number to church yesterday. We blessed Felix. What a great day.


 This pendant is diorite: A gem that the egyptians used in a lot of sarcophagi embellishment. It symbolized the eternity of the heavens with the dark blue color & the natural gold flecks. I love this symbolism.


 I've had these earrings for 4 years. Seriously, why have I never worn them until now?!?
 I'm mad that my hair is falling out. Not at you.


 For some reason, I feel like the proportions on this cardigan are slightly off for my body. I want the cardi to be either 4 inches longer or 4 inches shorter. Same with the sleeves. They're just about 2 inches shy of being a full sleeve, but they're too long to be considered a 3/4. The cardi tends to stretch a little bit during the day, so pushing up the sleeves is something I'm constantly doing through out the day. You'd think it was a nervous tick.
 This morning while getting ready to go out to lunch with my parents & sisters, I tried on a bunch of cardigans with this tank, but I wasn't really liking anything. This cardigan was the best, but didn't quite go with its proportions. It was just slightly shorter than the tank, so it hit at a funny spot where it made me look bulky in funny places. It was time to re-think this cardigan. I spent about 20 minutes pinning (5 of that 20 was photographing my steps) and sewing to shorten the cardi. I like the length SOOOOO much better now! Here's how I did it:
 I didn't want to make a new hem, so I measured out how much I wanted to shorten the sleeve & waistband by, then halfed it. with the cardi right side out, I folded the sleeve up until the end of the cuff & the fold read 3 inches. I pinned my fold in place & sewed along the hemmed line.
 From there, I folded the cuff back over & ironed the seam down - use the highest setting your garment will allow. Then I cut off the excess & ironed again.
 Looks pretty flawless, no? Isn't that easy peasy? I've seen some tutorials online use this same technique for hemming denim. It's a pretty quick way to shorten something & keep it looking professional. I love these results.
 These proportions look so much better in my opinion. I think I'll be getting a lot more use out of this cardigan now. What do you think? Do you have cardigans that hit at awkward spots?
 I altered this sweater before going out to lunch with my sisters & parents. We went to Vinto - an amazing (and fairly cheap) Italian restaurant. LOVED it.


 I've had the above button-up since before Chris & I were officially dating. Chris, a bunch of his super-hip buddies & I ventured up to Salt Lake (we were living 40 miles south at the time) and went thrift shopping. We had a great time. It was during this excursion that I scored this button up and
  With everyone riding the ombre train, a big part of me wants to steer clear from it entirely. It's beautiful, but I don't want to be the kind of person to
 Dyeing clothes isn't nearly as intimidating as I had once thought.


 These stars aren't Penelope's style at all (I totally project all of my interests & snobbery onto her).
The linen table cloth that I bought recently from
These stars aren't Penelope's style at all (I totally project all of my interests & snobbery onto her).
The linen table cloth that I bought recently from  Removing the cheesy stars makes all the difference in the world to me. I do this a lot to hand me downs & thrifted items. It's the perfect way to give something new life & style. Doing this is practically brainless - I just grab my seam ripper, an embroidery hoop, my computer & cuddle on the bed with Felix while I catch up on shows.
 The little stars were the most time consuming because the stitching was so tight, so I ended up getting my tweezers to help get those out of the way. No big deal, though. I love the final result & this outfit is just so adorable. She's such a little hipster with her little man dress shoes, cut off jean shorts & jean jacket.
I didn't think it was terribly necessary to remove the Tommy Hilfiger embroidery on the pocket - that's pretty subtle.
The little stars were the most time consuming because the stitching was so tight, so I ended up getting my tweezers to help get those out of the way. No big deal, though. I love the final result & this outfit is just so adorable. She's such a little hipster with her little man dress shoes, cut off jean shorts & jean jacket.
I didn't think it was terribly necessary to remove the Tommy Hilfiger embroidery on the pocket - that's pretty subtle.  Isn't this girl just adorable?!?


 I'm feeling happy. Today's a rainbow kinda day.


 I'm over at
  I don't remember which DI I found this at, but I do remember squealing with delight upon finding it! Handmade sweaters are paI LOVE the color combination and the pattern on the edges. I'm almost 100% sure that this is handmade, there are no tags identifying that it's not and you can see (if you look carefully) where the yarn starts & stops.
 I scored this beauty for $2. Of course the baby was a little more than that. I love his smiley angry face. This little boy has me wrapped around his little fingers.
 Have I mentioned that he's a chunk? Yesterday I had to take Penelope to the doc's office & we parked in the absolute worst place ever. I ended up carrying Felix in his carrier (nearly 30lbs combined) in one arm & Penelope (35 lbs) in the other for at least a quarter mile. Yeah, yeah, that's notthat far, BUT I was in semi-uncomfortable wedges hauling 60lbs of kid through gravel! It was enough to get me swearing. I have arm bruises from Felix's carrier to prove it.
SO, it's been a while since we've done a Thrifty & Chic. What great deals have you scored lately? Please share (with links!) in the comments! ALSOif you're lucky enough to be going to
Have I mentioned that he's a chunk? Yesterday I had to take Penelope to the doc's office & we parked in the absolute worst place ever. I ended up carrying Felix in his carrier (nearly 30lbs combined) in one arm & Penelope (35 lbs) in the other for at least a quarter mile. Yeah, yeah, that's notthat far, BUT I was in semi-uncomfortable wedges hauling 60lbs of kid through gravel! It was enough to get me swearing. I have arm bruises from Felix's carrier to prove it.
SO, it's been a while since we've done a Thrifty & Chic. What great deals have you scored lately? Please share (with links!) in the comments! ALSOif you're lucky enough to be going to  This fabric is light-weight, stretchy, but with a surprising amount of "body" to it. The rolled details add a lot of visual interest as well as wiggle room. Wiggle room for imperfect seams. Jersey can sure be a pain in the neck to sew if you don't have a surger. Which I obviously don't have. Here's how I made this little number and how you can make one of your own:

 This fabric doesn't fray so you don't need to hem it; but I did, because I liked the look better. I'll soon be hand-hemming the neckline to mimic the rolled woodgrain texture for a more finished look.
 I love how this fabric hides everything I want concealed but shows off my curves (I know they're little - so they need to be accentuated!). I LOVE my new dress! I think it'll make the perfect transition into fall, too. Oh yeah, I had two yards of the woodgrain fabric (it's $17 per yard), but it took just about a yard to make the dress. If you want a longer dress than 36 inches from the shoulder, you'll need more yardage.
 I wore this dress just last Sunday to church. It's super flattering & took less than 30 minutes to make!


 I think this might be my favorite summer outfit!


 That made me think that she might not be the only one wanting to know how. Or hope at least. I'm excited to share with you my method for figure drawing. This method is a bit more on the traditional side, what I'm showing you is sort of a caricature of what I learned in figure drawing in college. With these instructions I hope you'll be able to translate this into your own style fashion figure drawings. If you'd like to learn additional information on how to draw the body, I'd suggest


 Now your drawing is ready to accessorize. Draw clothing on top of your figure & erase the under-drawing.
 We were going to go to the zoo, but then I realized I left my keys in the car. The locked car. Oh yeah & I did it again today. POOP.


 Also, the fabric is completely sheer, so I doubled it up. I like how the stripes move & play with each other since the fabric is so transparent.
I made this skirt exactly how I made my
Also, the fabric is completely sheer, so I doubled it up. I like how the stripes move & play with each other since the fabric is so transparent.
I made this skirt exactly how I made my  This skirt is a very unexpected color pallette for my wardrobe. I'm not entirely sure what drew me to the fabric, perhaps it was my subconscious telling me that I needed something different in my wardrobe. I bought the fabric on clearance at Walmart (gasp) for $1 a yard. I made two skirts for $2. Not including my time, I can't even find skirts at my local DI for that little.
