 This lovely thing was $3. I bought it with the intentions of fixing the chipping white paint & hanging it in Penelope's room, but it just didn't work out. I think for our new place I'm going to paint it some sort of orange or brown color & add hooks below for our keys when we walk in the door. I'm also thinking of making a basket to go up top the shelf for filtering mail. What are your thoughts?
As I mentioned before, my thrifting weakness is mirrors. I can't seem to find any good ones. I have great luck with shoes, belts clothes & most furniture, but not mirrors. Is there something that you've shopped for that you've never managed to find? I want to know that I'm not alone.
This lovely thing was $3. I bought it with the intentions of fixing the chipping white paint & hanging it in Penelope's room, but it just didn't work out. I think for our new place I'm going to paint it some sort of orange or brown color & add hooks below for our keys when we walk in the door. I'm also thinking of making a basket to go up top the shelf for filtering mail. What are your thoughts?
As I mentioned before, my thrifting weakness is mirrors. I can't seem to find any good ones. I have great luck with shoes, belts clothes & most furniture, but not mirrors. Is there something that you've shopped for that you've never managed to find? I want to know that I'm not alone.Thrifty & Chic: Mirrors
September 30, 2010While packing I've come across a few things that I've had good intentions for. I may end up keeping some, but it's likely I'll be purging most of them thanks to the TV series Hoarders. That show makes me want to clean & purge practically everything I own. Among those items is this mirror. It's an okay mirror, but it definitely needs a face lift & surely has a '90s country cottage feel to it. Let's be honest, my mirror thrifting abilities pale in comparison to Kami & Susan.
This lovely thing was $3. I bought it with the intentions of fixing the chipping white paint & hanging it in Penelope's room, but it just didn't work out. I think for our new place I'm going to paint it some sort of orange or brown color & add hooks below for our keys when we walk in the door. I'm also thinking of making a basket to go up top the shelf for filtering mail. What are your thoughts?
As I mentioned before, my thrifting weakness is mirrors. I can't seem to find any good ones. I have great luck with shoes, belts clothes & most furniture, but not mirrors. Is there something that you've shopped for that you've never managed to find? I want to know that I'm not alone.
This lovely thing was $3. I bought it with the intentions of fixing the chipping white paint & hanging it in Penelope's room, but it just didn't work out. I think for our new place I'm going to paint it some sort of orange or brown color & add hooks below for our keys when we walk in the door. I'm also thinking of making a basket to go up top the shelf for filtering mail. What are your thoughts?
As I mentioned before, my thrifting weakness is mirrors. I can't seem to find any good ones. I have great luck with shoes, belts clothes & most furniture, but not mirrors. Is there something that you've shopped for that you've never managed to find? I want to know that I'm not alone.Moving. UGH.
September 29, 2010We're moving to a bigger & better place! Wahoo! I'm trying to stay on an even keel, but it's hard to stay chipper when I'm tripping over boxes and buried under piles and piles of laundry because Penelope has been vomiting everywhere. I think I need to be heavily medicated with our next move. This is crazy. See! Our living room looks more like the back room of a liquor store.
 BTW, did you know liquor boxes make the best moving boxes? They do, especially if you're packing up a lot of books.
I'm definitely looking forward to having my own well-lit studio! I couldn't be more excited about that. We're also finally getting a garage. How I've missed having a garage! So, this week & next are going to be a bit on the crazy side around here. I can't wait til the dust settles & I can get back into a routine again.
Do you have any tips for moving? What about moving with a child? I could definitely use the advice.
BTW, did you know liquor boxes make the best moving boxes? They do, especially if you're packing up a lot of books.
I'm definitely looking forward to having my own well-lit studio! I couldn't be more excited about that. We're also finally getting a garage. How I've missed having a garage! So, this week & next are going to be a bit on the crazy side around here. I can't wait til the dust settles & I can get back into a routine again.
Do you have any tips for moving? What about moving with a child? I could definitely use the advice.It's a. . .
September 27, 2010We went to the 20 week ultrasound this morning & found out a few things:
 First, we're having a B-O-Y!! Chris and I couldn't be more excited. I think Chris is already day dreaming of teaching his soon-to-be son to weight lift. We're pretty sure he's a Mr. Felix, but we have no ideas for a middle name. I like Domino, but of course I'm the only one. Do you have any ideas for good middle names?
Second, we found out that my due date is not January 30th like I had originally been told. Hallelujah! The adjusted due date is February 20th. Normally I would want to have this baby out as soon as possible, BUT with Altitude Design Summit on the 21-23 of January, I can't help but skip with delight that it's considerably less likely that I'll go into labor during the conference. WAHOO!
Third, the technician found there's more fluid in the ventricle of the brain than normal. She said it's just enough out of the range of normal that we need to monitor it, but it's very likely that there's nothing to worry about. Of course that means that I'm worried about it. I'll go in tomorrow for a second, in-depth ultrasound. I'm praying that this baby is healthy and normal, but I know that God knows we'll love this baby no matter what.
First, we're having a B-O-Y!! Chris and I couldn't be more excited. I think Chris is already day dreaming of teaching his soon-to-be son to weight lift. We're pretty sure he's a Mr. Felix, but we have no ideas for a middle name. I like Domino, but of course I'm the only one. Do you have any ideas for good middle names?
Second, we found out that my due date is not January 30th like I had originally been told. Hallelujah! The adjusted due date is February 20th. Normally I would want to have this baby out as soon as possible, BUT with Altitude Design Summit on the 21-23 of January, I can't help but skip with delight that it's considerably less likely that I'll go into labor during the conference. WAHOO!
Third, the technician found there's more fluid in the ventricle of the brain than normal. She said it's just enough out of the range of normal that we need to monitor it, but it's very likely that there's nothing to worry about. Of course that means that I'm worried about it. I'll go in tomorrow for a second, in-depth ultrasound. I'm praying that this baby is healthy and normal, but I know that God knows we'll love this baby no matter what.Hanes Sheer Tights
September 24, 2010This post is brought to you by Hanes.
 When Hanes invited me to try a few samples of their new sheer tights, I was totally game. After all, they could be super comfortable. I am so glad I tried them out! They're great! They have a label differentiating the front from the back. The material is silky smooth even on spiky I-haven't-shaved-in-a-week legs. And then there's the waistband. Ooooh, the waistband is heavenly. It's smooth, flat & seamless. I'm a fan. Here's how I wore my tights yesterday:
 Outfit Details:
- cropped blazer - thrifted
- cowl neck top - The ModBod
- braided belt - thrifted
- shorts - Puramania (Brazil)
- sheer tights - Hanes
- booties - Forever 21
Candy Pouch Printable
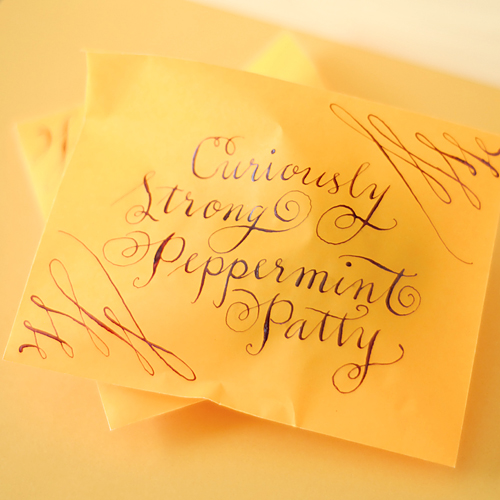
September 23, 2010It's been a while since I've done a printable! Sheesh. Well, I've got one for y'all today. It's a candy pouch.
 One of the ladies in my neighborhood has not been feeling too well. I was wracking my brain for something cute & thoughtful to do, but all I could think of was to drop by a bunch of packages of Ramen. That's what makes me feel better. Instead, I think a bright package full of candy might be more on par. It's a little more thoughtful than stuffing Ramen in a grocery bag. It's always the thought that counts.
While making this little package I thought I would share with you the pattern & artwork. No need for it to just sit in my harddrive all alone when it can sit on someone else's too. Right? If you'd like to make your own candy packages like the ones pictured above, here's what you'll need:
One of the ladies in my neighborhood has not been feeling too well. I was wracking my brain for something cute & thoughtful to do, but all I could think of was to drop by a bunch of packages of Ramen. That's what makes me feel better. Instead, I think a bright package full of candy might be more on par. It's a little more thoughtful than stuffing Ramen in a grocery bag. It's always the thought that counts.
While making this little package I thought I would share with you the pattern & artwork. No need for it to just sit in my harddrive all alone when it can sit on someone else's too. Right? If you'd like to make your own candy packages like the ones pictured above, here's what you'll need:
 This printable is free for personal use and should not be distributed without my consent. If you would like to use this printable for commercial purposes, please email me. Thanks!
One of the ladies in my neighborhood has not been feeling too well. I was wracking my brain for something cute & thoughtful to do, but all I could think of was to drop by a bunch of packages of Ramen. That's what makes me feel better. Instead, I think a bright package full of candy might be more on par. It's a little more thoughtful than stuffing Ramen in a grocery bag. It's always the thought that counts.
While making this little package I thought I would share with you the pattern & artwork. No need for it to just sit in my harddrive all alone when it can sit on someone else's too. Right? If you'd like to make your own candy packages like the ones pictured above, here's what you'll need:
- a sewing machine
- orange thread (or some other coordinating color)
- bright candy
- a paper cutter
- a hole punch
- matching baker's twine or ribbon
This printable is free for personal use and should not be distributed without my consent. If you would like to use this printable for commercial purposes, please email me. Thanks!Uninspired Potato Prints
September 22, 2010I've got crafter's block right now. Last week I was feeling all inspired to do creative things, but this week it's like all that creativity & motivation went out the window. It might be because we're getting ready to move into a place with enough room for me to have my own (non-dungeon) studio. I think I'm so busy fantasizing about that well-lit space, my creativity is all consumed.
 I wanted to do something crafty today, even if it was little. I was looking back through my archives to see if I could get any inspiration that way & came across a tutorial I did a couple years ago on how to make limited edition prints by using a styrofoam plate. It's a super easy & very fun process. I got all excited to make a greeting card or something, then realized there were no styrofoam plates in my house. There was, however, a 15lb bag of potatoes on our kitchen counter, so I snagged one & started carving with my Xacto.
Bunting & triangles have been sort of a thing on the interwebs & I admittedly love triangles. What a great shape! They're even more fun when they're irregular. So I made a series of triangles. Bunting, if you will. I thought it'd be cute to do a little bunting banner & then write a message on the dried triangles. Great idea if you have high-quality printing ink. The speedball ink I used for the potato print is chalky & not water-resistant. It was more than a little annoying to work with. Needless to say this is a very limited run print; a run of 1.
I wanted to do something crafty today, even if it was little. I was looking back through my archives to see if I could get any inspiration that way & came across a tutorial I did a couple years ago on how to make limited edition prints by using a styrofoam plate. It's a super easy & very fun process. I got all excited to make a greeting card or something, then realized there were no styrofoam plates in my house. There was, however, a 15lb bag of potatoes on our kitchen counter, so I snagged one & started carving with my Xacto.
Bunting & triangles have been sort of a thing on the interwebs & I admittedly love triangles. What a great shape! They're even more fun when they're irregular. So I made a series of triangles. Bunting, if you will. I thought it'd be cute to do a little bunting banner & then write a message on the dried triangles. Great idea if you have high-quality printing ink. The speedball ink I used for the potato print is chalky & not water-resistant. It was more than a little annoying to work with. Needless to say this is a very limited run print; a run of 1.Geometric Shirt Refashion for Penelope
September 21, 2010I've been so lazy recently. I have a gigantor pile of clothes next to my sewing machine that are begging to be mended, refashioned or updated. I also have an enormous pile of laundry to be folded and put away from my trip to the East coast. That pile has been sitting there for the last 8 days. YUP. I've got practically zero motivation, currently.
 Yesterday, when I had a short burst of energy, I thought I'd go through my old maternity clothes & see if there was anything I'd like to reintroduce to my wardrobe. I might reuse a couple of things, but it's so hard to think I'll look cute in something that only conjures up memories of an elephant waddling like a duck with a full bladder. Among those maternity clothes, I came across a few geometric maternity tops from Target. I like these shirts but they fit horribly. They're huge in the arms, too wide in the neck & far too short for a growing belly (darn my dryer!). Thankfully I can still appreciate these tops if I refashion them into something Penelope might wear.
 I love this print & the fun jewel-toned colors. Penelope's pretty happy about the dress, but she doesn't like the sash I made her wear. Whatever. Here's what I did in list form:
 This project took me 5 hours because I didn't measure, the fabric is a little squirly and I watched 4 episodes of Friday Night Lights. That show can be pretty distracting. The dress turned out cute, but it's about a 4T rather than a 2T (her actual size). I think it'll fit a lot better as she gets older.
 I've got two more versions of this exact same shirt which I plan to recycle into clothes for Penelope. I think I might do a skirt or a jumper. What are your thoughts? Do you like it? What should I do with the two other shirts?
Yesterday, when I had a short burst of energy, I thought I'd go through my old maternity clothes & see if there was anything I'd like to reintroduce to my wardrobe. I might reuse a couple of things, but it's so hard to think I'll look cute in something that only conjures up memories of an elephant waddling like a duck with a full bladder. Among those maternity clothes, I came across a few geometric maternity tops from Target. I like these shirts but they fit horribly. They're huge in the arms, too wide in the neck & far too short for a growing belly (darn my dryer!). Thankfully I can still appreciate these tops if I refashion them into something Penelope might wear.
I love this print & the fun jewel-toned colors. Penelope's pretty happy about the dress, but she doesn't like the sash I made her wear. Whatever. Here's what I did in list form:
- cut off the bottom for the skirt & set aside
- took in the sleeves & bodice about 6 inches on each side
- pleated the hem of the sleeve (3 inverted box pleats) to take in the sleeve even more
- pleated the back of the shirt (3 inverted box pleats) to take up the neckline
- took in the front of the shirt about 3 inches & turned it into a V neck
- pleated the shoulders to take up the neckline (1 inverted box pleat)
- attached the skirt to the bodice
This project took me 5 hours because I didn't measure, the fabric is a little squirly and I watched 4 episodes of Friday Night Lights. That show can be pretty distracting. The dress turned out cute, but it's about a 4T rather than a 2T (her actual size). I think it'll fit a lot better as she gets older.
I've got two more versions of this exact same shirt which I plan to recycle into clothes for Penelope. I think I might do a skirt or a jumper. What are your thoughts? Do you like it? What should I do with the two other shirts?Ecosystem Challenge Recap
September 17, 2010This post is brought to you by Ecosystem.


 I had a great time using my ecosystem book. I got the small, blank (artist) notebook. It was the perfect size to cart around in my purse and I just fell in love with the coated book cover, perforated pages, elastic closure & secret back pocket.


 From a bookbinder's point of view, this book is well made. It's sewn, then glued (where many cheap notebooks are just single sheets glued together = not strong). My cover surely took a beating between getting tossed around in my grubby purse & being man-handled by Penelope's grubby hands, but because of the coating, I could just wipe dirt & mystery sticky stains right off. It was great!

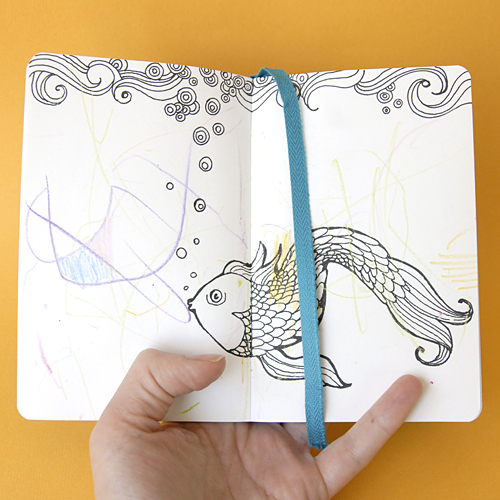 Here are some things that I did with my notebook:
- I used my Silhouette machine to create the patterned cover
- I sketched random scenes & patterns when I was bored
- I wrote down my grocery lists
- I drew schematic drawings for my project ideas
- Penelope had her way with a half-dozen pages
- Visit ecosystem's site & check out their notebooks
- Leave a comment on this post telling me what you'd use your notebook for
- US residents only
- Only one (1) comment per person
- Comment by 11:59pm (MST) Thursday, September 23, 2010
- No purchase necessary
- Three (3) winners will be chosen via random.org & announced Friday, September 24, 2010
Art Weekend - SLC
September 16, 2010I'm going to be teaching a couple of classes at Nicole's Art Weekend, October 7-9! I had the fabulous opportunity to teach last year & it was a blast for all involved. I had such a great time meeting new people & sharing my knowledge of bookbinding.
Last year was SO amazing, but I might venture to say this year is going to be even better! Classes will be at the historical Peery Hotel (what a cool atmosphere) and new classes will be offered this year like party planning, making paper products with Illustrator, studio lighting in photography & customizing blogger blogs. I think it sounds like a lot of fun.
Here's some info on the classes I'll be teaching:


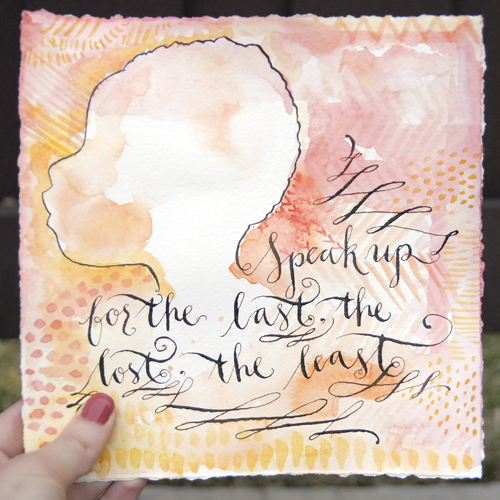
Watercolor Class:
In this class we'll focus on the basics of good, loose technique & the importance of using the right materials to do the job. Class is for beginners or novice painters looking for a refresher.
For information on all of the classes offered, head over to Nicole's Classes & scroll down.
To register for my classes or any of the classes offered, head over to the Art Weekend Eventbrite Page. HURRY! Slots are filling fast.
Thrifty & Chic: Sailor Penelope
September 15, 2010I've been hitting up thrift stores to try & find a fire pit, but with no luck. However, I did have some luck finding the cutest little outfits for Penelope the other day. They're both striped & very summery. I don't much care that summer is basically over, they were just WAYYY too cute to pass up.
 This little sailor dress is probably my favorite. I LOVE IT! The short pleated skirt is so adorable. I really can't get over it. It's a 2T, so it's not going to fit her for long (it's already really short), so I'm thinking I might try my hand at constructing a 3T version. We'll see. The pleating might be a little ambitious for me.

 So what do you think of Penelope's ensemble? It's a steal for $3, don't you agree? Sorry for the gratuitous Penelope photos, I thought they were too cute not to share.
Have you found any great deals lately? Please share with links in the comments!
So what do you think of Penelope's ensemble? It's a steal for $3, don't you agree? Sorry for the gratuitous Penelope photos, I thought they were too cute not to share.
Have you found any great deals lately? Please share with links in the comments!
This little sailor dress is probably my favorite. I LOVE IT! The short pleated skirt is so adorable. I really can't get over it. It's a 2T, so it's not going to fit her for long (it's already really short), so I'm thinking I might try my hand at constructing a 3T version. We'll see. The pleating might be a little ambitious for me.
So what do you think of Penelope's ensemble? It's a steal for $3, don't you agree? Sorry for the gratuitous Penelope photos, I thought they were too cute not to share.
Have you found any great deals lately? Please share with links in the comments!A Little Update
September 14, 2010Hello!! It's so good to be back. Penelope & I had such a blast playing around & exploring Myrtle Beach last week. I'm proud to say, not one of us lilly white Esplins got burned the entire trip. This is a HUGE feat for us. Chris and I are both so white, we got sunburned on our honeymoon in Cancun while in the shade with sunscreen on. Unfortunately, Penelope doesn't fall too far from the tree as she got second degree sunburns on her cheeks at two months old (while in the shade, too). Since then we've vowed to be crazy diligent about using sunscreen even at a very young age.
This vacation was great in so many ways. I was able to spend some quality one-on-one time with my folks, take naps everyday & recharge my creative batteries. I'm not sure if you've noticed, but I've not been feeling very inspired lately. This trip cured that. I'm just swimming with all sorts of ideas now. One of those ideas was to modify a sweater that I've had for a while.
 I bought this sweater from DownEast Basics the beginning of summer. I thought it was really sweet; the knitted lace really caught my eye. After getting it I think I wore it once or twice & let it filter to the back of my cardigan stash. For some reason we didn't mesh well. I've not really been able to put my finger on it. Maybe it was the length, maybe it was the sleeve. MEH. It just wasn't doing anything for me. I had this crazy brain wave the other day when I thought about chopping the sleeves & making it a sweater vest. Maybe I was channeling some Project Runway or something. So I chopped off the sleeves.
 Outfit details:
 It was a bit of a risk to modify this garment because I typically LOVE this length of sleeve & this cardigan wasn't a $3 thrift store find. I think I paid $30 for it. I kept thinking to myself, how much am I getting out of this sweater now? Practically nothing. How much could I potentially get out of this sweater after I modify it? A lot more than nothing.
I think it's a big improvement. What do you think?
It was a bit of a risk to modify this garment because I typically LOVE this length of sleeve & this cardigan wasn't a $3 thrift store find. I think I paid $30 for it. I kept thinking to myself, how much am I getting out of this sweater now? Practically nothing. How much could I potentially get out of this sweater after I modify it? A lot more than nothing.
I think it's a big improvement. What do you think?
I bought this sweater from DownEast Basics the beginning of summer. I thought it was really sweet; the knitted lace really caught my eye. After getting it I think I wore it once or twice & let it filter to the back of my cardigan stash. For some reason we didn't mesh well. I've not really been able to put my finger on it. Maybe it was the length, maybe it was the sleeve. MEH. It just wasn't doing anything for me. I had this crazy brain wave the other day when I thought about chopping the sleeves & making it a sweater vest. Maybe I was channeling some Project Runway or something. So I chopped off the sleeves.
Outfit details:
- Top - Ann Taylor Loft
- Cardigan - DownEast Basics
- Belt - D.I.
- Corduroys - Gap
- Moccasins - D.I.
It was a bit of a risk to modify this garment because I typically LOVE this length of sleeve & this cardigan wasn't a $3 thrift store find. I think I paid $30 for it. I kept thinking to myself, how much am I getting out of this sweater now? Practically nothing. How much could I potentially get out of this sweater after I modify it? A lot more than nothing.
I think it's a big improvement. What do you think?Proudest DIY Moment by Guest Summer & Matty
September 13, 2010
![]()
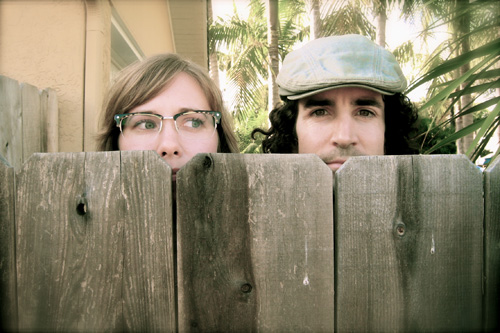
We’re Summer & Matty, and we’re honored to guest post on ISLY, a never-ending source for creative inspiration! We started Domestic Nest just about a year ago. We have two etsy shops, one for our leather goods, and one for other handmade wares. The Domestic Nest Blog is where we write about our home, our business, and whatever else strikes our fancy.
Every month in 2010, we’ve made a specific nesting resolution to improve the aesthetics or function of our home. One of our favorite projects has been the makeover of our entryway. It’s a large space that deserves a grander purpose than simply passing through. In addition to our $7.50 fireplace facelift, we created a workspace. The crowning glory of the room is Matty’s proudest DIY moment. The desk!

The desk is made from scrap wood left over from building our fence, and is the perfect size and height for its purpose. It’s eco, sturdy and good lookin’. We had plans to cover the top with glass, but we decided against it. With time and a bit of sanding, the wood texture feels just fine. We’ll see what else is born from the fence scraps. We’re working on some custom frames and market displays. The challenge of using scraps or thrift finds in DIY projects fuels our creativity. The best part is tackling the job together!

Thanks, Melissa, for inviting us over. We've really enjoyed seeing everyone else's proudest DIY moments. What fun!
Proudest DIY Moment by Guest Tiffany
September 10, 2010


 This pleated bow pillowcase dress turned out differently than I had sketched in my book. Originally it had pleated sleeves and just pleats in the front. Once I started making it, I forgot the sleeves and added the bow because I thought the pleats alone looked a little plain. And the white trim at the bottom of the skirt was a last minute idea. I had scraps leftover from the pillowcase and didn't want it to go to waste.

 Next, the retro ruffle pillowcase dress was actually my first pillowcase dress design. I found the pillowcase first and loved the pattern and colors. I knew I wanted to make a dress out of it and give it a retro style. This dress turned out great except I made the collar a little too big. It didn't turn out to be a huge deal because I could tighten by shortening the ribbon on the back of the dress. I love little girls in blue dresses, don't you?
If you want to make these dresses, go to Simply Modern Mom for the full tutorials.
Happy sewing!
Tiffany {Simply Modern Mom}
Next, the retro ruffle pillowcase dress was actually my first pillowcase dress design. I found the pillowcase first and loved the pattern and colors. I knew I wanted to make a dress out of it and give it a retro style. This dress turned out great except I made the collar a little too big. It didn't turn out to be a huge deal because I could tighten by shortening the ribbon on the back of the dress. I love little girls in blue dresses, don't you?
If you want to make these dresses, go to Simply Modern Mom for the full tutorials.
Happy sewing!
Tiffany {Simply Modern Mom}Art Up for Auction
September 9, 2010Hello!!
Turns out we have internet at our place afterall. I'm not sure I would've survived an entire week without it. Maybe I need to get counseling for my addiction. I've been thrilled with the fantastic posts and projects that have been shared! They're all wonderful.
Proudest DIY Moment By Guest Madeline
September 9, 2010
Sometimes I see something lovely and expensive and I fall in love with it. The next days and weeks are spent feverishly plotting ways to get that something for myself - without breaking the bank. My proudest DIY moment came about from one of these times. I started coveting this Anthropologie Hidden Hummingbird Tank the second I saw it.
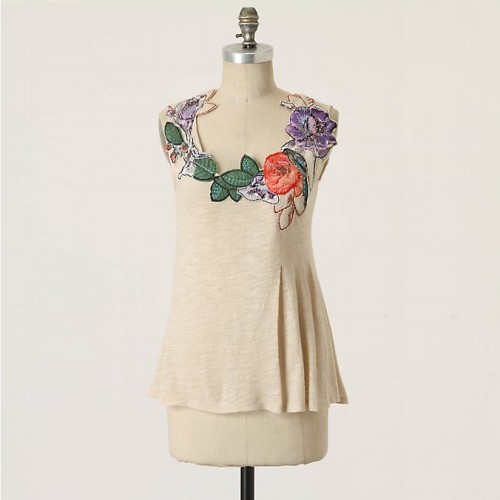
Isn't it gorgeous?
As soon as I saw the $78 price tag I started plotting ways to make one of my own. Then I remembered this ridiculously awesome fabric that has been in my mother's fabric stash since about 1991.
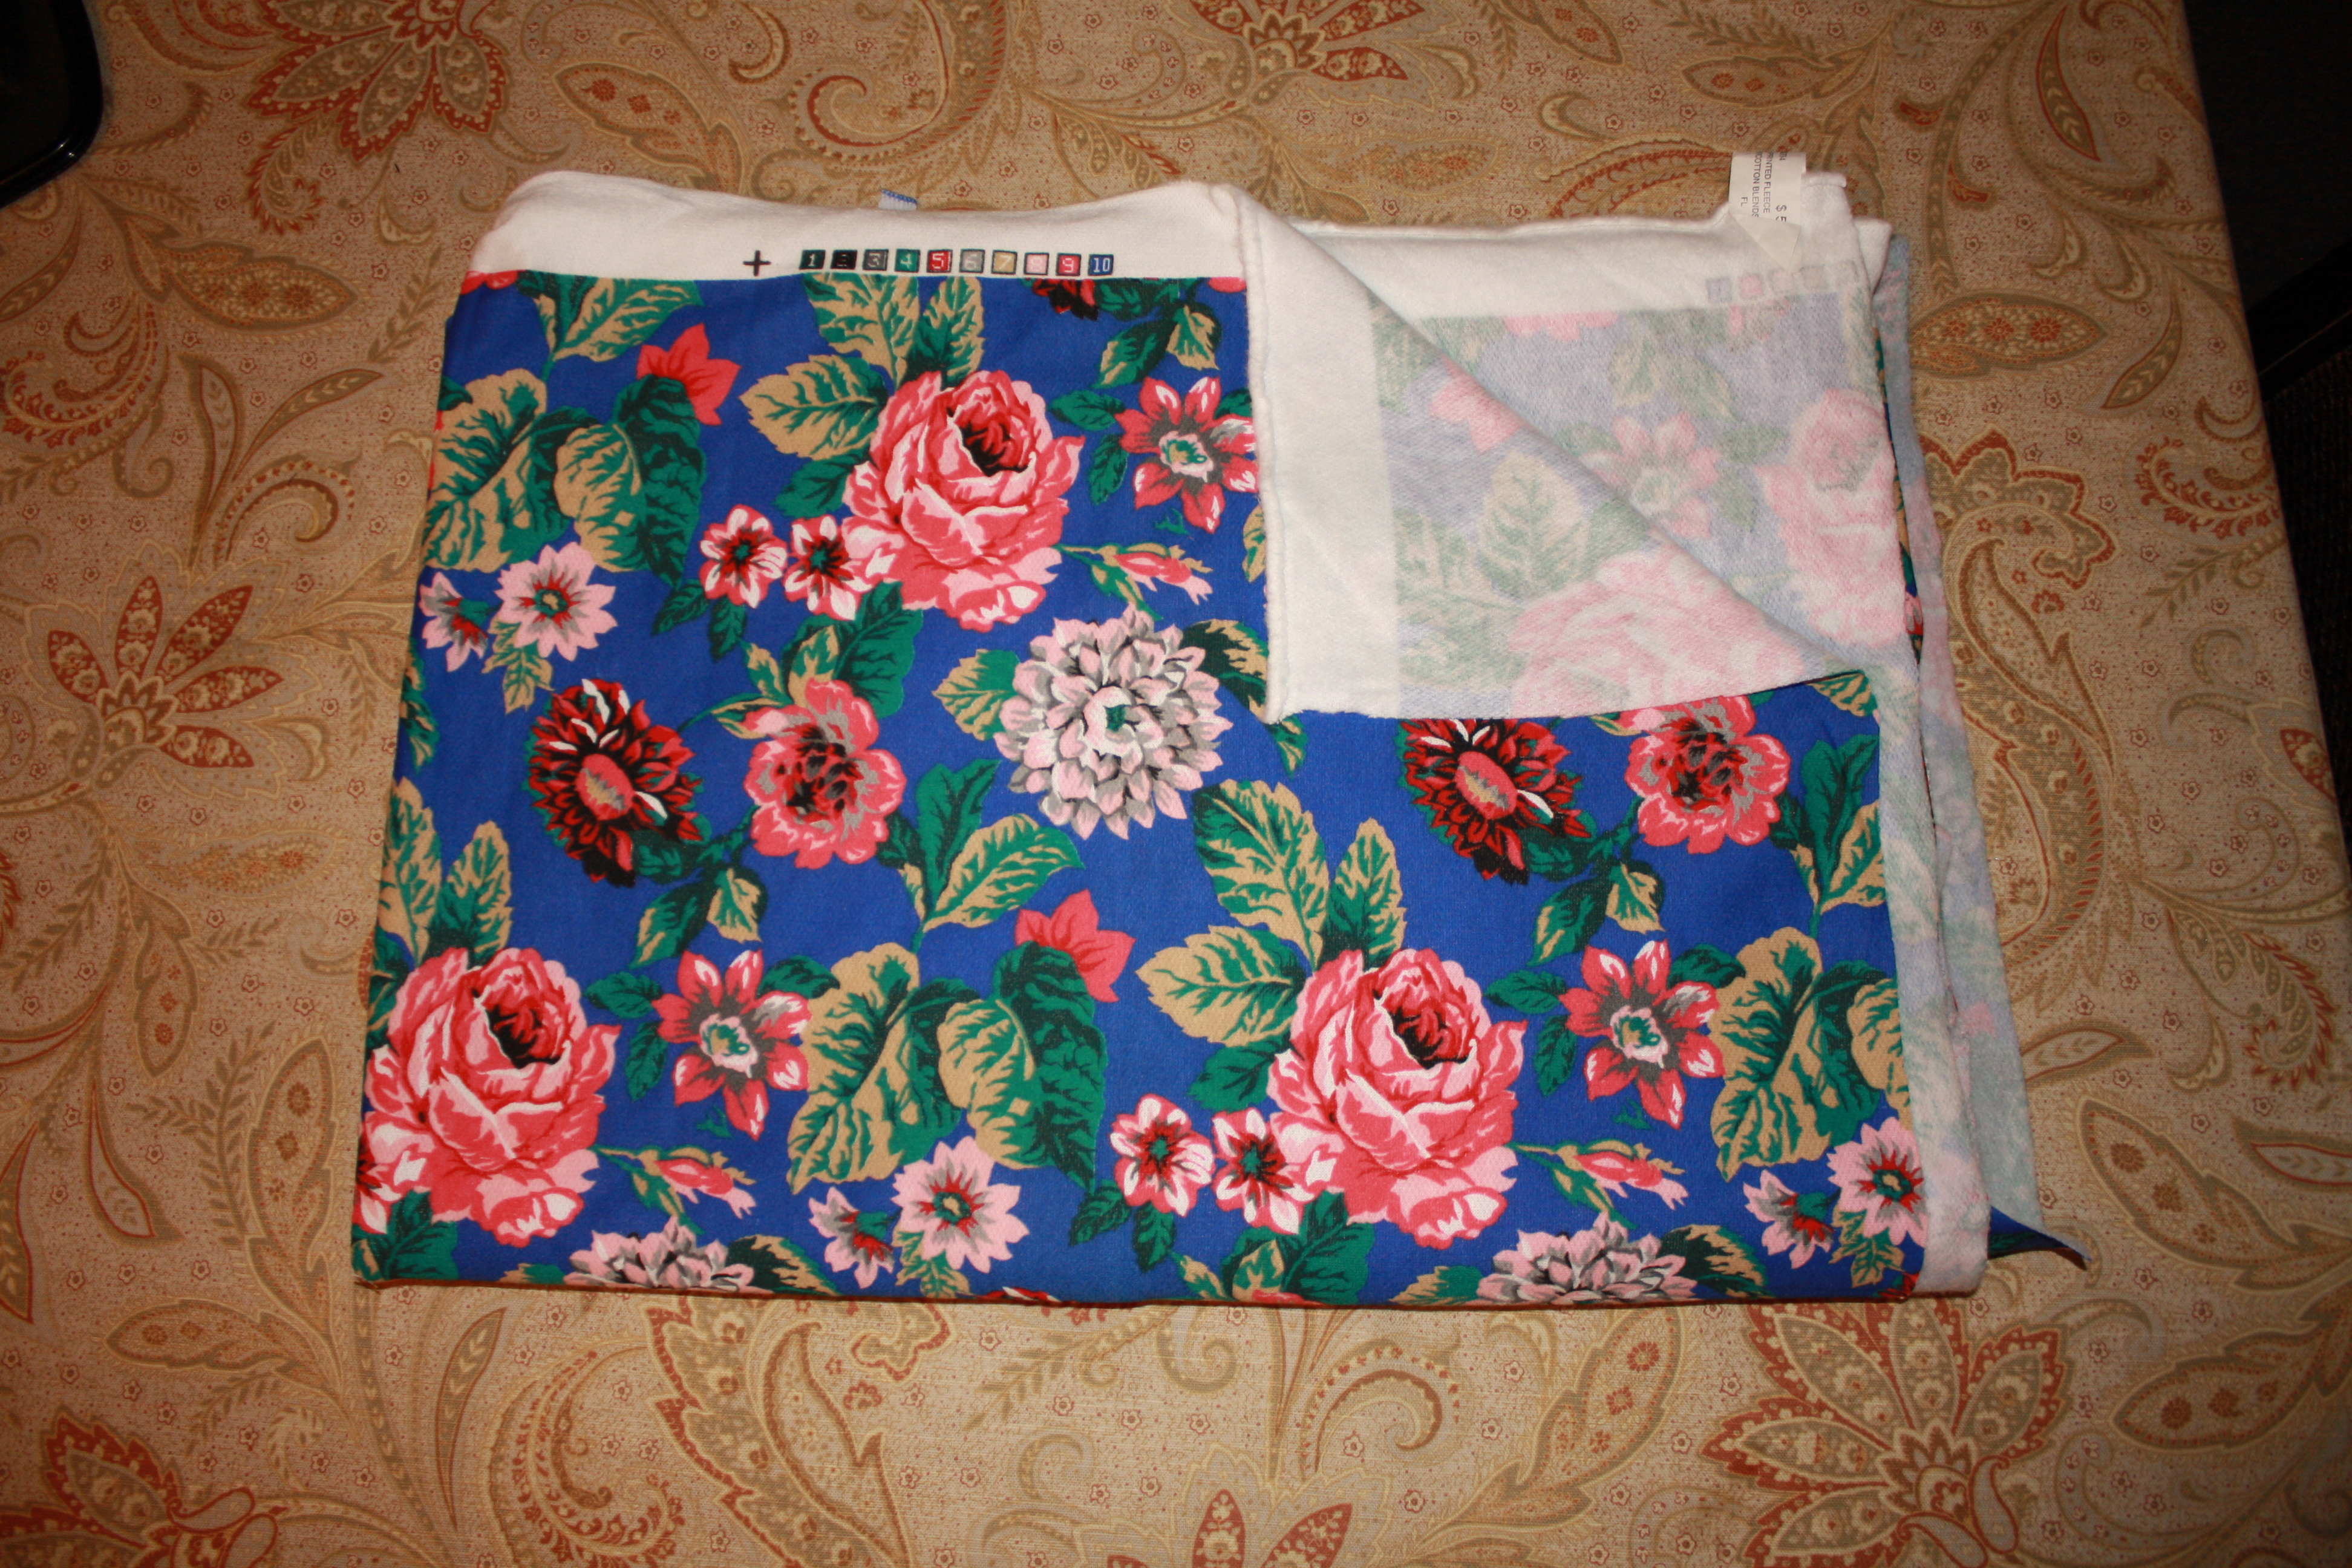
 It's a single side floral printed fleece. My mom said she bought it to make my little first grade self a sweat suit. So awesome. I cut the flowers and leaves out to use in my design. I also cut leaf shapes out of the solid blue portion of the fabric.
I laid out the pieces on my scoop neck tee, pinned them in place and hand sewed them on. I added the contrast stitching around the edges while sewing. Then, I added beading to the flowers.
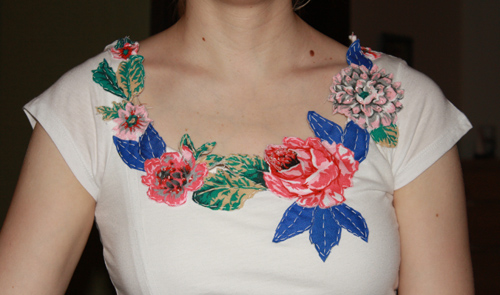
Here's the finished product:

Looking back, I would have ironed fusible interfacing on the inside of the applique, because the fabric rolls a bit. I also would never put this in the washing machine, and obviously not the dryer.
Other than that, I am really happy with how it turned out. 5 months later I am still completely in love with it.
Proudest DIY Moment by Guest Melanie
September 7, 2010
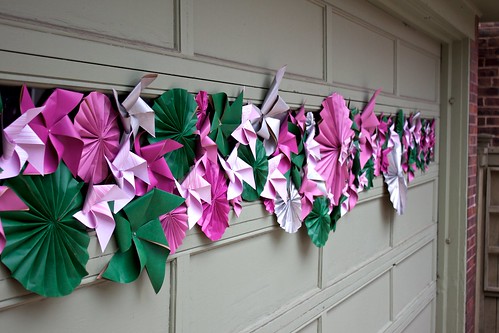
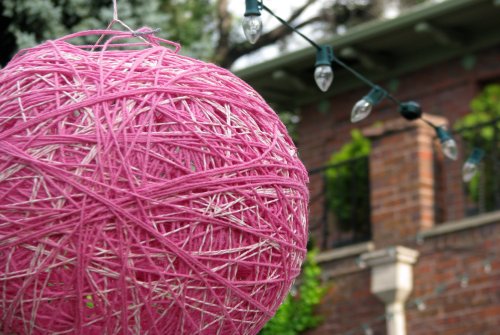
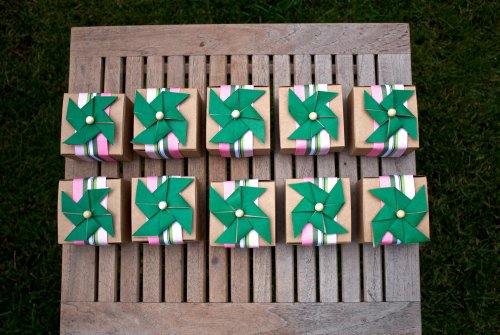
Every detail was handmade and although pinwheels are on the easy end of things, it was still a proud DIY moment for me. Mostly because it turned out like the picture in my head and that's a rare, rare thing. Just ask my husband about his birthday cake this year.
Proudest DIY Moment by Kami Bigler
September 6, 2010

Here is what it looks like now, you gotta love spray paint:

Below are some pics of the transformation process.


A good friend was over recently and commented, "That mirror looks like it came from Anthropologie." It was so fun to tell her that I bought it for $10 at the D.I.

You can find Kami at no biggie sharing all of her favorites: great recipes, upcycled thrifty finds and paper crafts. You can also find her blogging on Baby Center's Momformation blog.
Proudest DIY Moment by Guest Jessica
September 3, 2010
 Jessica here of Allora Handmade where I blog about my crazy happy (mostly) life as a mom and handmade business owner trying to keep it all together. (I'll let you in on a little secret. I don't have it all together. Promise.) Moving on...
When Melissa asked me to post about my favorite DIY moment I completely drew a blank. Between working on my shop and making sure my kids have something to eat three times a day, there is little time for DIY around here. Unless you count Mac N’ Cheese. But I’m pretty sure that doesn’t count. Besides that, I happen to be married to one of the best DIY-ers I’ve ever met. Naturally, any project I dream up or even begin is more often than not made bigger and better by the Mr. I think I’m pretty lucky to be married to the handyman/graphic designer/interior designer pro, but when I look around at all the projects in my house there are very few (as in zero, ahem.) that I can call my own. BUT, I think we make a pretty awesome team.
Since we have moved 7 times in the 5 years we’ve been married (can you imagine?), one of the most important DIY projects we do together is making sure our house feels like a home. Though it's tempting to never settle in, we have put a lot of effort into every place we’ve ever lived, regardless of how long we were staying. Our taste and our skills have evolved with each new home, and I must say, our current home is definitely my favorite.
[caption id="attachment_3562" align="aligncenter" width="500" caption="the view from our front door"]
Jessica here of Allora Handmade where I blog about my crazy happy (mostly) life as a mom and handmade business owner trying to keep it all together. (I'll let you in on a little secret. I don't have it all together. Promise.) Moving on...
When Melissa asked me to post about my favorite DIY moment I completely drew a blank. Between working on my shop and making sure my kids have something to eat three times a day, there is little time for DIY around here. Unless you count Mac N’ Cheese. But I’m pretty sure that doesn’t count. Besides that, I happen to be married to one of the best DIY-ers I’ve ever met. Naturally, any project I dream up or even begin is more often than not made bigger and better by the Mr. I think I’m pretty lucky to be married to the handyman/graphic designer/interior designer pro, but when I look around at all the projects in my house there are very few (as in zero, ahem.) that I can call my own. BUT, I think we make a pretty awesome team.
Since we have moved 7 times in the 5 years we’ve been married (can you imagine?), one of the most important DIY projects we do together is making sure our house feels like a home. Though it's tempting to never settle in, we have put a lot of effort into every place we’ve ever lived, regardless of how long we were staying. Our taste and our skills have evolved with each new home, and I must say, our current home is definitely my favorite.
[caption id="attachment_3562" align="aligncenter" width="500" caption="the view from our front door"]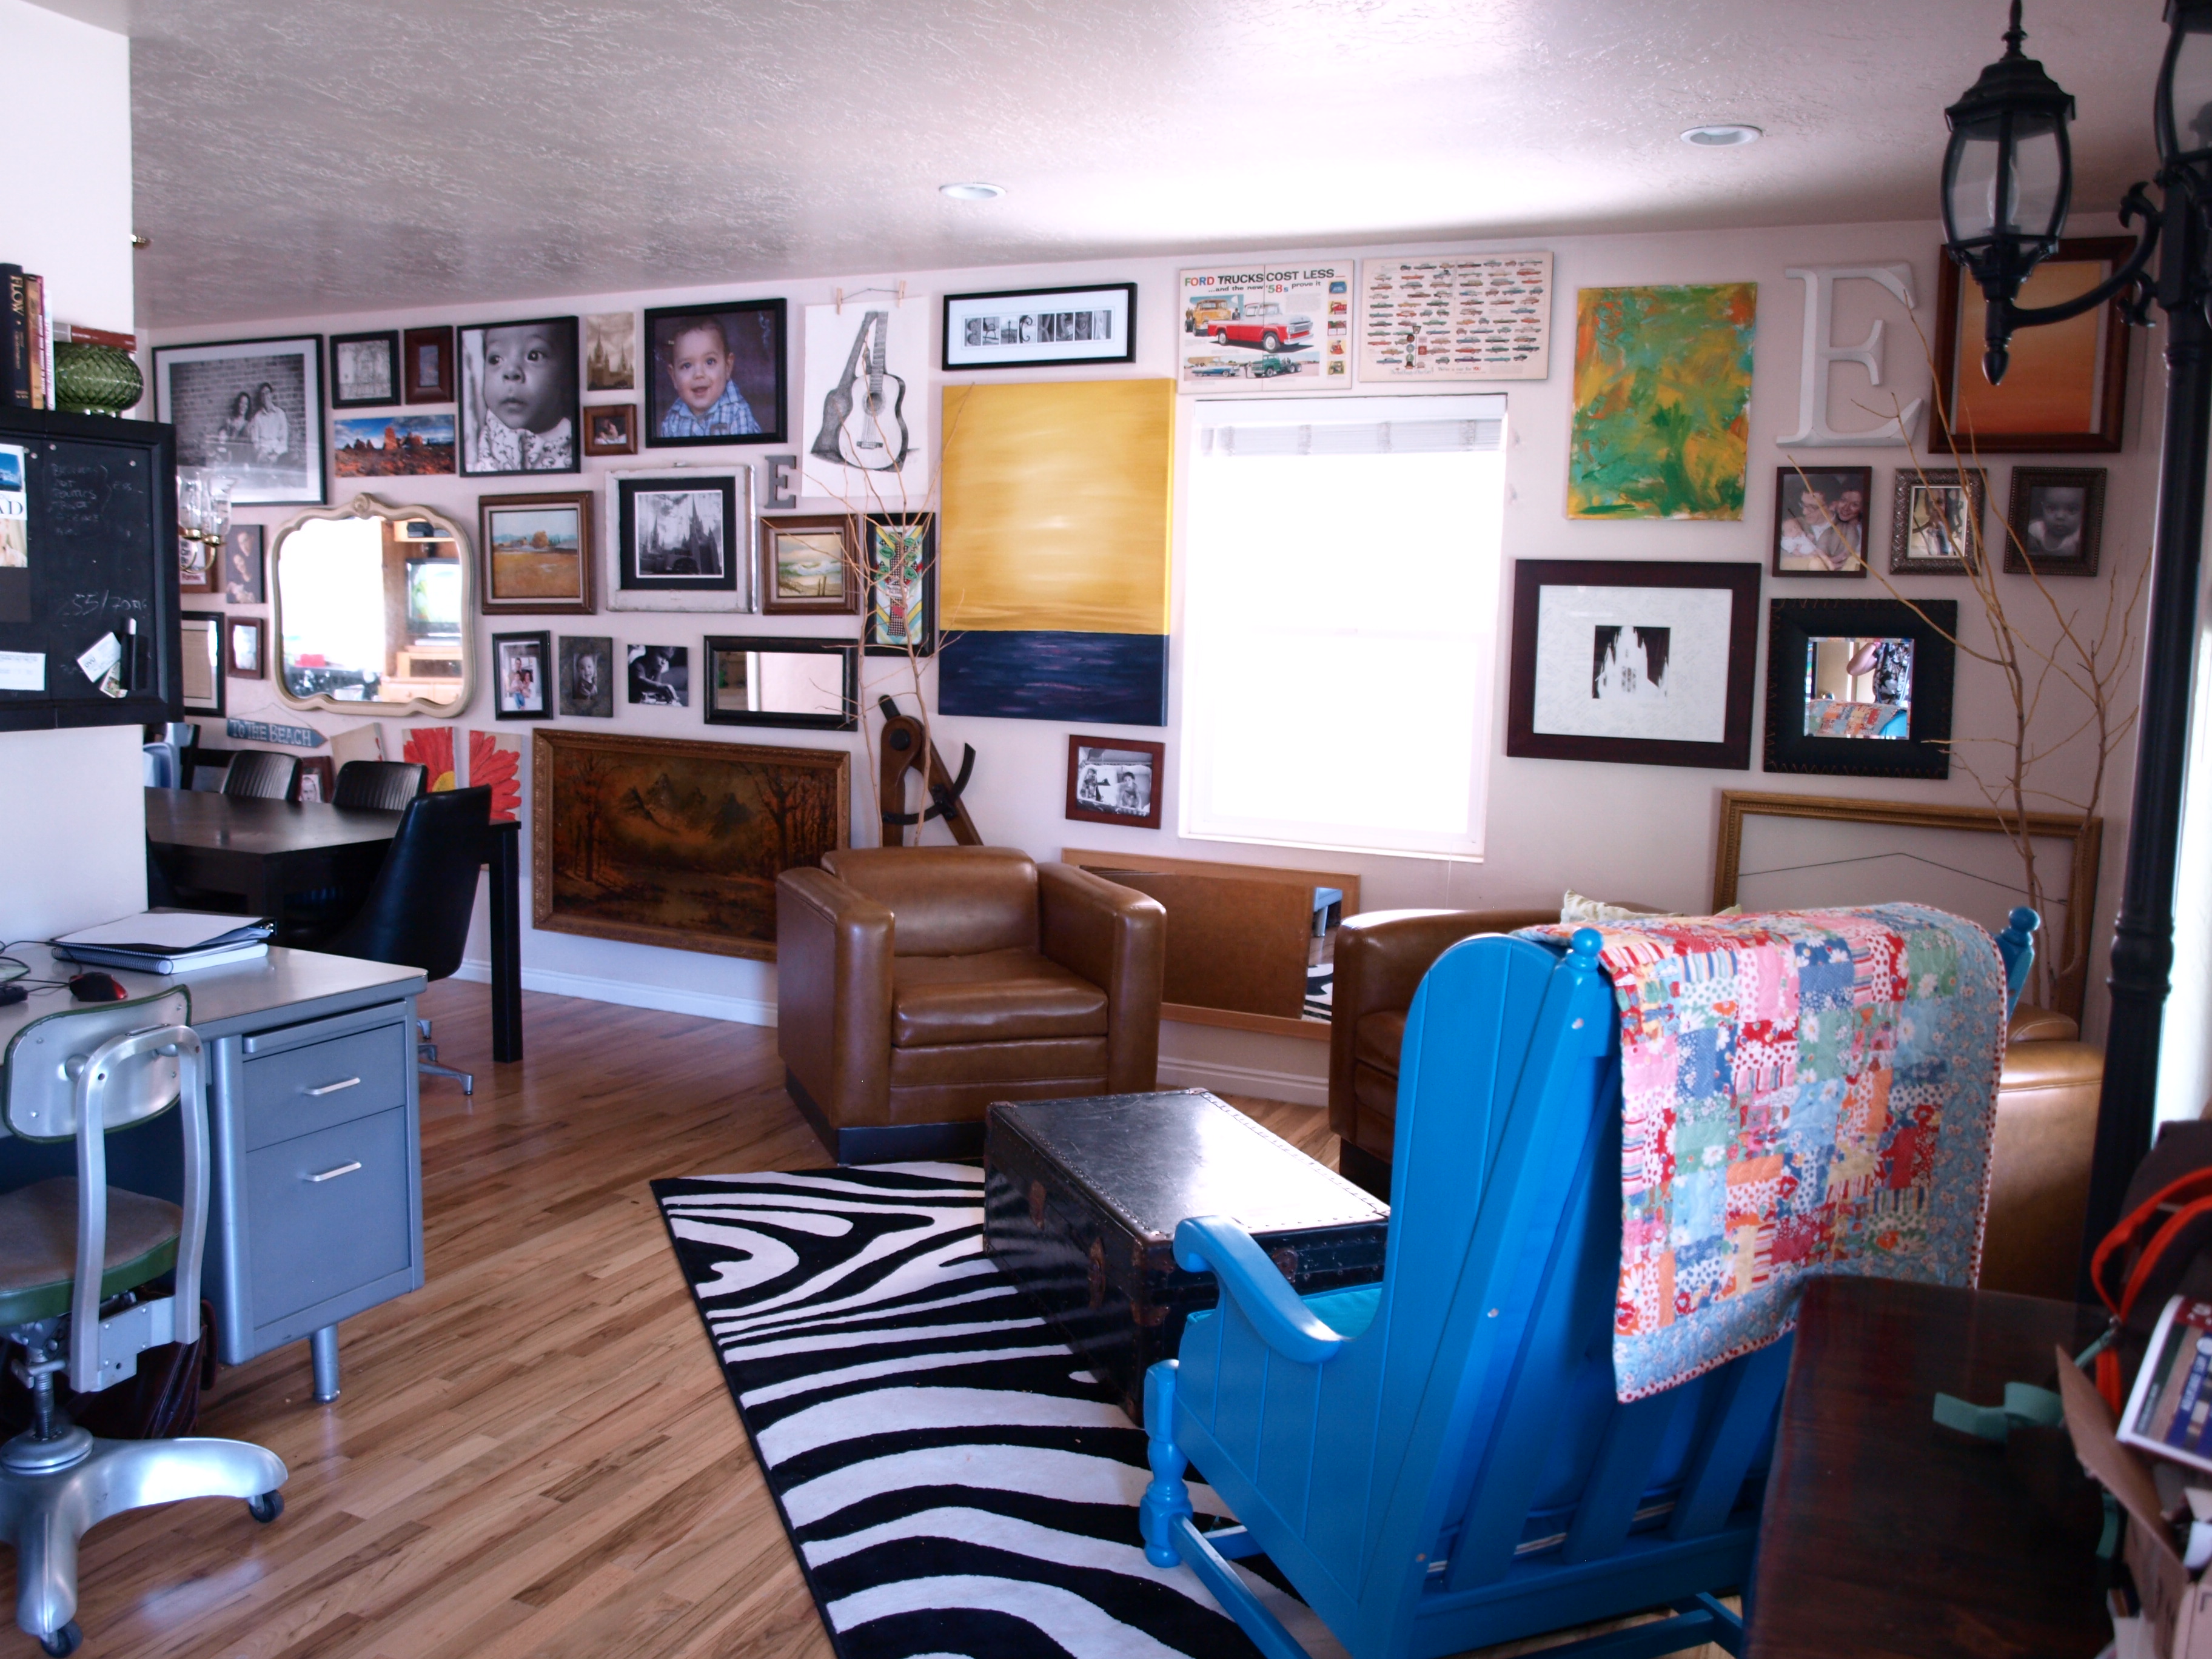 [/caption]
Our style is pretty eclectic, but has to be 1 and 2 year old friendly. We love bright colors and pictures (obviously) as well as thrifted and vintage items. The Zebra rug is quite a statement, but I love it. Totally unexpected when you walk in the front door. The bright blue chair is my husband's most recent project. It's crazy wild, but my boys can't get enough of it. Really, everyone who comes to our door feels compelled to step in and take a look around.
[caption id="attachment_3564" align="aligncenter" width="500" caption="yes, i know the chandelier needs replacing..."]
[/caption]
Our style is pretty eclectic, but has to be 1 and 2 year old friendly. We love bright colors and pictures (obviously) as well as thrifted and vintage items. The Zebra rug is quite a statement, but I love it. Totally unexpected when you walk in the front door. The bright blue chair is my husband's most recent project. It's crazy wild, but my boys can't get enough of it. Really, everyone who comes to our door feels compelled to step in and take a look around.
[caption id="attachment_3564" align="aligncenter" width="500" caption="yes, i know the chandelier needs replacing..."]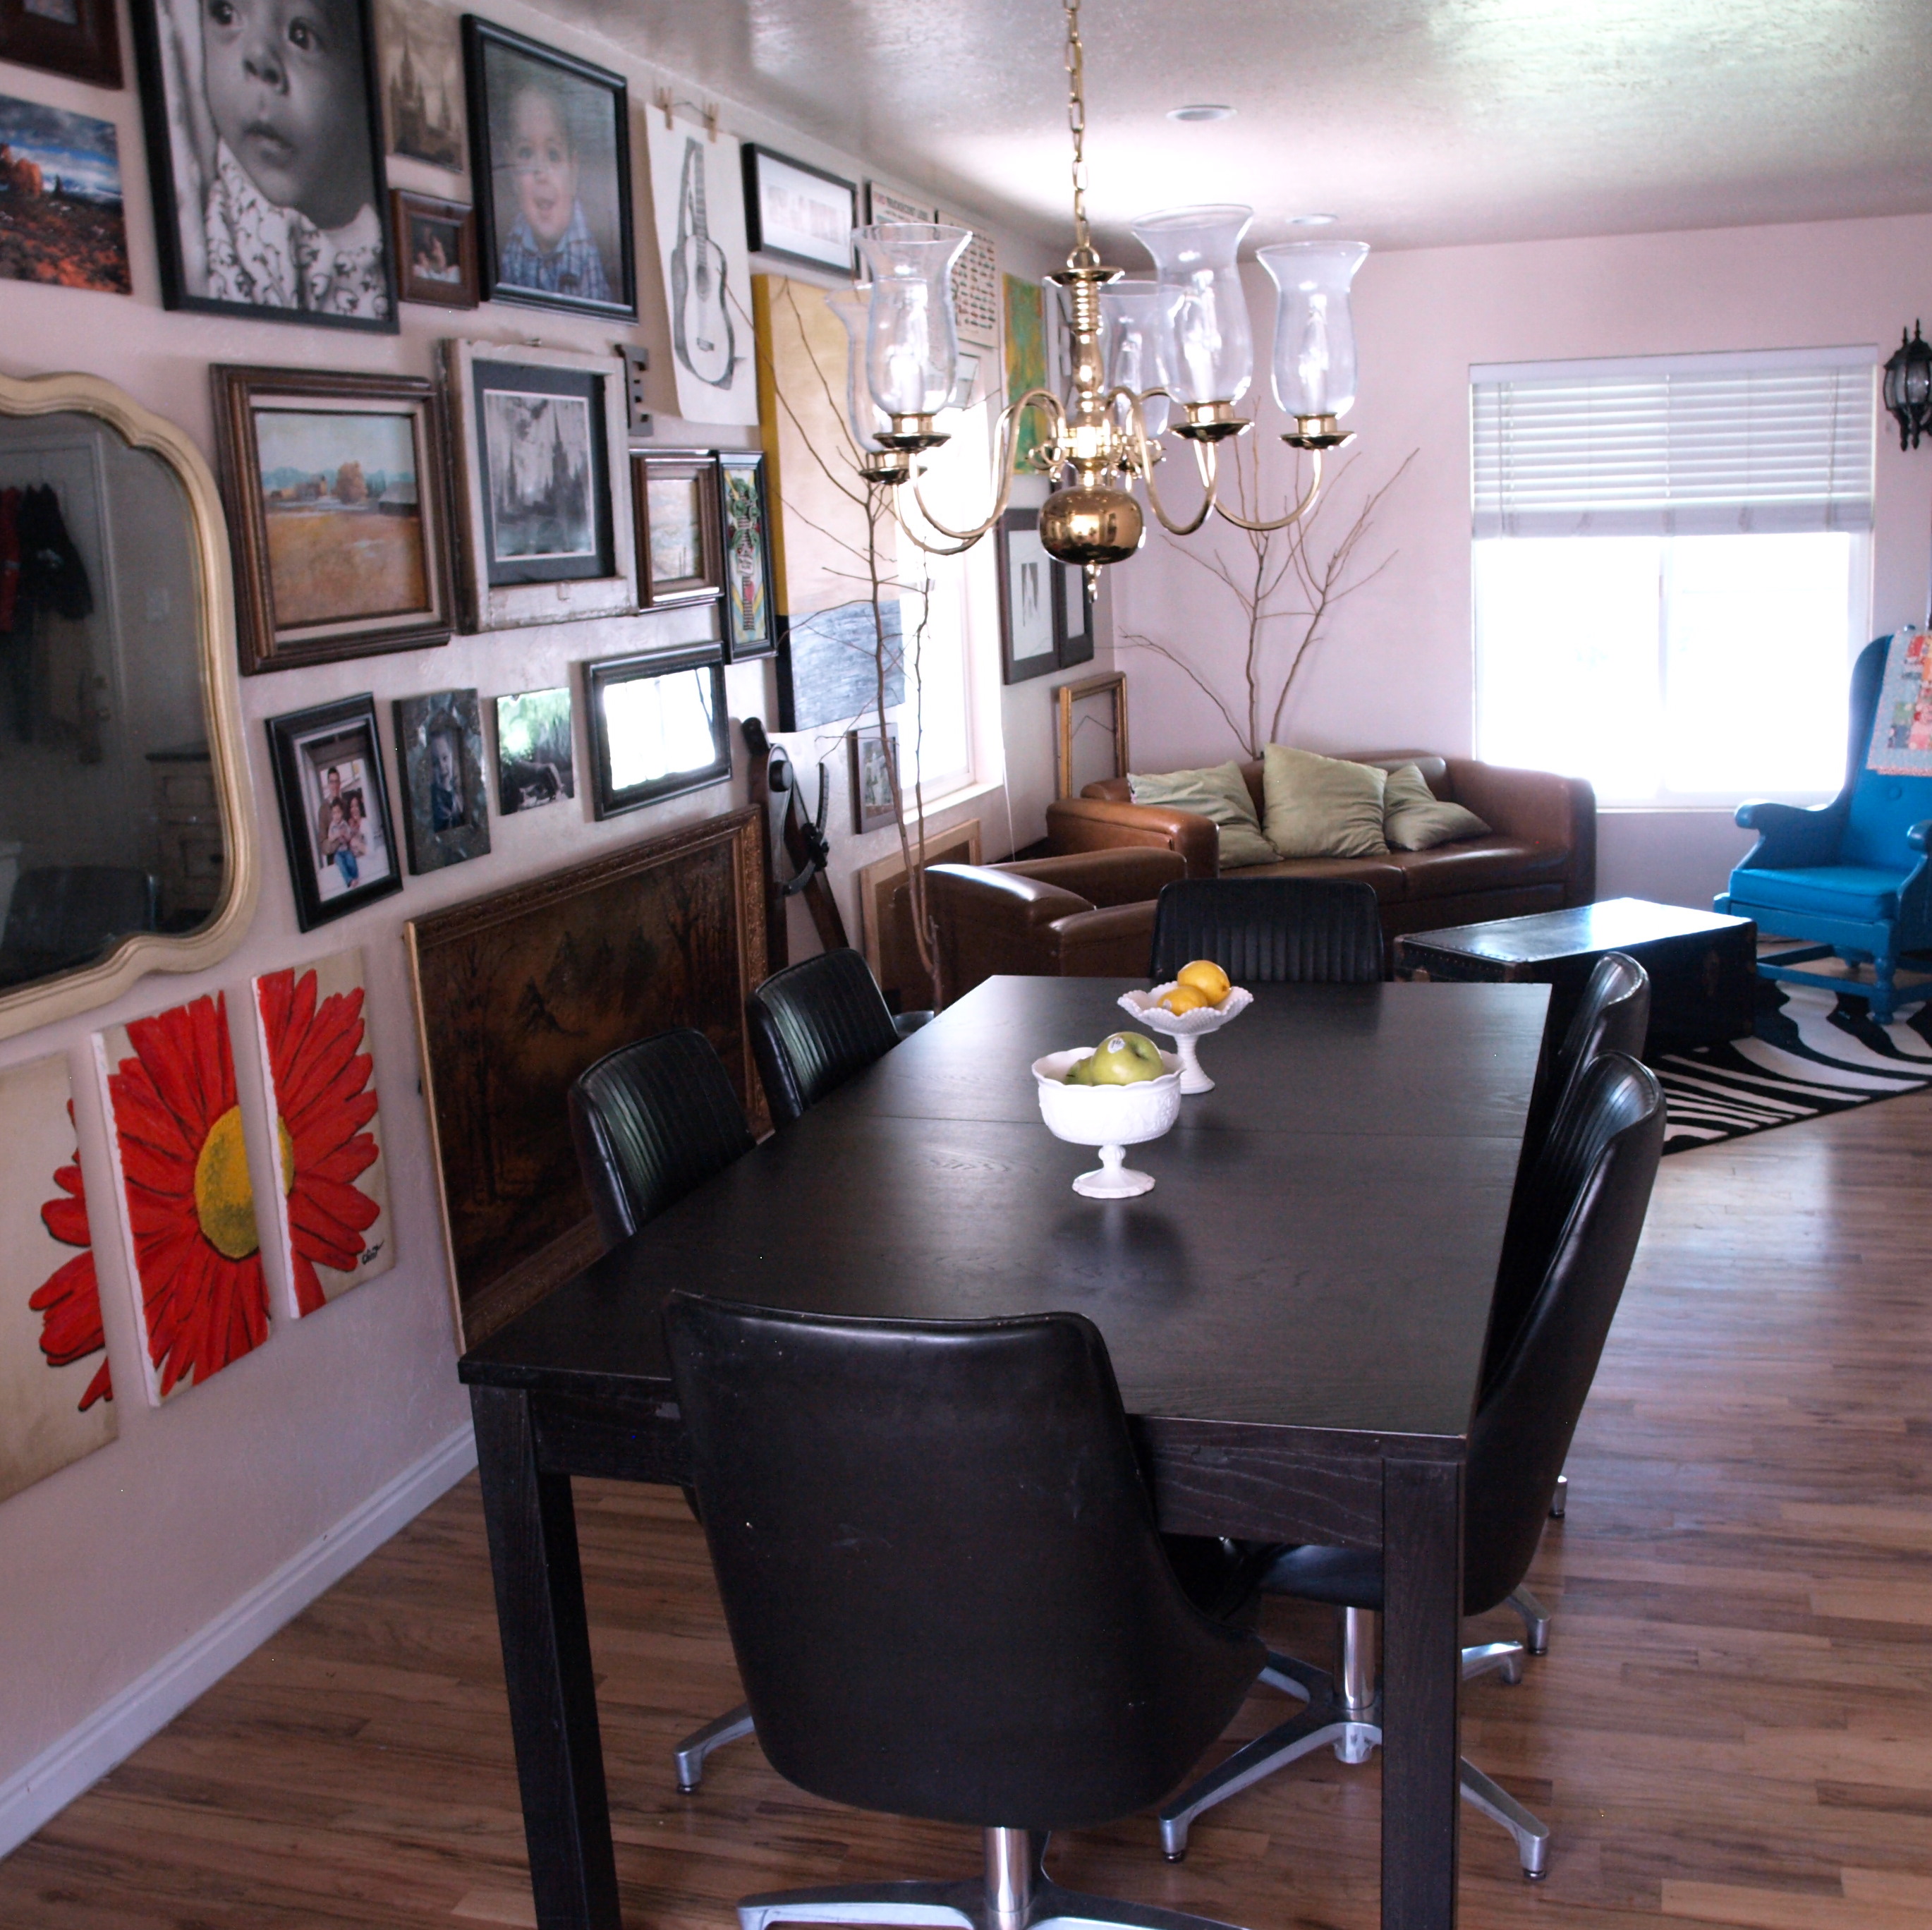 [/caption]
In almost every home we've lived in, we've incorporated some sort of picture wall, but this one is different from the rest and has a little more flair to it. Instead of just pictures, we've added in some thrifted art, some personal art (even a few done by the boys!), vintage mirrors, etc. We love the way all of the frames look together - all mis-matched and gallery like. To recreate this look, start hunting around for some cool art with colors you like, some thrifted frames, and blow up some of your favorite photos. If you're obsessive like us, measure all of your frames and draw out a map of where everything will go before trying to hang anything up. Keep in mind, it doesn't have to be perfect! At our house most of the time the frames are a little cockeyed and full of little boy fingerprints.
[caption id="attachment_3563" align="aligncenter" width="500" caption="treasures are kept high and out of reach"]
[/caption]
In almost every home we've lived in, we've incorporated some sort of picture wall, but this one is different from the rest and has a little more flair to it. Instead of just pictures, we've added in some thrifted art, some personal art (even a few done by the boys!), vintage mirrors, etc. We love the way all of the frames look together - all mis-matched and gallery like. To recreate this look, start hunting around for some cool art with colors you like, some thrifted frames, and blow up some of your favorite photos. If you're obsessive like us, measure all of your frames and draw out a map of where everything will go before trying to hang anything up. Keep in mind, it doesn't have to be perfect! At our house most of the time the frames are a little cockeyed and full of little boy fingerprints.
[caption id="attachment_3563" align="aligncenter" width="500" caption="treasures are kept high and out of reach"]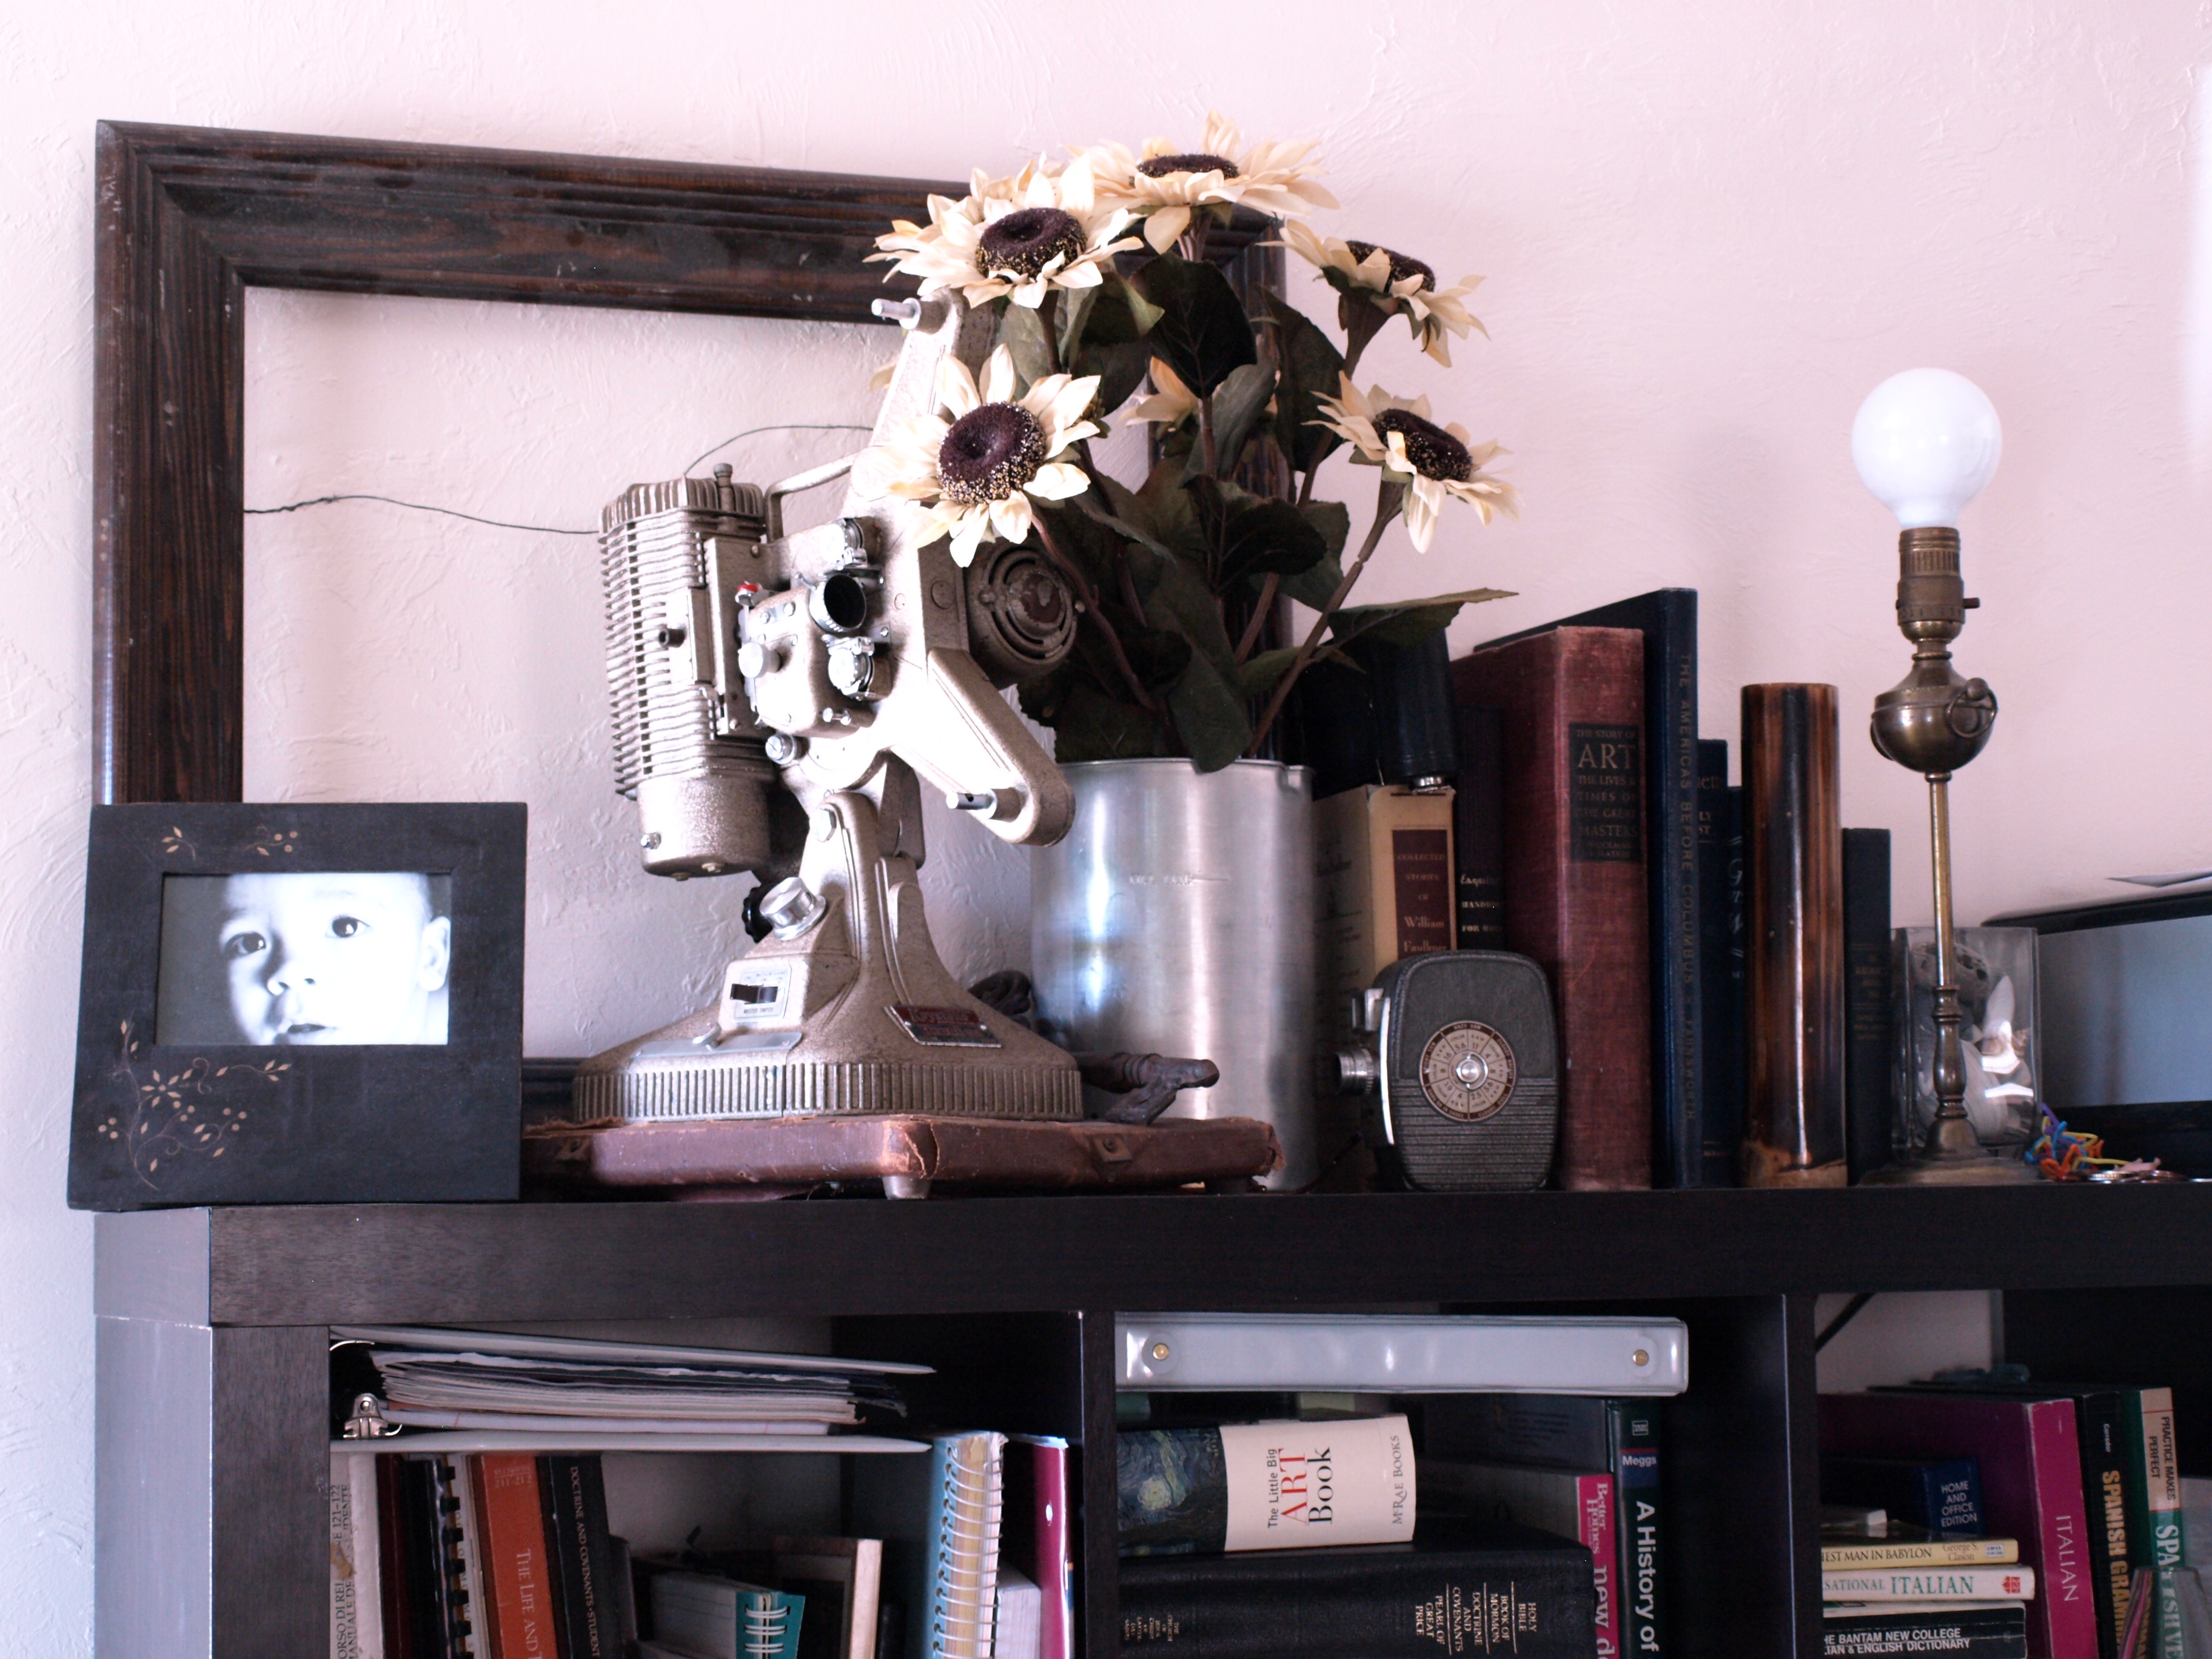 [/caption]
The greatest part about all of this? Most of it was free or super cheap. Not kidding. Those awesome swivel dining chairs? Free. The blue chair? Maybe $20 including paint and fabric. The vintage metal desk? Free. The leather sofa and chair? $50. The big vintage mirror? $10. Most of the frames were from a thrift store and all of the found items as well. Believe me, if we can create a home out of a house and a few bucks, anyone can! And while I never look forward to moving, I am excited to share many more DIY moments with my Mr.
[/caption]
The greatest part about all of this? Most of it was free or super cheap. Not kidding. Those awesome swivel dining chairs? Free. The blue chair? Maybe $20 including paint and fabric. The vintage metal desk? Free. The leather sofa and chair? $50. The big vintage mirror? $10. Most of the frames were from a thrift store and all of the found items as well. Believe me, if we can create a home out of a house and a few bucks, anyone can! And while I never look forward to moving, I am excited to share many more DIY moments with my Mr. Proudest DIY Moment by Guest Mique
September 2, 2010
 Hi! I'm Mique from 30days. My little online spot has craft tutorials, giveaways, guest posts and whatever else I feel in the mood for. I also co-host a craft show in the San Diego area with my sister called the Queen Bee Market.
I was flattered that Melissa asked me to guest post. I absolutely love and admire her style in everything she does....and then she asked me to share my favorite DIY moment. Hmmmm. Most DIY moments in my life are given away. I'm a DIY gift giver. So I thought about it and thought about it some more and realized that my favorite DIY gifts have been to my nephew. I am sorry about the poor image quality- I took pictures and gave the presents away (no retakes!).

 And for O's first birthday I gave him a fabric book of his first year. It was my labor of love to my only nephew (at the time) on my side of the family. This was my inspiration and I tailored it to my nephew's first year.
Proudest Moment Mini Series
September 2, 2010
 While in college, I had the opportunity to take some 3D art electives. I loved these classes. I almost considered switching my major from painting & drawing to 3D media because I love it so much. While taking these classes, I had access to the studio with all the tools & awesomeness with it. It was great, but I really wanted tools of my own. See, when a million students use the same tool every year, it's not long before that tool is broken, mangled and/or crusted with mystery goo. I wanted my own tools. BADLY.
For my birthday that year I woke up at 6am, headed to Home Depot & bought a drill & a ton of bits. I was so excited to get this drill I also bought lumber & screws with it, too. Our apartment kitchen needed a stove-side table desperately & I was determined to make one with my new toy. Equipped only with my drill, bits & access to the junkiest mitre saw on the planet, I drafted up plans & made a simple table.
While in college, I had the opportunity to take some 3D art electives. I loved these classes. I almost considered switching my major from painting & drawing to 3D media because I love it so much. While taking these classes, I had access to the studio with all the tools & awesomeness with it. It was great, but I really wanted tools of my own. See, when a million students use the same tool every year, it's not long before that tool is broken, mangled and/or crusted with mystery goo. I wanted my own tools. BADLY.
For my birthday that year I woke up at 6am, headed to Home Depot & bought a drill & a ton of bits. I was so excited to get this drill I also bought lumber & screws with it, too. Our apartment kitchen needed a stove-side table desperately & I was determined to make one with my new toy. Equipped only with my drill, bits & access to the junkiest mitre saw on the planet, I drafted up plans & made a simple table.
 This table has had about 4 coats of paint on it. It started out black, then I wanted a different black, then I wanted white and then I finally settled for green. I also added wallpaper to the table top to make it interesting. It's great wallpaper.
I love this table. It's got a shelf. The legs are all the same length so it doesn't wobble (miraculously) & it's been from heck to breakfast over the last 6 years & still looks fabulous. I never knew this piece of furniture would last through all of my decorating phases & moves. I love this thing. I did it all by myself & I am proud of the end result.
I hope you'll enjoy this mini series! If you have a proud DIY moment, PLEASE share in the comments!! I'd love to hear about and see (link to it!) what you're most proud of making.
This table has had about 4 coats of paint on it. It started out black, then I wanted a different black, then I wanted white and then I finally settled for green. I also added wallpaper to the table top to make it interesting. It's great wallpaper.
I love this table. It's got a shelf. The legs are all the same length so it doesn't wobble (miraculously) & it's been from heck to breakfast over the last 6 years & still looks fabulous. I never knew this piece of furniture would last through all of my decorating phases & moves. I love this thing. I did it all by myself & I am proud of the end result.
I hope you'll enjoy this mini series! If you have a proud DIY moment, PLEASE share in the comments!! I'd love to hear about and see (link to it!) what you're most proud of making.