MelissaEsplin.com

Treats, lots of treats

March 25, 2008
I guess my thoughts have been on food quite a bit recently, probably due to the fact that I'm 35 weeks along and eating my way through the day. Chris has noticed my change in appetite, the other day he mentioned that I'm eating about the same amount as he is. I'm trying to keep it all balanced, trying to eat plenty of fruits and vegetables (the vegetable part is hardest for some reason) and good grains and proteins. However, my sweet tooth has become an insatiable monster!! All I want to do is make fun desserts and eat them. We recently bought an ice cream maker. I really like it. The first thing I made was an orange sorbet for the kids in our Sunday school class. They really liked it. I did, too. Next I made Lemon Custard ice cream, which was pretty much the reason for buying the maker in the first place. The lemon custard ice cream turned out perfectly. It's smooth, creamy and fabulously subtle. I've enjoyed eating it with fresh strawberries, it reminds me of summer and my dad. Chris seemed to enjoy it, but not with the same amount of enthusiasm (probably because he's not pregnant). lemoncustardicecreamsm.jpg 
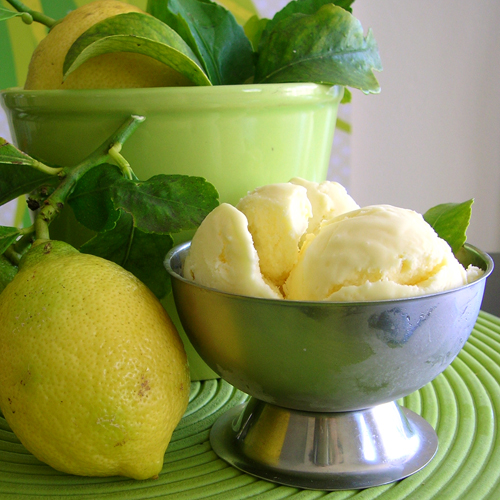
LEMON CUSTARD ICE CREAM 4 T. flour 2 c. sugar 3/4 t. salt 3 eggs 6 c. milk 2 t. vanilla 1 T. lemon flavoring 3 c. cream, whipped Combine flour, sugar, salt, eggs and milk and cook to a custard. Stir in vanilla and lemon flavoring. Cool custard until very cold. Blend in cream. Freeze in ice cream maker. Makes 4 quarts.

. . .


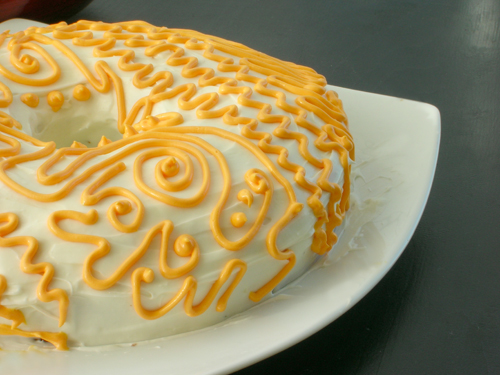
We had two of Chris's sisters stay with us for Easter weekend, it was so great to have them with us. They are so fun to hang out with, and so helpful, too!! I really wanted Easter dinner to be special, but more importantly I wanted the dessert to be special. Nothing says Easter like a carrot cake. The taste just says spring, maybe it's the correlation between carrots and the Easter bunny.

I was trying to find a round pan for the cake, but could only find a bunt pan (thank you, Kate!!). I think having the hole in the middle was brilliant, because more surface of the cake could be frosted! I'm a little weak in the knees for a good cream cheese frosting. I had a little too much fun frosting the thing. Shelley said that the designs kind of look like easy cheese, doesn't it?!? Thanks Brooke and Shelley for your help around the kitchen. Seriously.

carrotcakesm.jpg CARROT CAKE 1 c. oil 2 c. sugar 4 eggs 2 c. + 2 t. flour 1 t. vanilla 2 t. cinnamon 3 c. finely grated carrots 1 t. salt 2 t. soda Cream oil and sugar, add eggs, vanilla & carrots. Add sifted dry ingredients. Mix well. Bake at 350 for 47 minutes. When cool. Frost with cream cheese icing: 4 oz. cream cheese (room temp) 4 T. softened butter 1 1/4 c. powdered sugar a little bit of milk to soften it up

Bread

March 18, 2008
french-breadsm.jpg Recently Chris and I have been just eating cereal and sandwiches. It's not the most exciting diet. It's mostly because I just don't have the energy, or any ideas to make exciting dinners. I'm kind of pathetic right now. I've been feeling particularly guilty, because I've always made dinner for Chris, and now I'm making him fend for himself. Poor guy. So, my guilt became too much to live with the other day, so I decided I'd make French bread as a peace offering to my starving husband. (okay, don't worry, we're not really starving, just craving the finer foods in life) I'm not the best bread person in the world. Most of my bread experiences have resulted in very dense, flat, flavorless masses that smell too much of yeast. I meticulously assembled the ingredients hoping for a little bit of success. I'm very happy to report that the bread turned out very well! It was more dense than the bread you buy at the store, but it was perfect. There's nothing like munching on warm, fresh bread. I was just so excited about how well it turned out, I had to take pictures to prove that I actually did it.

Sweeter Than Honey to my Mouth

March 18, 2008
My goal recently is to take up reading again. I was such an avid reader when I was younger, then when English teachers started to require reading, it wasn't so much fun anymore. Now that I'm out of school, and don't have any literary requirements, it's starting to be fun again! I've started reading a few books here and there, mostly the ones that are recommended from the book club I'm in. Just a few weeks ago, I picked up the book "The Secret Life of Bees" by Sue Monk Kidd. I'd heard loads of good things about the book, so I thought I'd give it a try. I really, really enjoyed it!! It was just a good solid book, well written, not too flashy, and not too boring. It was fabulous. Anyway, I came across this picture online, and it reminded me of the book. Maybe because there are bees in it. Anyway, this artist, Tomás Gabzdil Libertiny (what a mouthful!) makes forms for the bees to make the honey comb around, making these gorgeous sculptures! Thought it was pretty darn cool. The photography (by Raoul Kramer) is pretty rad, too. hv_1.jpg

Another Crib Update...

March 12, 2008
A lot of you are VERY, VERY sick of me talking about my crib, but I don't care. I'm just too dang excited about it. A week and a half ago, I entered it into a DIY contest. Some of you may know that I was a semi-finalist for it, which just about made me pee my pants. Well, I'm now a FINALIST!! Wahoo! My crib entry made it into the top 20! So now all I have to do is wait, and hope that people vote for my project!! I'm really hoping to get into the top 4, so I can use anyone and everyone's help. To vote/view entries, go to www.designsponge.com (or click here for the direct link). My crib is entry #12, you'll have to scroll down a bit. At the top of the post there's a link to submit your vote. Thanks to everyone for all of your support.

*An Update on the Crib Update*

I won 3rd place, folks!! Thanks to everyone that voted. Grace (from design*sponge) said that there were over 1,000 votes for the crib! Can you believe it?!? Click here for the d*s post.

Bookbinding Class

March 11, 2008
I just finished teaching my first ever bookbinding class a couple weeks ago. It was such a fabulous class!! I thoroughly enjoyed the class. We managed to cover the Coptic bind, Flat Back bind, Portfolio Bind, as well as the Pamphlet and Japanese Stab bind all in 4 short weeks! It was bookbinding on SPEED. Just last Thursday we had a little get-together to show off what we accomplished, and here are pictures of some of the work. I have been so impressed at what everyone came up with!! Great Job, guys! [gallery=14]

Crib Update

March 10, 2008
My recent obsession has been telling everyone and anyone about the crib that Chris and I made together (yes, from scratch--we're so proud). I think most of the people I've told have heard how excited I am about the crib two or three times. I'm going to talk about it some more!

. . .

I entered photos (found in the previous post) of the crib to a DIY contest. You could enter in as many projects as you wanted, they just had to be something you've made, or refurbished. Well, on Thursday (or was it Friday?) I got an email saying that I was selected as a semi-finalist for the contest!! So, this is pretty big, but still, it just means I'm in the top 100. I'm hoping to get into the top 10-15 and possibly top 4 (cross your fingers). The email also said that we had the weekend to take more photos, if we so desired, to really spice up the project. I'm not going to pass up an opportunity to get ahead, so I set to work. It's really such a shame that I don't have my little Penelope just yet, I'm so antsy for this little girl to come out!! I really wanted some photos with a little baby, even if it wasn't mine, so I asked my friend, Natalee, if she'd be willing to lend me her child for a half hour or so. She was fabulous, and so was Vivian. Natalee also helped supply me with more decor to make our "set" a little more like a baby's room, and Vivian did a great job of being the cutest little girl ever. Many thanks to Natalee and Vivian for your help with the photos!!! I think they turned out pretty darn cute. [gallery=13]

Preparing the Nest, Continued...

March 3, 2008
I am happy to report that we have finally FINALLY finished making Penelope's crib! I finished it just in time to enter into a DIY contest that just ended. I'm really happy with how the crib turned out. I was very skeptical at first, not trusting that it would be sturdy enough for a bouncing baby girl, but I've been pleasantly surprised as I've rolled it around the apartment. Nelly’s Crib

. . .

The reason why we decided to make our own crib was mainly because we don't have enough room in our apartment for a standard sized crib. Plus, we wanted to put the crib in one of our closets (to serve as a mini 'room' for Nelly Pea), and the closet wasn't big enough to house a standard crib. It's shy just a couple inches. I was looking into the Co Sleepers, but they're not very sturdy. Well, not enough for a baby over 15 pounds (I'm not planning on having a baby that big, but she'll eventually get there). So, I used the same dimensions as the Co Sleeper, just making it more sturdy. We used poplar for the frame; it was not very expensive and has a nice greenish grain to it. I made the mattress from high density foam, and bumper pads as well as the crib. The sewing was a little obnoxious for the bumper pads, because I made the bumper pads too big at first, so I had to rip open several seams and sew again. Between making the frame and the bedding I think we used every single tool in our house. I am so thankful to the various family members that have bought/handed down the tools we have. This project wouldn't have been possible otherwise. I need to give credit where credit is due, Chris did help a ton with the crib. He helped make quite a few of the cuts and he did keep me from balling up in a corner and crying my eyes out of frustration. Got to love the emotional roller coaster of pregnancy. I am particularly pleased with how the paint job turned out. I have been totally into this tole painting style, recently, I think it just looks so . . . whimsical might not be the right word. Well with any further ado, I present to you the photos of the final product... [gallery=12]