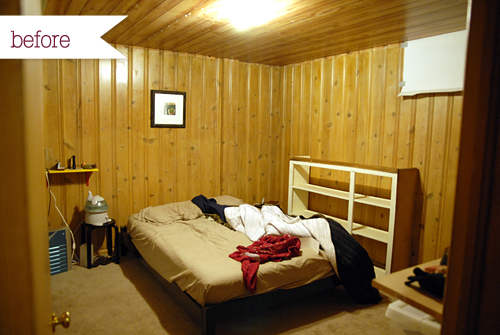
While looking for rentals last year, our place was listed as a two bedroom. Well, it wasn’t really. It has one bedroom upstairs & one downstairs in the unfinished basement. The second bedroom wasn’t really habitable before we moved in. We liked the finished part of the house, so we signed a rental agreement under the condition that the owner would make the second room liveable, i.e. remove the mysterious puddle of water in the middle of the floor, install carpet, paint the walls, install a ceiling and add a rod in the closet to make it functional. You know what they did? They installed the cheapest, ugliest carpet they could find and stapled (YES) faux wood paneling to the ceiling. See. . .
We didn’t have a closet OR a dresser for nearly two months. IT. WAS. AWFUL. Our landlord wasn’t going to do anything about it, either. So, Chris (the awesome husband that he is) installed a metal rod to the ceiling studs of the closet using a bunch of industrial chains. See, we couldn’t just put any rod in because the closet wasn’t/isn’t framed. Yup. The landlord’s grandson was in the process of ripping apart the studs of the closet to refinish the basement when he got accepted to dental school. Our basement was never finished.
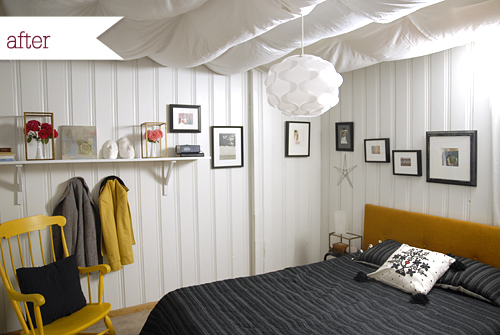
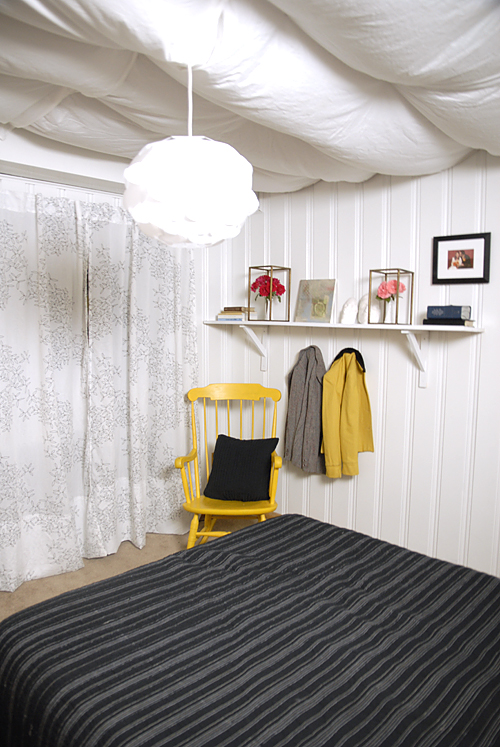
We lived in this dump for about 5 months. I was so sick of sleeping in a dungeon, I made Chris fix it up with me. Now it looks like this. . .
Sigh. This was a much needed improvement. If we actually owned the place I think we would have spent more time & money fixing the carpet, trim, door & closet but considering we may move out of this place any time it was just the right amount of investment. Here’s what we did:
- painted the walls white
- added a new light fixture
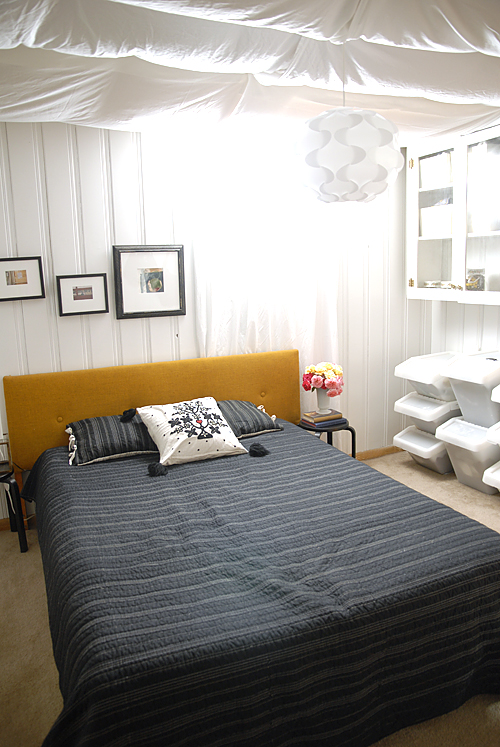
- stapled white bedsheets to the ceiling
- installed old kitchen cabinet to the wall for storage
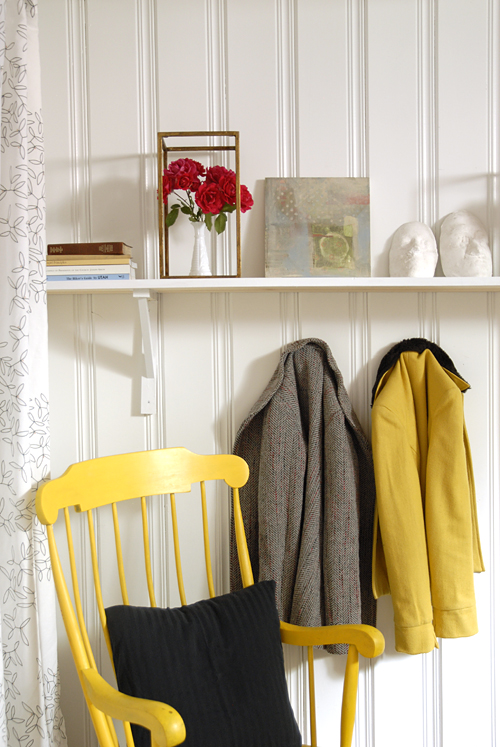
- made a shelf (from scratch! Chris is awesome), installed it & painted it white
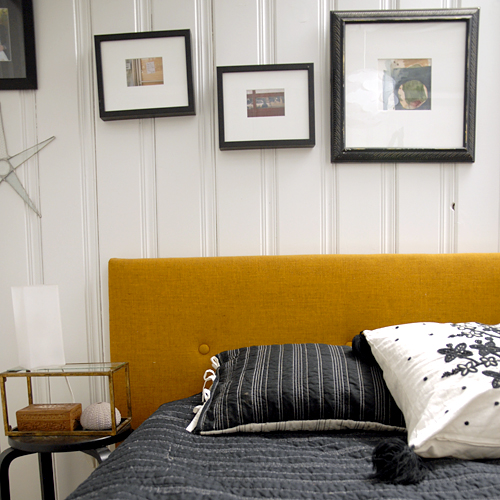
- added a headboard
- hung artwork
- added curtains to hide the closet
- added curtain to the window
Here’s what we spent:
- Paint: $28
- Ikea light fixture: $30
- White bedsheets: $18
- Lumber for shelf: $7
- Headboard: $8
- Milk glass vases: $3
- Brass cages: $1.50
Awesome, right? We managed to give this room a complete face-lift for under $100!
I love my new headboard. Susan pointed it out for me while we were thrift shopping together. I love the simple design & the rich color. Some day I think I’ll recover it with a hounds tooth or chevron pattern. Wouldn’t that look sharp? It works well in this room for now.
Our room is also rather A-symmetrical. Because of the off-kilter window & random raised-wall thingy, we went for an A-symmetrical look with decorating. Certainly not my typical style for decorating, but it works. I’m still not sure how I feel about how the frames are hung. I’ll probably rehang those at some point.
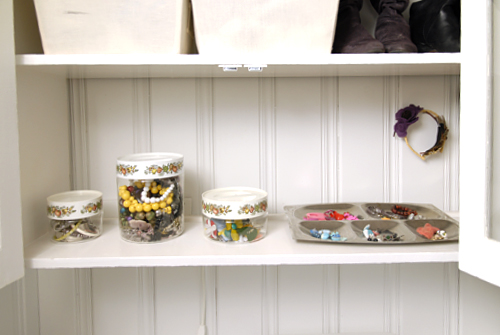
The cabinet (above) was from the previous kitchen & just taking up space in our basement. We painted it white & installed it on the wall. It’s the perfect place for my accessories & shoes. We had an awfully hard time finding a dresser when we moved in, we just opted to buy stackable Ikea bins instead. They’re not as gorgeous as the dresser I have in mind, but they’re cheap & functional. We figured it was better to buy these bins than a dresser we didn’t like. This way, if we find the perfect dresser we’ll just repurpose the bins as storage for my growing mounds of fabric or something.
This shelf was in the kitchen of our last apartment, but works perfectly in this little nook by the bedroom door. We stash our pocket contents here when we come in for the night.
For the longest time we didn’t have anything covering our closet. It’s so nice to finally have something hiding all that chaos.
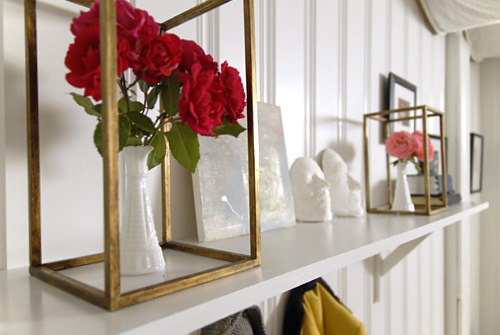
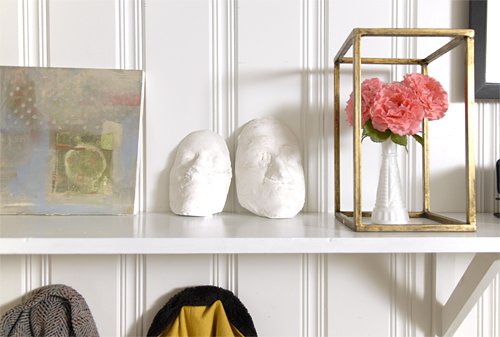
I found these brass cages at the thrift store just last week. Aren’t they fun? I wonder what the original owner used them for.
Here’s my favorite decoration: our death masks. We made those when we were dating. Such a great reminder of our courtship!
There you go. We no longer live in a dungeon. Hip, Hip HOORAY!
Additional Info:
- We got our bedding & shams from Target 4 years ago as a wedding gift.
- We did not paint the ceiling (the reason why I covered it with bedsheets) before attaching the bedsheets.
- We were really lazy & just painted right over the wood paneling. No priming. Next time we’ll prime before we paint, but it doesn’t really matter since we’ll likely move the end of next month.
- Since the house has an unusually tall basement for a home built in the 1930s, stapling the bedsheets to the ceiling makes the room feel cozier, but not smaller.
•I M P O R T A N T•
I’ve received a few emails from concerned readers regarding the code of this bedroom. The shelterpop article was actually a little misleading. There is a window in the room (as evidence by the light in the after photos), it’s just covered by a curtain. The window measures about 2’x3′, which is pretty incredible for a basement window of a house built in the early 1900s. The window is also above ground (nice!). Bottom line, it does count as a room as far as Utah rental laws are concerned. It was just a poor excuse for a room before I got my hands on it. Additionally, we don’t live there anymore. Our current bedroom windows are GIGANTIC! Hooray for loads of natural light!









WOW! I love what you did with the place!!! I came over from Clothed Much.
Melissa- awesome! can you tell me how you hung the sheets and that whole process? I’m moving into a bedroom with drop down office ceilings and I was hoping to cover up that nasty with something tent like- c’est parfait! thanks!
That ceiling makes me think of sleeping under clouds. I love all the shelving you have…I have kind of a love affair with shelves.
[…] do believe this is the most amazing room makeover I have ever […]
[…] do believe this is the most amazing room makeover I have ever […]
[…] melissaesplin.com Vía: at AKPC_IDS += "1625,";Popularidad: unranked [?] […]
one. i have that quilt & shams set!
two. i have that exact rocking chair sans yellow stain
three. awesome job! i love yellow!!
<3 jem
[…] Find how the heck she did it here. […]
I like the pictures of “before and after” and especially the decoration.
[…] my awesome headboard from my old dungeon of a room? Well, sadly it doesn’t fit in our new place. Our bed is a queen & the king-sized […]
Absolutely gorgeous! Congratulations… you did an amazing job!! PS… love the yellow rocking chair!
Those sheets on the ceiling made all the difference in the world. Congrats on a job well done.
[…] is to strip it & stain it yellow. YELLOW! I’m so excited. It’s going to match my rocking chair. I am worried, however that it might be too much yellow, so I’ve been thinking of painting […]
Oh GORGEOUS! I found you looking for ceiling posts and fell in LOVE with your room! I just had to link the bedsheets on your ceiling to my ceiling project post too – well done!
VERY DANGEROUS DEADLY HAZARDOUS CODE VIOLATION
URGENT…IMPORTANT INFO !!!
Before others get the same idea…this warning. The NATIONAL building code requires that EVERY bedroom have a means of egress in the bedroom. Not only must there be a window…that window must meet size requirements that will allow enough space to exit and firemen to enter.
Here is the code:
The one thing that inspectors never fail to check is the required emergency-egress window from a sleeping room. At least one window in each bedroom must be of sufficient size to permit the occupants to escape a fire and also to allow a fully outfitted firefighter to enter. And it may not be too high off the floor to allow easy access. Here is the code:
An egress window must satisfy all four Internatioinal Residential Code (IRC) criteria:
•Minimum width of opening: 20 in.
•Minimum height of opening: 24 in.
•Minimum net clear opening: 5.7 sq. ft. (5.0 sq. ft. for ground floor).
•Maximum sill height above floor: 44 in.
[…] was sad to see our old headboard go, but it just didn’t fit our new place. I knew it’d be nearly impossible to find another […]
SHAME on you for ruining a beautiful knotty pine bedroom. I don’t think slapping gobs of white paint over the wood is an improvement at all. You need a window? Fine. A new bed? Sure. But JEEZ! To paint over that gorgeous wood paneling is HORRIBLE.
Love this! But, I’m curious…you mention that this was listed as a 2-bedroom and that this was the second, that you liked the upstairs finished part of the place, which was why you decided to sign the lease. So. Why not sleep in the upstairs bedroom, which was presumably not a “dungeon”? Roommates?
Can you give me a step by step on the ceiling?
This is great! Thanks for the great ideas. I’m looking for inspiration for our very own dungeon room. I have some fantastic ideas now. Thank you!!
That’s Cool!
I like pictures!!!
I would like a step by step of the ceiling.
[…] Même si je préfère la solution consistant à peindre les poutres du plafond, il peut s’avérer plus utile de les recouvrir de tissu si les amas de fils et de tuyaux sont trop nombreux. Mélissa Esplin a recouvert le plafond avec des draps blancs et nous présente la transformation sur son blog Thrifty &Chic. […]
I’m just now seeing this post, and love this idea for my bedroom, which has ugly cheap paneling in one area. Can’t wait to make this change in my life!!
Hi. I love the ceiling idea. I have a basement apartment that I have been trying to figure out what to do with the ceiling. I love this idea. Did you just staple the sheets?
Yep! Just staples!
Can you provide of any instructions on how to hang the sheets from the ceiling? I have the
Start at one end of the room and staple to the ceiling beams. allow the fabric to drape and then staple to the next row of ceiling beams (or skip a few, it’s about personal preference). I think I skipped 2-3 rows of ceiling beams. Those beams are always parallel to one another, so your sheets will look even if you staple parallel to those beams. Hope that helps. We no longer live in that house, so I don’t have any images or step-by-step stuff I can send you. Good luck!
[…] Find how the heck she did it here. […]