I know there are loads of tutorials around the internets showcasing etching glass, but thought I’d add my own point of view on the matter.
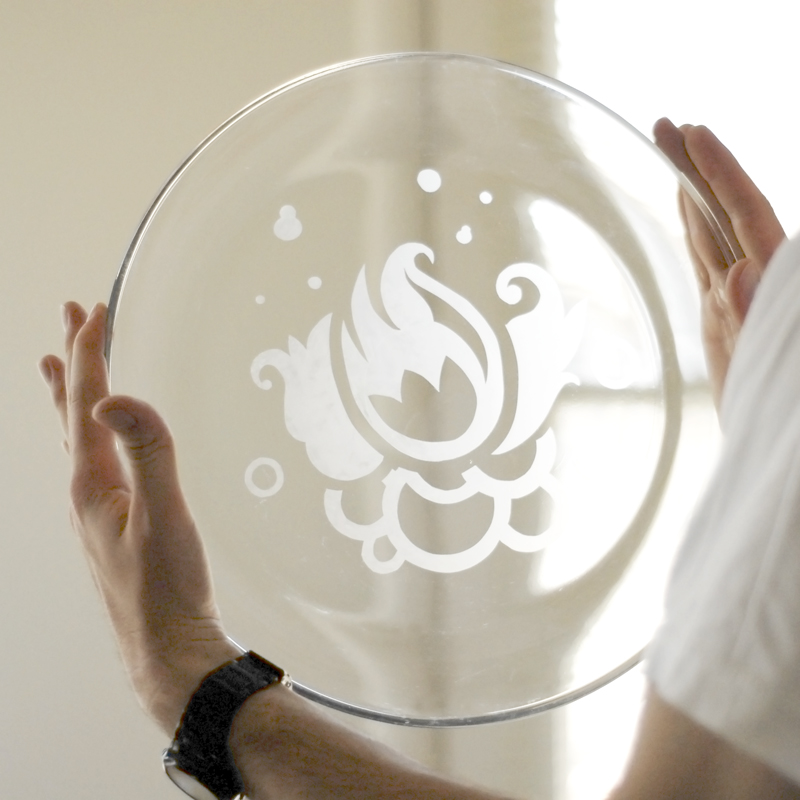
I’ve had this large glass serving platter for 6 months or so, and don’t really have much motivation to use it, mostly because it’s plain and boring. Now it’s a little more exciting, but in an oh-so-subtle way. Glass etching is also very practical for marking your glass serving ware for pot-lucks and parties. You’re less likely to end up sans dishes when they have your name on them.
Click here for the FREE printable glass etching tutorial! or read below for the step-by-step instructions.
Glass Etching Tutorial

Supplies:
- Roll of Contact Paper
- Glassware
- Junk Brush
- Bonefolder or credit card
- X-Acto Knife
- Pencil
- Armour Etch Acid
- RUBBER GLOVES!!!!

Clean your glassware and dry thoroughly. Apply contact paper to the outside of the glass. Smooth out bubbles with a bonefolder or credit card.

With a pencil or sharpie marker, make your marks. *If you don’t want to hand draw the image, print out the desired design on regular paper and tape image onto contact paper.

With an X-acto knife or scalpal, cut and remove contact paper for etching.

In a well ventilated room, generously apply armour etch acid with a junk brush. Wait 10-20 minutes for acid to etch the glass.
If you’ve applied a load of etching acid, you can scoop the excess back into the bottle for later. Rinse and wash glass, brush and your hands thoroughly with soap. Remove contact paper, dry and enjoy.

Many thanks to How About Orange and Apartment Therapy for featuring this tutorial!




Ooooh, neato. I love the idea of putting it on traveling glass ware. Thanks, you oh-so-talented person, you!
You should add gloves to your list of items needed to do this. The acid that is in the etching cream (hydroflouric) is one of the absolute worst acids to be burned with. I know personally because a relative of mine was burned by it. It doesn’t show up as a burn but instead goes directly to the bone. We were told by the doctors at the Burn Center where he was taken that there is not another acid on Earth that is more dangerous than this one. Be careful not to get it on your skin. Always wear gloves.
Be sure to also remove your diamond ring and wear safety glasses, it can also,etch prescription glasses too!
THEY SAY U NEED GLOVES~!!!
Yes you do!
Thank You so much for this advice about how important it is to ware gloves when using this type of acid product. Caring people are a grase from God.
My instructions said to leave the etching cream on only 1 min. Will the contact paper not melt if you leave it on for a long time. ! minute definitely did not etch my dish…arrrrrr,
Will using this on ovenware weaken it and eventually cause it to break while cooking?
Personally I haven’t done it on ovenware, so I can’t tell you. I don’t think it will, and honestly I’ve heard that you need to leave it on ovenware extra long because it has special protective coatings. I left my acid on the contact paper for about 20 minutes with no issues. I don’t think you could reuse the contact paper, but it didn’t seem to break down.
I hope that helps!!
Thank you so much for the information. I will try this again and leave the etching cream on for a longer time.
Hey. This message is a little late, but on the instructions on the etching cream it says that pyrex (and I assume other bakeware) won’t work well. I have armor etch and leave it on for 5 minutes and it works perfectly.
Please be aware that etching, scratches or chips can make glass bakeware weak and can result in failure. Simple breakage or actual forceful cracking AKA exploding can happen. Please consider safety when you are making these beautiful items.
I’m gonna try this! Thank you so much for sharing!
the tutorial says there is a printing error and won’t load; is that just me?
Me too :C
Yes, but if you click OK it downloads anyway (at least it did for me). :-)
Lovely idea!
[…] each way to pick up the note, but it worked. They went on a date last night. What did they do? Etched glass. My brother-in-law’s a stud. I think he learned that from his older […]
[…] Boya de?il, asidik bir ?ey. Bardaklara, tabaklara istedi?iniz deseni harfi yazabiliyorsunuz. ?urada bir uygulamas? var. (Resim de oradan) Son olarak Zihni Sinir’den ho?lan?yorsan?z […]
Wow! Can’t wait to try this!
[…] your monogram on the bottle by following this glass etching tutorial via I Still Love […]
Thanks so much for the wonderful tutorial! I just printed it out. I love the pattern on the glass – so pretty. I’ve done DIY projects and posted on http://www.makemania.com Take a look at mine and feel free to promote your blog!
[…] glass tray by ISLY, visit ISLY for the tutorial, and visit my blog today for an interview by the lovely Melissa of […]
[…] made 2 frosted glass bowls (one for Sophia and one for mi madre) PLUS a pitcher for Mama Boyle.Etched glass is […]
[…] ici : http://melissaesplin.com/home/2009/03/simple-glass-etching-tutorial/ (Cliquez sur le lien Click here for the FREE printable glass etching […]
I’ve done some glass etching & love it, but I’ve come across a problem with my cream crystallizing. has anyone else ran into this problem? if so, what do you do to keep it from happening. when it does this it leaves specs in the print that is being etched.
@Paula – if you have really old etching cream, it can crystallize, but that doesn’t mean you should go out & buy a new bottle. just pick out the large clumps as you’re working & make sure you generously coat the project with cream. the thicker the coat of cream, the more even the etch. hope that helps!
[…] etching is pretty simple already, it just requires patience and a steady hand. Melissa from “I Still Love You” has a wonderful tutorial nonetheless, so go ahead and take a […]
i was wondering if ur doing letters how do u get them to turn out wouldn’t it reverse the image because u apply it to the outside of the dish and can u etch on the inside? maybe sound dumb but i’ve never etched
[…] faux-glass etching tutorial here, definitely bookmarking this one! i have never seen this material before (the etching liquid). What […]
I agree with Karen ^^. When etching glass bakeware, would I etch the bottom outside? Or can you etch the bottom inside and still use it to cook food? I would LOVE to make these as gifts in 9×13 glass cake pans.
When etching into anything that will have food on it, you’ll want to make sure it’s on the outside of what will come in contact with the food (so the bottom of a casserole dish). This may mean that you’ll want to reverse your image so it will come out properly.
Hope that helps!
If I etch a 13 x 9 pyrex dish, can I still use it to bake food in the oven?
Do you have that pattern printable?
I like what you did, but I can’t draw that and can’t find anything as nice as what you did.
Do you have an easy way to do this on round wine glasses? I am having trouble figuring out how to do this?
[…] etched this platter several years ago, when I published how to etch glass with contact paper. I’ve had a few people ask for the design template that I used, so over three years later […]
I used this paste to make custom wine flutes for my wedding. Instead of contact paper I lightly colored on a piece of plain paper with a crayon and covered it with wide masking tape. Then I put it in my printer and printed my text and design onto it. I peeled the tape off and stuck it on the wine flutes and cut out the letters and design with an Xacto knife. Then used the etching paste. They came out great and I didn’t have to spend a fortune for professional ones!
[…] Pans: We purchased glass etching compound (per directions we found on the internet) and designed glass pans for the grandparents. Polaroid photo magnet tutorial can be found at […]
The etching cream does NOT work on most older Pyrex dishes. Use a newer dish (probably made in China vs US)
where can u get the design?
You can download the artwork here: http://melissaesplin.com/2012/11/download-glass-etched-design/
I would love to do etch something on a sliding glass door. Would that be possible??
[…] to Melissa’s blog for helping me out when I first […]
[…] and a craft stick. It also came with a small square piece of glass to practice on. (via) Here is my inspiration from, you guessed it, Pinterest. Maybe one of these days I’ll be […]
Great tutorial. I will buy gloves to try it!