Posts Tagged ‘scrapbooking’

Embossing Hand-Lettering & Calligraphy

0 Comments

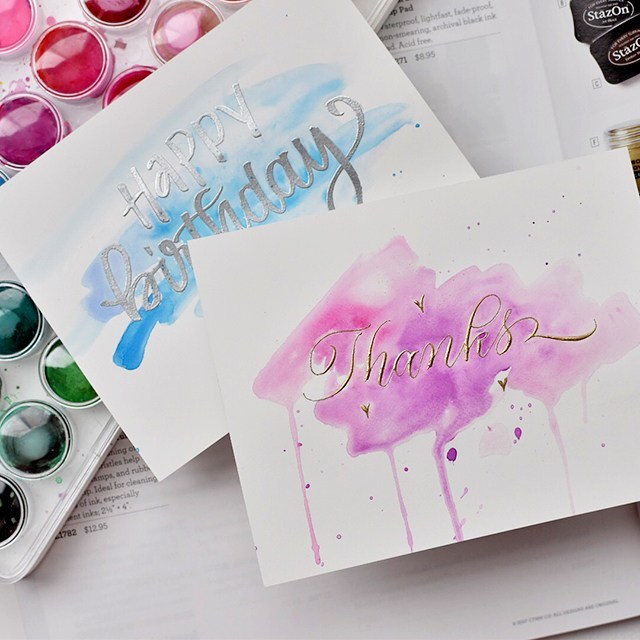
Close To My Heart sent me a sweet care package of embossing goodies to try with calligraphy. I’ve had a blast ever since they showed up on my doorstep! It’s been so fun to make cards and address envelopes with my new gadgets. And now I want every color under the sun to use for embossing! The raised texture is fantastic. And I’ve been able to get reliable results time after time with my pointed pen and my pointed brushes. It’s definitely a worth-while investment. 

Materials used: 
Gillott 404 Nib 
Oblique Holder 
Strathmore Bristol Paper
Size 2 Liner Brush
CTMH Embossing Powder
CTMH Heat Tool
CTMH Watercolors
Glycerine

I found that the Versamark liquid (for refilling stamp pads) was too sticky to use as ink, so I opted for glycerine. I’m glad I was able to find a suitable substitute as the glycerine doesn’t gum up my nibs or brushes. That said, I do like to use my cheaper nibs and brushes for this particular activity. I don’t want to be destroying my sable hair brushes in the process! 

Check out the video or read through the post details to find out how to emboss your own lettering!


  1. Dilute 1 part glycerine and 1 part water to make your ink. It helps to use a pipette to dilute with water so you have good control. 
  2. Pen or brush your words/phrase/name on the paper. Use a nice quality paper so the glycerine doesn’t bleed. Before lettering, make sure to scrape or drip off excess “ink” so you’re not laying down too much glycerine. It can affect how the embossing happens. 
  3. Place your paper over a scrap sheet, I like using a thin sheet of paper so that I can easily clean up excess embossing powder. 
  4. Pour a generous amount of embossing powder over your design. Tap excess off the paper onto the scrap sheet. Set project aside and funnel excess powder back into the embossing powder jar. 
  5. Heat your design with a heat tool. Keep the tool 2-4 inches away from  your work and move the tool as the powder melts. 
  6. Optional: Add a watercolor wash over your work. 
  7. For best results, the watercolor wash should happen after. The watercolor resists the embossed work, so no need to do it prior. If you do happen to do it beforehand, you may find the glycerine bleeds over the wash and your lines will get fuzzy. 

Products from Close To My Heart (CTMH) were provided for this video. All thoughts and opinions are my own. The affiliate links used help support this blog and the tools used for making more tutorials, reviews and content. Thanks for your support!

Thankful Box by Guest

3 Comments

Until I get my studio set up at our new place, I’ll be posting mostly thrifty finds, ideas & guest posts. If you’re interested in guest posting , please email submissions (photos 500px wide) to melissa at melissaesplin dot com.

• • •

Hi everyone! My name is Holly and I’m from elevencupcakes. I am so excited to be on ISLY today (one of my favorite blogs!). We have been thinking up some fun ideas for a kids Thanksgiving table for the past few weeks and I am super excited to be sharing how to make this ‘Thankful Box’ with you today. Enjoy!

Thanksgiving Kids’ Table: Thankful Box

Thanksgiving is a great time to remember all that we are thankful for. We made these simple ‘thankful boxes’ for each child and had them at their table. While they wait for dinner to start, kids can write, draw, and remember all that they are thankful for this year.

• S U P P L I E S •

  • Altoid tin
  • white spray paint
  • 3″x10″ strip of white paper (fold 3″x2″)
  • scrap paper
  • markers

Spray paint the altoid tin white. You may need to do a few coats to cover it completely. Take the 3″x10″ piece of paper and fold it over 2″ back and forth, so that you make an accordion. Decorate the white paper with scrap paper and stickers. Once the altoid tin is dry, tape one end of the accordion paper to the bottom of the tin. Decorate the outside of the tin with scraps of paper. We printed the word ‘thankful’ to attach to the front as well. Put out markers and pens to kids can write and draw all the things they are thankful for.

We also made a ‘Thankful centerpiece’ for the main table.

• S U P P L I E S •

  • 6 pieces of paper 10″x7″ long (folded in half)
  • Scrap paper and stickers
  • Pictures
  • Tape and markers

3 Don’t Miss Sales

6 Comments

Until I get my studio set up at our new place, I’ll be posting mostly thrifty finds, ideas & guest posts. If you’re interested in guest posting here, please email submissions (photos at least 500px wide) to melissa at melissaesplin dot com.

If you live in Utah’s Wasatch front, I’ve got two sales you don’t want to miss! First one, my sister-in-law Shelley, and her sophomore Industrial Design class at BYU made lamps & they’re selling them to the public. These lamps are killer! Hello, bottom left lamp! You’re going to be mine. All lamps are $20. Seriously, you can’t pass this up. Be sure to spread the word along to friends & family that might be interested. I believe they’re only offering 15 of each design. You can find them selling the lamps outside at the Gateway Mall – at the main intersection by the parking garage by Gap, J.Crew & Abercrombie.

The second sale is American Craft’s annual Scrapbooking sale. I like hitting this up every year for gifts for my mom & for packaging for Christmas. I went yesterday & found some fantastic deals on ribbons, trims & paper bows for giftwrapping! If you’re thinking about buying the CUTUP, they have a few available at half the price. You’ll want to get in on that if you’ve been thinking about it. Directions and details in the image below.


. . . And there’s one more I almost forgot!! The Bijou Market is this weekend, too! I’ll definitely be stopping by to check out the goods from 5th & HazelAnnily GreenAshmaeLivy Love Designs and more!


Well, as you can tell, progress on moving in is much slower than I had anticipated. Last night Chris set up the big computer, so I’ll actually be able to get some design work done. This place is fantastic, but the studio is going to be a giant project as it is in the unfinished basement. I’ll be posting videos of my progress periodically.

DHD Blog Hop + ANOTHER PRINTABLE

32 Comments

Are you getting sick of my printables, yet? If you’re not, good. If you are, suck it up; I’ve got one coming your way today.

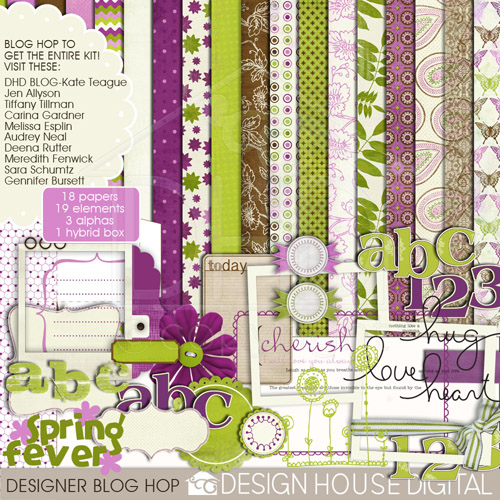
Today I’m participating in a DHD blog hop. YUP. SO FUN! The idea is that you start at the DHD blog and make the rounds to each designer’s blogs and pick up freebies along the way. By the time you’re done, you’ve got an entire kit of awesomeness on your hands. Pretty rad, right?

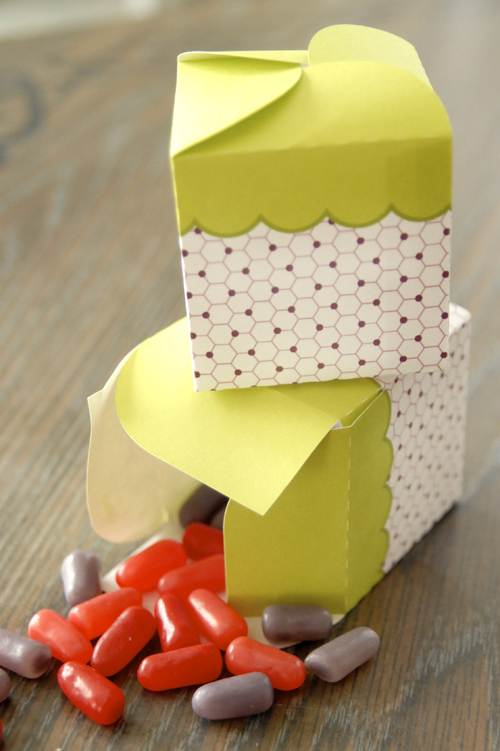
I know there are a lot of non-digital folk out there, so I thought I’d do something that everyone can use. A printable box. I hope you like it. The final dimensions come out to 2.25 x 2.25 x 2.25 inches. Click the button above to download.


Hop forward by clicking on the left, hop backward by clicking on the right.

Here’s a little preview of the artwork you can expect to get if you participate in the blog hop. Man, that’s a load of artwork! Isn’t the color scheme so fun? I love purple & green.

This printable is free for personal use. If you would like to use this printable commercially, please email me. Thanks!

My New Favorite Tool + Freebie

49 Comments

This post is brought to you by Silhouette.

If you follow this blog at all you know that I love paper crafts. My friend Heather recently introduced me to a new paper-crafting tool that has blown my mind and opened up a whole range of craft and design possibilities.  It’s called a Silhouette SD.  I’ve seen cutting machines floating around the craft stores for years.  They use expensive cartridges pre-programmed with stock word art.  The Silhouette is entirely different.  It’s a computer peripheral that takes your true type fonts and digital designs and cuts them with PERFECT PRECISION.  Glorious.

Silhouette sent me a machine to test out about two weeks ago. I was in Arizona when it came, so I was more than a little jealous that Chris was home all alone with my new Silhouette SD.  He kept teasing me about all of the fun he was having with “his Silhouette”.  My husband senses gadget lust on my voice and moves quickly to exploit it for his own entertainment. At least he didn’t unbox it while I was gone. That’s not a line that he wants to cross. ;)
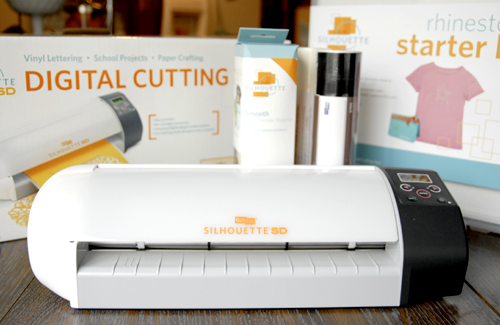
Silhouette machine with heat transfer material, vinyl, and rhinestone starter kit

My first impression was that the packaging is surprisingly clean.  The only other gadgets that I’ve purchased that had this level of attention to detail in the packaging was my Apple iMac and my Wacom tablet. The cutter itself is very light and attractive. The first words out of Chris’s mouth as he lifted it out of the box were, “Wow! It’s so light!”  The only two machines on our office table are the iMac and the Silhouette, and they make excellent desktop friends.

Installation was a tad tricky for a few reasons. First, we don’t have a PC. The silhouette is optimized for Windows, but can be used with Macs. Second, I was connecting the Silhouette through the USB hub on our backup hard drive. You’ll want to connect it directly to your computer to clear up any potential communication issues. Third, I was trying to install the illustrator plug-in for the Silhouette, not the Silhouette SD. There’s a difference. I was in business once I installed the correct software (Cutmaster 2 for CraftRobo 1.61 I have this for CS3, btw) and read this tutorial.

Mac users need Adobe Illustrator to use the Silhouette SD, because Silhouette America has yet to publish a standalone cutting application for the Mac. My contact with Silhouette says that they’ll have a dedicated Macintosh application in the near future.  This is good news for Mac users who don’t already own a copy of Illustrator.
I can’t quite describe how much fun I have watching the Silhouette cut a project. I’m like a little kid waiting for Santa Claus. I hover over the cutter, craning my head all over the place to catch a peek of the cutting blade in action.  It makes this awesome robot noise as the paper jerks in and out and the blade zooms back and forth along its tracks.
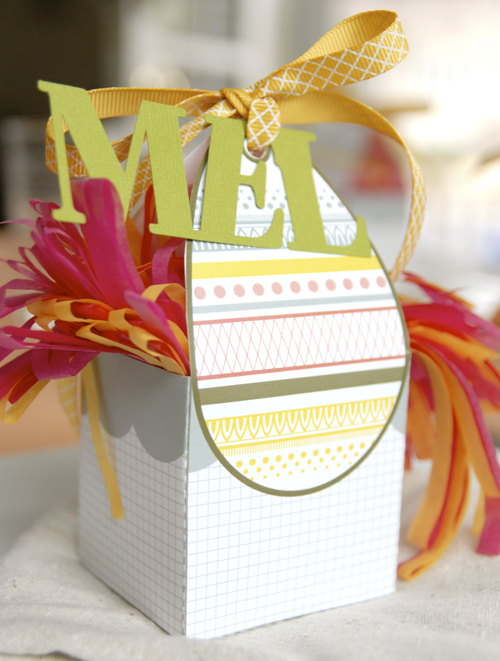
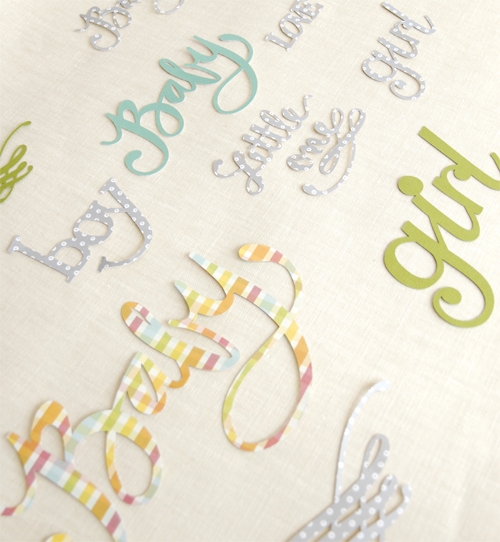
I needed a worthy project fast, and I quickly realized that I needed to cut out everyone’s names for Easter Sunday dinner. I used Bodoni font, squished each letter together and used the pathfinder tool to make each word one shape. The names didn’t take very long, so I whipped out an extra one for my mom and sent it along with a gift box I was prepping for her.
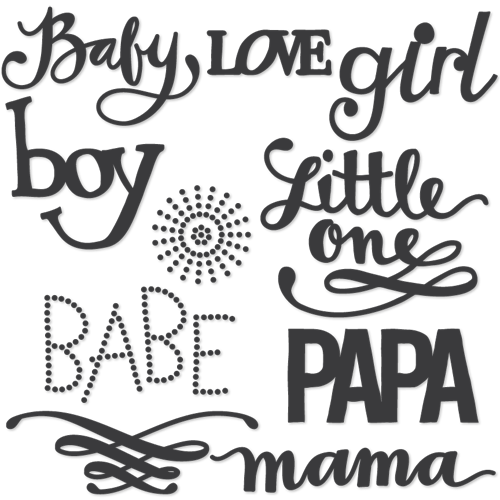
I submitted the above word art to Silhouette, and they’ve decided to offer it for free on the Silhouette online store. Click the “Purchase Online” button within the Silhouette software to view & download these graphics for free! YUP. Free. There are even two 10ss rhinestone graphics, perfect to add a little bling to some baby onesies. Mac users cannot access the Silhouette online store, but don’t feel left out. Just email me and I’ll send you the artwork. ;)

EDIT: Download my baby graphics for free by clicking the download button below! ENJOY!! And, as always, these graphics are free for personal use only. If you would like to use these graphics commercially, please email me. Thanks!


Currently I’m a little obsessed with the “baby” and “girl” graphics. Do I sound a little baby hungry?
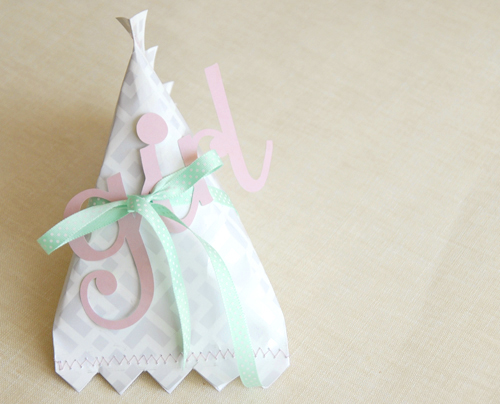
I just wrapped up a little gift for my friend who’s having a girl soon. Doesn’t the girl word art look so cute when tied to the package? Ugh. I’m a woman obsessed.
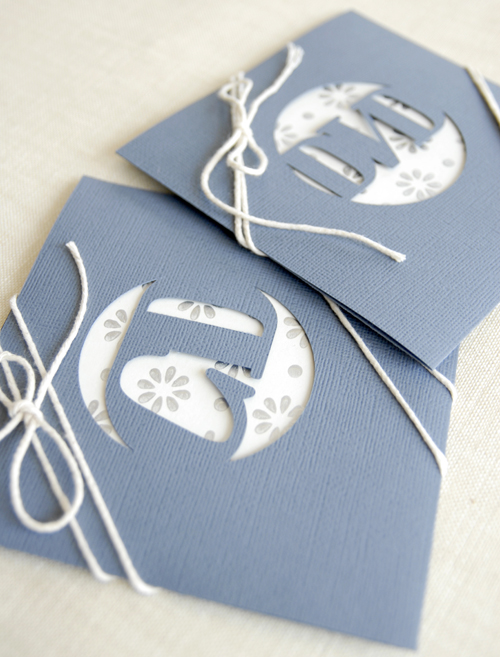
The silhouette isn’t limited to word art. Check out their “What Can It Make?” section for more ideas. Penelope’s grandparents live far away, so we can’t forget to share her photos and videos with them. It’s been a while since I’ve burned them a CD or DVD, so I cut these cases to provide myself with a little motivation.
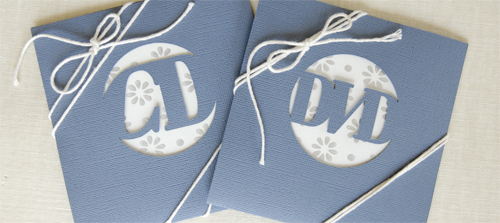
I’ve always printed and cut out my own CD sleeves, but it’s a time-consuming, hand-ache-inducing process.  The digital cutter speeds things up considerably.  I cut the card stock down to size, run it through the Silhouette, fold and glue.  If I’m going to make one, I might as well make ten.  Or twenty!

My contact at Silhouette hooked me up with a huge discount to share with ISLY readers, so this is your chance.  If you find yourself with a healthy combination of papercraft desire and spare change, check out the Silhouette store and make sure to place your order before MAY 8, 2010 to get $50 off a Silhouette machine and 10% off everything else in the Silhouette store. They’ll throw in 10 feet of vinyl, 10 feet of transfer tape, and a hook and scraper to sweeten the deal.

Full Disclosure:  Silhouette sent me a Silhouette SD in exchange for my honest review.  I suspect they knew that I’d love their product.

Silhouette Resources:

mobile site