Posts Tagged ‘free’

Redesigned: Stinky Guts Printable

7 Comments

We’ve not gotten in the mood for Valentine’s yet. Is anyone else in the same boat? I’ve got to get going on some Valentine treats, but I’m still at a loss for something clever to do. I’m sure I’ll pull something out at the last minute, in typical Melissa fashion.

Last year around this time I made a little love note for Chris’s bathroom, but I’ve never been that happy with the lettering. It’s fine, but every time I sit at the toilet I think of all of the little mistakes I made.  This morning I buckled down and redid the thing. I may as well with Valentine’s day around the corner. So here it is.

I’ve digitized it, played around with some colors and I’m offering it as a free printable. I do hope you enjoy and surprise your loved one with this funny quote above the toilet. Click the button below to download.

• Terms of Use •

This freebie is free for personal use and should not be distributed without my consent. I love getting shout outs from around the web, so please link with love. Do not copy this text, publish more than 1-2 photos or outright steal this idea for commercial publications. If you would like to use this freebie for commercial purposes, please email me. Thanks!

Adjustable Knot Leather Bracelet

14 Comments

One of my Alt Summit friends recently posted about how to make an adjustable knot, you know, the ones that you use when making friendship bracelets. It got my wheels turning and I put a few scraps to good use.

Right now, layering 2-20 bracelets couldn’t be more popular. I’ve found myself doing this quite a bit. I’m not one to sport a ton of bracelets, mostly because they get in the way as I type and work on art projects. These leather bracelets are so low profile, I don’t notice them much at all. If this isn’t your cup of tea, check out my other bracelet tutorials. I have enough for you to decorate both of your arms.

Friendship BraceletDouble-Wrap Bracelet • Magic Braided Bracelet

Bow Bracelet • Bow Cuff • Wallet Cuff • Twisted Leather Bracelet 

Check out the outfit here.

Why not stock up on some leather scraps & make a few more with me? If you’re looking to get leather scraps, head over to your local upholstery shop & ask if they have any leather scraps they’re about to toss. Often times they do. They’re typically big enough for a project like this & you’re doing the Upholstery shop a favor by helping them put scraps to good use. Alternatively you could purchase scraps from your local Tandy Leather supply or online from Freshly Picked.

Read the tutorial after the jump!

(more…)

Yellow Pages Booster Seat Tutorial

25 Comments

I feel like the yellow pages are such a waste of paper in this digital age! Either they collect dust for the next renters to deal with, or they get dumped the recycling bin. Hardly fair for something straight off the press, don’t you think? Last week we got our beloved yellow pages delivered on our doorstep. Chris brought it in & suggested that we recover it & use it as a booster seat for Penelope. She’s stopped eating in her highchair & is much too short to successfully transport food from her plate to her mouth. Of course I needed to cover this. Why hadn’t the though occurred to me before?

Sometimes I totally ride on the creative coattails of others. Like my husband.

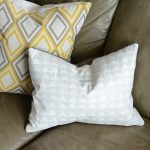
Those are tennis balls on the legs of the chair. AND yes, they’re awesome.

I did it. It didn’t take long to figure out, although I did end up unpicking a few seams along the way. Besides stopping & photographing the steps, this project took a half an hour. I used a thick canvas for our cover because a) it was on hand & b) it matched our chairs. I think oilcloth would be perfect for this project.

Yellow Pages Booster Seat Tutorial

Supplies:

  • pencil
  • washable marker
  • measuring tape
  • pins
  • sewing machine
  • thread
  • fabric (1/4 yd)
  • ribbon (1 yd)
  • yellow pages

Measure your yellow pages. Mine were 20 inches x 24 3/4 inches. Make sure to measure accurately, but not too tight, otherwise you might be cursing me later.

Cut your fabric. From the measurements I took I used a simple formula to calculate my measurements:

X ÷ 2 + 1 = WIDTH         Y ÷ 2 + 1 = HEIGHT

Cut two squares using the above formula & cut a third rectangle at: HEIGHT x 4 inches.

Snag one of your large rectangular pieces & the small one & fold the long edge over twice (for a clean edge on both sides) iron and hem. Set aside.

Cut ribbon in half & fold each half in half. Grab the remaining large rectangle (the one without the hem) & pin the ribbon 3 inches from each corner along the long side of the fabric with the ribbon fold flush to the edge of the rectangle. Pin ribbon in place.

Place large, hemmed rectangle right-side down on top of your ribbon. Match the long unhemmed side to the side where ribbons are secured. You want to have the ribbons opposite of the envelope opening.

Place the smaller rectangle right-side down on top of the two fabric pieces. Line up the unhemmed side to the bottom of the first rectangle. Pin all pieces in place. Sew along all four sides with a 1/2 inch seam allowance.

While the casing is still inside out, slip your yellow pages into the cover (binding side first) & pinch off corners (the two corners that are opposite of the envelope opening. Pinch the excess fabric & mark a line where the edge of the yellow pages are.

Remove yellow pages from casing & sew along those two perpendicular lines. This will create two boxed corners.

Flip casing right side out & insert yellow pages binding side first. When enclosing the envelope, bend the pages of your book in order to get the envelope over the book. Push pages back into place.

Tie the book to a chair & use as a booster seat! Enjoy!

For your convenience, click the button above to download the printable version of the tutorial. Cheers!

This tutorial is free for personal use and should not be distributed/republished without my consent. Altering the file NOT ALLOWED. If you would like to use this tutorial for commercial purposes, please email me. Thanks!

Oh, and by the way. . . I just finally updated the tutorials page!! Check it out to see if you’ve missed anything.

2010 Christmas Candy Box

23 Comments

It’s the time of year when my sisters (and perhaps my mom) and I get together & make caramels & dip pretzels for all of our friends. I look forward to this get-together every year. There’s something about being with the women I love most & chatting away in the hot kitchen that I just love. Do you have any Christmas/holiday traditions like that?

Well, I’m very excited to share with you this year’s (the 4th annual!) Christmas candy box. This year’s is a two-fer. I’ve included one with “Happy Holidays” and one without. The one that says Happy Holidays measures about 4.25″ x 5.25″ x 1″. The plain one is about half the size. If you’re not one to send sweet confections, this is the perfect container for small gifts like jewelery, gift cards, small journals, etc!

Here’s a preview of the plain one.

I do hope you get around to using this printable! For your convenience I’ve also included links to previous years’ candy boxes. Enjoy!!

For the 2009 Christmas candy box, click here.

For the 2008 Christmas candy box, click here.

for the 2007 Christmas candy box, click here.

These printables are free for personal use and should not be distributed without my consent. If you would like to use any of them for commercial purposes, please email me. Thanks!

Candy Pouch Printable

24 Comments

It’s been a while since I’ve done a printable! Sheesh. Well, I’ve got one for y’all today. It’s a candy pouch.

One of the ladies in my neighborhood has not been feeling too well. I was wracking my brain for something cute & thoughtful to do, but all I could think of was to drop by a bunch of packages of Ramen. That’s what makes me feel better. Instead, I think a bright package full of candy might be more on par. It’s a little more thoughtful than stuffing Ramen in a grocery bag. It’s always the thought that counts.

While making this little package I thought I would share with you the pattern & artwork. No need for it to just sit in my harddrive all alone when it can sit on someone else’s too. Right? If you’d like to make your own candy packages like the ones pictured above, here’s what you’ll need:

  • a sewing machine
  • orange thread (or some other coordinating color)
  • bright candy
  • a paper cutter
  • a hole punch
  • matching baker’s twine or ribbon

First, you’ll want to download the artwork (click the download button below) and my post & presents tutorial (click on the last line of the post to download). Then you’ll want to print out the artwork on cardstock. I printed mine at home, but you could easily have this done at your local print shop. Cut off the unprinted edges so the pattern bleeds off the page, then cut the page in half width-wise. Follow the instructions on the post & presents tutorial to make your pouch. Cut out the little tags provided in the download & punch with a hole punch. Use baker’s twine or ribbon to attach the pretty tag & voila. Done. This would be perfect for a party/dinner favor, a little gift for a friend or anything else you can think of. The orange definitely says fall to me, but there’s no reason why you couldn’t use this year round. I do hope you enjoy.

This printable is free for personal use and should not be distributed without my consent. If you would like to use this printable for commercial purposes, please email me. Thanks!

mobile site