Posts Tagged ‘free tutorial’

DIY Gilding Calligraphy with Deco Foil

2 Comments

This post is in partnership with Therm O Web’s Deco Foil™ line. I’ve been using this stuff for a couple of months now and I figured it was high time I shared with you how I use it! It’s incredibly easy and adds SO MUCH SPARKLE to your work (calligraphy or otherwise).

melissaesplin-decofoil-calligraphy-gilding-1a

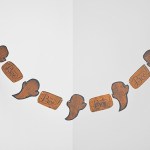
In the above image I’ve applied the metallic foil (I don’t dare say gold, because it’s not real gold) in 3 different ways; (from top) laminator, bone folder and die cut machine. My favorite is probably the die cut machine, second is the bone folder because of the application. But I’ll talk about that a little later.

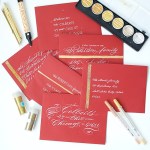
The foils come in a zillion different colors. I’m excited to try the watercolor foils soon because of the subtle color variation from one spot to another. Here I’ve used Pink Melon (top), Rose Gold (middle) and Copper (bottom). I use the copper one the most, it photographs better than the lighter golds do, so I prefer that. Let’s go through the materials needed for this technique and just get going, shall we?

melissaesplin-decofoil-calligraphy-gilding-1b

SUPPLIES:

The supplies list feels kind of long to me; but I bet if you’re anything like me, you’ll have most of these things. For the instructions, click the read more button below!

(more…)

Before & After: Craft Fail, Redemption & a Tutorial

5 Comments

Have any of you noticed how horrible I am at taking half-decent “before” pictures? I should be so ashamed. Then again, a bad “before” photo always makes the “after” photo look so much better.

before-1

Ew Gross Before Picture

I’ve had this shirt forever and I swear the neckline just gets lower and lower every time I wear it. Last time I wore it, I thought how great it would be if I did a simple refashion to bring up the neckline. I was going to braid an intricate insert, then I got lazy and decided a cowel neck could be cooler. NOPE. Not at all. It looked like I was wearing a knotted dickie and that put me in a pretty sour mood. I was just about to throw in the towel and proclaim the shirt dead, then my better half (aka Chris) reminded me that there was such a thing as a seam ripper and not all was lost.

after-1

Aw cute After Picture

Instead of butchering another neckline I decided to re-enter my comfort zone and refashion the shirt into a dress for Penelope. Isn’t Penelope adorable? These sorts of refashions are a lot of fun, and not very time-consuming. I think I like that shirt so much better on Penelope.

screen-shot-2009-11-19-at-110158-pmHere’s a little preview of the tutorial

I think it’s high time I give you a tutorial on how to do it. Yeah, there are a million other tutorials out there on this type of thing, but this is my take on it. Since natural light is pretty rare around these parts, I thought I’d illustrate each step instead. Let’s be honest, I was really just looking for an excuse to use my new Wacom tablet. Please enjoy the free tutorial. Click on the button below to download.

download here

This tutorial is free for personal use. It cannot be distributed without my written consent. All content is original and exclusive to IS•LY.

Simple Glass Etching Tutorial

43 Comments

I know there are loads of tutorials around the internets showcasing etching glass, but thought I’d add my own point of view on the matter.

I’ve had this large glass serving platter for 6 months or so, and don’t really have much motivation to use it, mostly because it’s plain and boring. Now it’s a little more exciting, but in an oh-so-subtle way. Glass etching is also very practical for marking your glass serving ware for pot-lucks and parties. You’re less likely to end up sans dishes when they have your name on them.

_dsc2870sm

Click here for the FREE printable glass etching tutorial! or read below for the step-by-step instructions.

Glass Etching Tutorial

Supplies:

  • Roll of Contact Paper
  • Glassware
  • Junk Brush
  • Bonefolder or credit card
  • X-Acto Knife
  • Pencil
  • Armour Etch Acid
  • RUBBER GLOVES!!!!

Clean your glassware and dry thoroughly. Apply contact paper to the outside of the glass. Smooth out bubbles with a bonefolder or credit card.

With a pencil or sharpie marker, make your marks. *If you don’t want to hand draw the image, print out the desired design on regular paper and tape image onto contact paper.

With an X-acto knife or scalpal, cut and remove contact paper for etching.

In a well ventilated room, generously apply armour etch acid with a junk brush. Wait 10-20 minutes for acid to etch the glass.

If you’ve applied a load of etching acid, you can scoop the excess back into the bottle for later. Rinse and wash glass, brush and your hands thoroughly with soap. Remove contact paper, dry and enjoy.

Many thanks to How About Orange and Apartment Therapy for featuring this tutorial!

To print out a template of the above design, click here.

mobile site