Posts Tagged ‘holidays’

How to Make A Stamp With Silhouette Mint

55 Comments

CHECK OUT my instagram for details on how to win your very own Mint™ machine!

I’ve had my Silhouette Mint for a little bit now and I’m crazy in love with how quickly and accurately I can make a stamp. The below stamp design took under 20 minutes from design to stamp. The bulk of the time was spent waiting for the ink to dry so I could scan it in.

melissaesplin-make-a-custom-stamp-silhouette-mint-1

This new-fangled miracle-worker should be on every calligrapher/designer’s list this year. It’s not terribly expensive and it cuts a lot of time out of the stamp-making process.

The stamp itself is a different technology than traditional rubber stamps. It creates a recessed area where the ink holds. Because of this, you can create super-fine hairlines and still get a great impression! You’re “limited” to 7 standard sheet sizes with the stamps, but they cover just about every range, it doesn’t feel like a limitation at all.

melissaesplin-make-a-custom-stamp-silhouette-mint-2

See below for a step-by-step video on how to make your custom design into a stamp.

Use code: MELISSA for an exclusive discount on the Silhouette Mint for amazing Black Friday deals. I get an affiliate fee on each purchase made with the discount at silhouette.com. It helps fuel the content over here. I honestly wouldn’t be hocking Silhouette’s products if I wasn’t absolutely obsessed. I hope you like this fancy gadget as much as I do! Deals start at 12:01am MST on Thursday, November 26!

  • Free Shipping on orders over $50.00*
  • 40% off almost everything in the Silhouette America store
  • 20% off Silhouette Design Store Subscriptions*
  • Silhouette Mint $99.99
  • Portrait & Mint $189.99
  • CAMEO $199.99
  • CAMEO & Portrait $289.99

*Deals end December 4th. Free Shipping applies to Contiguous United States. For 20% off subscriptions, use code BLACK.

melissaesplin-holly-stamp-silhouette

Right-click on the image above to download for your own Mint making!

melissaesplin-make-a-custom-stamp-silhouette-mint-3

By downloading the above material, you agree to terms of use: This tutorial/freebie is free for personal use and should not be distributed/republished without my consent. Altering any files is NOT ALLOWED. If you would like to use this freebie for commercial purposes, please email me. Thanks!

Sewing: Easter Dresses for the Girls

4 Comments

Easter came and went so fast. I can’t believe it’s been over a week since that glorious day. We kept festivities simple with new Sunday Best and a basket of candy for each kid (minus J – she’ll get one next year ;)).

esplin-easter-2015

I made dresses for the girls and bought Felix pants and a polo. It’s kind of unreal how Felix’s pants match the fabric I picked out for the girls.

melissaesplin-sewing-easterdress-8

I found this great polyester (I’m assuming it’s polyester) in the fabric district in L.A. last month. It’s very drapey, but with how light-weight it is it’s completely opaque. I’ve had trouble finding fabric with good drape and opacity these days. The print and colors aren’t what I would normally gravitate towards, but it’s growing on me. I like the little tulips and the unexpected blue. I love dressing girls up in blue. Little known fact: Pink used to be a boy color and baby blue was a girl color because they were the pastel versions of red and blue. Red being viewed as more masculine than blue. I don’t think color should be relegated to just masculine or just feminine. I like mixing it up.

melissaesplin-sewing-easterdress-9

Back buttons and pleats for Juniper’s dress

For the dresses, I made up the patterns. I drafted both dresses from clothes that Penelope and Juniper already had and fit. I kept them simple with pleats instead of gathers (whoever says gathering is easy is crazy). I wanted them to be simple enough that they could be pulled over, but with some thinking, that wasn’t going to happen with a woven fabric. Some kind of fastener had to be involved. Due to the fabric’s drape, I decided buttons were the best fit. I hate putting on buttons. Executing the button holes was a breeze. I’ve got an amazing automatic button hole setting on my machine, so I would set it then let it do its thing while I sat or left the room to take care of something else. It was sewing the buttons on that was a pain.

melissaesplin-sewing-easterdress-11

Front pleat detail for Penelope’s Dress

Overall, the buttons add a sweet element, particularly to the simple silhouette of Penelope’s dress. Both girls have to have help getting dressed, but closing a button isn’t a big deal.

melissaesplin-sewing-easterdress-10

Back button detail for Penelope’s Dress

The fabric has been a dream to work with. Now I want something in my size. I’m still trying to decide what to do. I’ve got about 2 1/2 – 3 yards left so the possibilities are nearly endless. Culottes? Wrap skirt? Pleated dress?

esplin-easter-2105

Also, I think I have the most beautiful children. I might be a tad biased.

Humbug Halloween

12 Comments

I love the holidays, but I don’t want to do a thing for them. I’ve got my BOO sign out front and some random gourds; and that’s all I want to do.

I’m having a hard time mustering the motivation to do anything festive or productive today. I had planned to make us all Adventure Time characters for Halloween, but I think only Penelope will be dressed up at this point. And it’s just because I just so happen to have a black cape so she can go as Marcelene. Maybe we’ll pull this off, but I highly doubt it at this point. Maybe I’ll get really ambitious and hang up my skeleton painting.

So who else is doing the bare minimum while gawking at brilliant, easy and ambitious Halloween projects on the interwebs? Just me?

Girlie Dinosaur Party Printables

11 Comments

Why haven’t I done this sooner? I’ve genericized Penelope’s Dino Brunch invitations & design elements for you to download. So if you have a little girl who loves dinos or a boy who loves both pink and dinos, you’ve got pretty much most of the party already done for you.

Penelope LOVED her dino party and I loved planning it. We kept things super simple, but I got a little creative with the invites and favors.

The download includes a fill-in-the-blank invitation. Instead of “Pen is turning THREE!”, I changed it to “it’s a dino PARTY!” in the same style. The bottom half has areas for date, time, place, rsvp, etc.

I included the dino sticker – ganged up for Avery’s 2 1/2 inch diameter labels. The #3 was taken off.

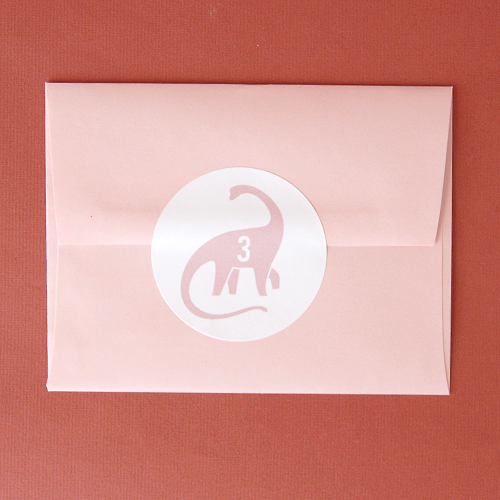
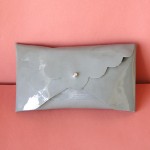
I included the dino eggs sticker – again compatable with the above Avery labels and the pouch printable. I would suggest printing on a light-weight (ideally 24lb laser) paper & cutting out by hand. For the pinked edges, use pinking shears or decorative scissors. Also, not pictured, I included a Thank You postcard for easy, matching thank yous!

There you have it! I hope someone will find this useful for an upcoming party! Click the button below to download the suite.

This tutorial/freebie is free for personal use and should not be distributed/republished without my consent. Altering the file NOT ALLOWED. If you would like to use this tutorial for commercial purposes, please email me. Thanks!

• C L I C K   H E R E   T O   S E E   T H E   P A R T Y   D E T A I L S •

• C L I C K   H E R E   T O   S E E   T H E   F A V O R S   •

• C L I C K   H E R E   T O   S E E   T H E   I N V I T A T I O N S   •

Happy Easter Weekend, Folks!

6 Comments

Here are a few pictures of the Spring/Easter-themed cookies I made with my in-laws while visiting in Arizona last week. We had so much fun stamping out the cookie dough and frosting them. We used Williams Sonoma cookie cutters and decorative pens to make these cookies. Aren’t they just beautiful? They sat around the house for about two days before we ate them. That’s pretty impressive considering my sweet tooth!

I hope you all have a weekend full of candy, delicious food (maybe a vegetable or two), friends and most importantly, family.

Aren’t those greedy little fingers adorable?

mobile site