Posts Tagged ‘art’

John & Anna Wedding | Watercolor Wash DIY

0 Comments

I had the joy to design and letter the wedding invitations for one of my cousins this last August. They were dream clients, too. Both have amazing taste and trusted my expertise and let me play with some fun, new techniques. 
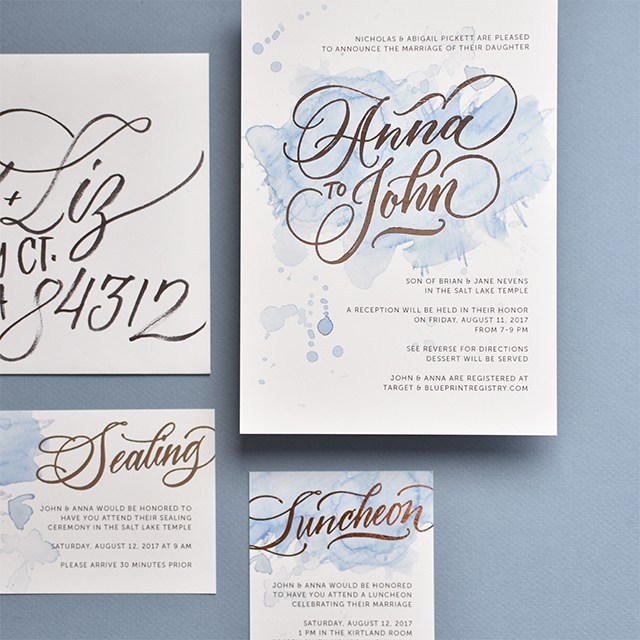
 

I’ve really enjoyed playing around with watercolor pencils and the playfulness and depth they provide to a simple watercolor wash, so I mixed a few colors to get their wedding colors in the wash and went to town. See the below video for an in-depth explanation of how to get that wash. I love the energy that explodes from the background with those washes. 

Check out the tutorial below and subscribe to my YouTube channel for more tutorials like this in the future! 

We went with copper foil printing for the names on the invitation. Part of me wanted to do copper foil for all of the text, but I didn’t want readability to be an issue. We did digital printing with digital foil through a wholesale printer I have an account with, so it was quite affordable, too!
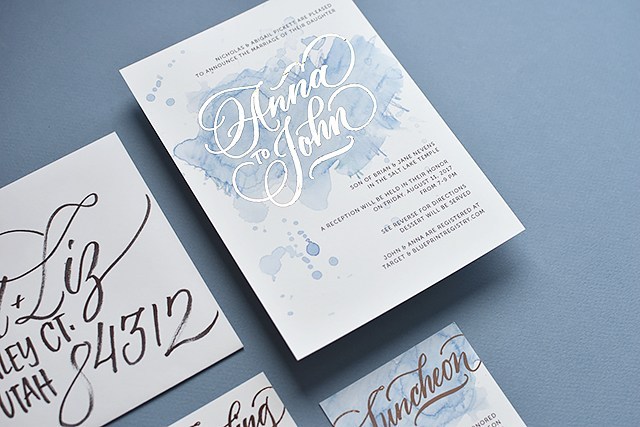
Man, foil is so hard to capture with a camera! It has a lovely rosy, rusty tone to it, it’s hard to see that in the images. But it popped nicely against the watercolor background. 

For the design, I used my go-to font Museo Sans and my own hand-lettering. I lettered the names and titles of cards with my iPad Pro using Procreate and Brush #4 from Fabian Fischer’s ultimate calligraphy brush set. I really liked the texture and functionality of that brush more than any other brush I’ve found around. If you’ve found other good ones, let me know!  
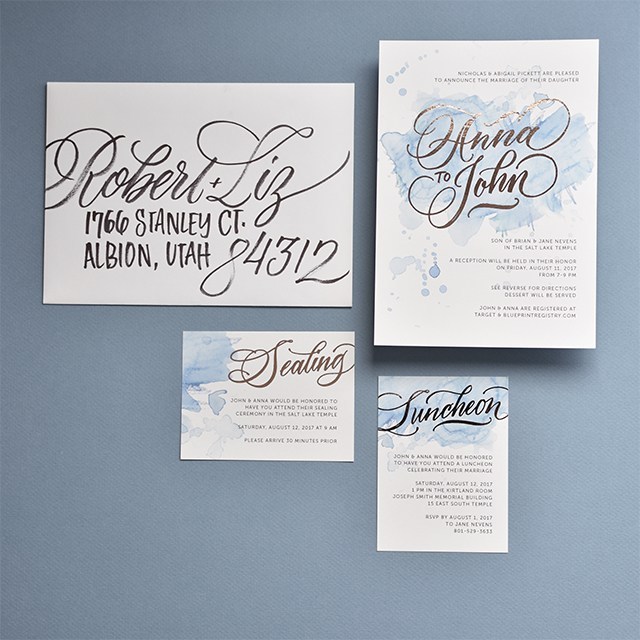
I ended up addressing all of the envelopes for the invitations as well. The couple gave me 100% creative freedom to pen them however worked best. I ended up doing a large-scale script for the names with an all caps for the address. I used the Cocoiro Brush Type marker (if you’re purchasing one for the first time, don’t forget to get a pen body to go with it). The markers lasted me about 75 invitations before it ran out of ink. I ended up doing between 500-600 envelopes. It was a project for sure, but I was THRILLED with the end result. 
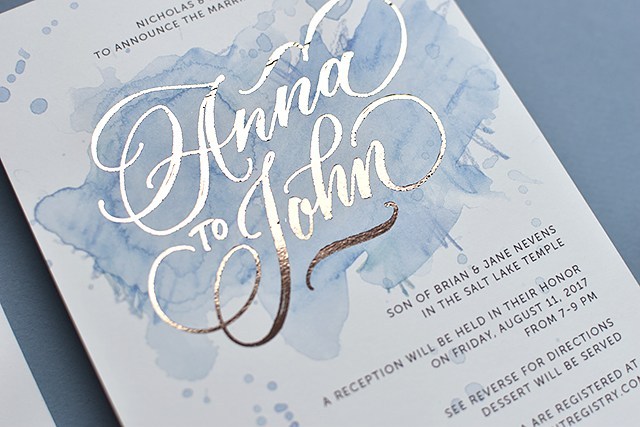
I’ve recreated the invitations using my ink-jet printer and laser printer and foil laminator so you can see some of the spots where the foil didn’t adhere. All details have been changed for privacy purposes.

Watercolor Pencil Ranunculus Tutorial

0 Comments

I’ve had this thing in the queue too long! It’s no secret that I’m a materials hoarder. When I got the chance to score a set of General’s Kimberly Watercolor Pencils, I jumped at the chance. I tried watercolor pencils a long, long time ago (before I really even knew a thing about watercolor painting in general), and didn’t really do well with them. I needed to make up for lost time. 

I really loved how these watercolor pencils turned out. They’re smooth, vibrant, juicy, and blendable. BUT… they aren’t watercolor paints! There’s a real distinction between the two… See? 

I love how I can get very gestural strokes with the watercolor pencils. It adds a lot of movement to the paper. I filmed a quick little tutorial on how to make your own ranunculus in the video below. I do hope you enjoy! 


Add your own calligraphy to your florals, and you’ve got a VA-VA-VOOM piece that your friends and family will love! Don’t know calligraphy yet? Consider taking my online class. It’s THE BEST (if I do say so myself. ;)). 

2017 Easter Printable #PRINCEofPEACE

0 Comment

I’m a Christian, Celebrating Easter for me has become more and more about celebrating the life-teachings of Christ, with the added bonus of jelly beans.

I couldn’t let Easter pass by without making something for the season! I’ve been reflecting on the life of Christ and this scripture kept coming to me over and over again. So I put pen to paper (actual Apple Pencil to iPad) and made it happen. 

I’ve formatted the printable quote to 8×10. I do hope you enjoy and remember Christ this Easter! He is our key to peace. I’m loving the focus on Christ with 8 principles of peace over on Mormon.org

I do hope you take the time to print it out and display it somewhere. If you print it out, please leave a comment here or tag me @melissapher on instagram so I can see where you’ve displayed your scripture! 

CLICK HERE TO DOWNLOAD

Want more Easter goodies? Some are more a-religious than others. Check them out below. 

2016 Easter Basket Tag • 2016 Easter Box • 2016 Easter Scripture •2014 Easter Banner2011 Easter Box • 2010 Easter Box

*By downloading the above material, you agree to terms of use: This tutorial/freebie is free for personal use and should not be distributed/republished without my consent. Altering any files is NOT ALLOWED. If you would like to use this freebie for commercial purposes, please email me. Thanks!

My Favorite Waterproof Calligraphy Inks

12 Comments

Let’s talk ink for a bit. It’s been a while since I’ve done a watercolor or a calligraphy post, or any post for that matter. I’ve recently adopted the “slow blogging” method. I spend most of my time teaching these days. You know I teach calligraphy right? If you’re new, it’s a stellar class that includes personal coaching so you know you’re getting the right instruction for your specific needs (and yes, I totally teach lefties).

melissaesplin-waterproof-calligraphy-inks-1

Sometimes I find I want to do some kind of watercolor wash after doing an illustration or a name. But I can’t, because the ink inevitably smears everywhere. I thought I’d test out to see how many of my inks are waterproof. Now, I didn’t test all of my inks, I just tested the ones I have that are easily available and most common. I have some small-batch inks that are a little harder to source. I’ve also only tested black (or black-ish) inks. Pigmented inks are a whole different can of worms because of the unique properties from pigment to pigment. If you’re hoping to use a pigmented ink with watercolor, I would recommend trial and error before working on a finished piece. Well, and really trial and error no matter what you’re using before working on a finished piece.

melissaesplin-waterproof-calligraphy-inks-2

Among my inks, I tested:


melissaesplin-waterproof-calligraphy-inks-3

So what inks do you think performed the best? I personally thought that the Pebeo Encre De Chine and the Ziller Glossy Black would do the only waterproof ink. I was mostly wrong. Continue below to find out which ones did the best!

(more…)

TUTORIAL: DIY Ink/Paint Holder

0 Comments

I made this and shot pictures like 2-3 years ago. I just discovered it while cleaning up images on my desktop (which is a hot mess) and figured I would share. I’m sure it’s been done various other places, but I need to cross this off my list so here we go.

istillloveyou-calligraphy-tiny-dish-holder-diy-1a

I found myself wanting small jars for mixing custom ink colors in gouache (for calligraphy, but works for any aqueous media) and then tipping them over. Constantly. We replaced the flooring in my studio not long ago because of how horribly stained it got. Also, I hate carpet.

So I made this little ink tray. You may want to, too.

SUPPLIES

istillloveyou-calligraphy-tiny-dish-holder-diy-2

Cut down your block to 12″ wide. Sand the edges so they’re smooth to the touch.

istillloveyou-calligraphy-tiny-dish-holder-diy-3

Mark out every inch along the board with a pencil. Optional: create an indent with the tip of the screw so your bit won’t slip around as you start the process.

istillloveyou-calligraphy-tiny-dish-holder-diy-4

Measure how deep you want the drill to go and tape it off. This will allow you to have consistent heights when you put your jars in the board.

istillloveyou-calligraphy-tiny-dish-holder-diy-5

Drill away! Go slowly and make sure you’re in a well-ventilated area with protective glasses.

istillloveyou-calligraphy-tiny-dish-holder-diy-6

Admire your handywork!

istillloveyou-calligraphy-tiny-dish-holder-diy-1

Use the sticky tack to apply to the bottoms of your jars so they don’t move around. it also helps tilt the jars when the ink gets low.

This tutorial or freebie is free for personal use and should not be distributed/republished without the express consent of Melissa Esplin. I love getting shout outs from around the web, but please, link with love. You may publish 1 photo along with credit back to the original post. If you would like to use this tutorial or freebie for commercial purposes, please email me. Thanks!
mobile site