


I had to make myself another poopy clutch (the old one was misplaced) and thought I could do much better than the tutorial/pattern I gave you last year. Without any further ado, I give you THREE versions of the old tutorial!! The new patterns are smaller and still fit up to 3 size 4 diapers plus a travel wipes case!! Very convenient for undercover diaper bags (aka purses).
Materials Notes:
It might be useful to note where my supplies can be found. Button studs, Leather (you’ll want 2-3 ounce leather for this project) and hole punches can be found online at tandyleatherfactory.com, or check out their store locator for the store nearest you. (I sound like an advertisement, but seriously they have everything.)
As seen below, you can also use leather, vinyl or fused plastic. The folks at Etsy labs have a great tutorial on fusing plastic bags. I’ve seen some really cool fused bag projects.
• • • • • • • • • • • • • • • • • • •

The No-sew Version
Similar to last year’s pattern, this pattern is optimized for leather, vinyl or fused plastic. No sewing required!
Click here to download the Normal Poopy Clutch Instructions
• • • • • • • • • • • • • • • • • • •

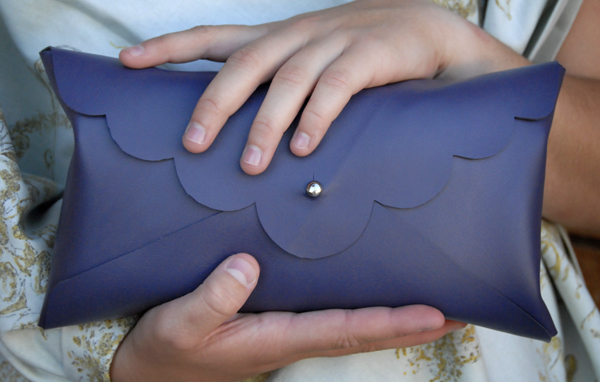
The No-Sew Version + SCALLOPED EDGE
This version is my personal favorite. It’s just like the first, it’s made for leather, vinyl or fused plastic, but with a decorative scalloped edge to add a little flirty flair to those messy diapering sessions. No sewing required.
Click here to download the Scalloped Edge Poopy Clutch Instructions
• • • • • • • • • • • • • • • • • • •

Sewn Fabric Version
Can’t find leather or vinyl? Wanting to use up your ever-growing fabric stash?!? This pattern is for fabric, complete with instructions for two different edges.
Click here to download the Normal Poopy Clutch Sewing Instructions


Hey I just read your comment on my blog, and then realized you also guest blogged on Black Eiffel. Yep – I live in Arizona. You too? I agree; we should be friends!
Thanks for the smoothie recommendation.
So Cute! I can’t wait to change diapers one day! Thanks for the free tutorials.
Totally on my list of “things I want to make”! Maybe for the next kid.
I made one of these last year when you posted it, but I made mine of fabric. Only now the one you’ve made looks way better than mine! It’s such a convenient thing to have! Thanks for the great idea!! They all look great!
These are SO awesome, Melissa! Thanks for posting them!
Freaking Sweet!!! You are awesome! I love the scalloped edge!
Can’t wait to try them out (for some mommies to be- myself eventually ;). THANK YOU.
Cute, Melissa. I love the scalloped edged one…however, I doubt I could ever make it! :)
No Way, Seriously all you have to do is cut, trace, punch and assemble. Seriously it’s so stinking easy. I’ve seen you put together more complicated El Ed posters in college. This should be a breeze!
i’m famous! thanks for leaving a comment on my blog!
that’s gotta be pretty weird to click on some strange person’s blog and see a picture of yourself. i promise, i’m not wacko.
i love your blog (and your hair) and i love your daughter’s name! too cute.
This is such a great idea!! I’m going to try make the scalloped one for a friend that’s just had a baby. Thanks for sharing!!
[…] para todos, y no precisas ser una experta para hacer los trabajos. En el día de hoy realizamos un práctico sobre de cuero. No lleva ninguna costura por lo que es muy simple de hacer. Es un trabajo perfecto para empezar a […]
Thanks for this tutorial! I finally made one today, I was so sick of the diapers being all scrunched up in the bag. I’m gonna keep this handy to make for babyshower gifts as well. Thanks again!
Hi – just found your blog (via design mom) and was wondering if you’ve ever tried to make one of these with oil cloth? Think it will work?
Thanks – have a great weekend,
Shannon
I think white oilcloth would be fabulous! It’d be sturdy, keep any messes away and still let a little light through. I used two layers of felt in mine, so you’d probably only need one for each side.
Hi! again:). How did you get the floral print inside the yellow clutch? Thanks Jennifer
You keep asking great questions, Jessica. Keep them coming!
One of my favorite products for various sewing and bookbinding projects is Heat ‘n Bond, it’s used for fusing fabric together. You can buy it by the roll at virtually any fabric store. I just fuse the fabric of my choice to the leather following the fusing instructions provided in the packaging. If you’re using a thinner leather, 1-1.5 oz, you can do a satin stitch around the perimeter to keep the fabric from fraying. Anything thicker and your sewing machine will hate you forever. If satin stitching isn’t your thing, just put a little bit of fray check around the perimeter and you’re all set!
Hope this answered your question!
[…] First up is A Newly Improved Poopy Clutch Tutorial: […]
[…] to Melissa Esplin I now have this fabulous clutch to hold all things diaper-related. I was using a plastic bag before. Ugh. This was ridiculously […]
Love it! I featured your tutorial here: http://designsbyvanessa.blogspot.com/2010/04/tutorial-roundup-baby-crafts_16.html
This is awesome! I don’t have bebe’s, but I think I’m ‘unna have to make one for myself. Plus, I’m always on the look-out for gifts that’ll make all the other baby shower guests ooh and aah. I think this would do the trick. Thx!
Hello,
I i’m on tandy leather online and I’m trying to figure out what leather did you use for this project I love the blue and yellow colors?
Thanks
I am going to make one of these for new grand daughter- Niya. These are so cute! I will make it out of fabric.
…you might want to double check your spelling—do you mean “p-o-p-p-y” clutch?
Hi. Love this project and want to make one for a friend that just had a baby. What are the dimensions of the leather you would need? I didn’t see that posted anywhere (if it was, i must have missed it!). Thanks for sharing!
A few more questions…what size button stud and hole punch? They have several on the website you suggested and I wasn’t sure which one you bought. Thanks.
Hi i absolutely LOVE the scalloped diaper clutch!! i cannot wait to get hold of some leather and or laminated fabric to try this out! :] my 3 year old little girl is out of Nappies now but would make an awesome wet wipe holder or even for going out! :] thanks for the awesome tutorial, when i make one ill link back to you! :] Thanks again :]
Jade x ♥ x
[…] Poopy Clutch • Fringed Coin Purse • Bow Cuff • Fringed Feather Necklace • Magic Braided Bracelet Posted in adventure, crafts, diy Tags: crafts, diy, leather, Studio5, tutorials […]
[…] Mug – Fabric Envelope – Sunglasses Case – Composition Caddy – Car Seat Cover – Diaper Clutch – Poopy Diaper Clutch – Travel Art Journal – Business Card Holder – Removable Tote Organizer – Passport Sleeve – […]
[…] love this little leather clutch! It was made using the Poopy Clutch Tutorial written by Melissa Esplin on her blog ISLY. I also really like how she has a couple of different […]
I was on the tandy leather website and can’t seem to find the beautiful pictured. What type of leather do I look under?
[…] easy project (very similar to Swellmayde’s) is from I Still Love You: The (ahem) Poopy Clutch. Let’s call it the Sweet Scallop instead, shall […]
Love it :)
I made a list of Clutch tutorials on my blog <3
You're in it, hope thats okay :)
http://crafterlifebyme.blogspot.com/2012/02/lot-of.html
Thank you so much for sharing these tutorial with us. I made several for baby shower gifts. So far the first recipient was completely in love with the clutch and I have no doubt the others will be as well!
[…] Make her a pretty diaper and wipes case (that doubles as a cute clutch) […]
[…] you going to any baby showers this summer? What’s your favorite gift to give? Mine is a patent leather diaper and wipes case. It doubles as a cute clutch, but serves a very noble purpose as […]
[…] that I started making last night (and could have finished if I had all the materials) was this poopy clutch from I Still Love You. There is a free pattern for it on the site. I thought it was pretty cute and while I was at […]
Hi, I love the clutch and have made it all except I am lacking the button stud. There aren’t any I can buy locally and so will have to order online. What size did you use? I am unsure which size will work best.
Either one is fine, but I’d get the small. Hope that helps!
Thanks so much! I was thinking it might be the bigger ones based on the pictures. I just ordered some smaller ones. Can’t wait to get them! I painted some turquoise feathers on my bland tan vinyl that I got. I also just bought some leather scraps because I have some ideas for sewing on some embellishments on other ones.
[…] Poopy Clutch Tutorial by Melissa Esplin – Scalloped Edged Clutch PDF […]
[…] 11. This Scalloped Leather Envelope Clutch was designed to hold a couple of diapers and wipes, but it’s so elegant that you could totally get away with carrying it as a clutch. […]
I love the structured look of this… plus that you can make it out of multiple fabrics!
Thank you so much!!