Archive for the ‘refashion’ Category

How to Get Rid of Muffin Top Tights Tutorial

45 Comments

This post is brought to you by Baby Lock. Baby Lock is dedicated to the love of sewing by creating a full line of sewing machines all with ease-of-use, high quality and a touch of elegance.

Connect with Baby Lock on Facebook and TotallyStitchin.net.

I’m not talking about losing weight. Weight is never the issue. Tights and hose are no respecter of persons when it comes to the blessed muffin top. Since I have 1-2 pairs of tights that don’t give me muffin top, I’m bound to think that I’m not the only one with this issue.

Also, it’s not really about the bulge of skin peeking out from the opening of tights (okay it’s partly that), it’s about how terribly uncomfortable tights are when they have such a tight waist. I’m not so prideful that I purchase tights within my dimensions. I always size up. It’s just a gamble whether or not those particular tights were made with a suffocating waistband.

It’s not  reliable to stick with a certain brand, either.

refashion-relaxed-waistband-tights-tutorial2

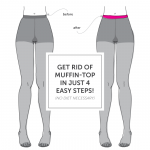
I would show you a real before and after, but no one needs to see me in my tights. You get the idea with the illustration above.

But I solved the problem this weekend. It’s crazy easy. I’ll show you how to lose that muffin top without diet, exercise! Is it witchery, you ask? Perhaps. Let’s get started.

No-More-Muffin-Top Tights Refashion Tutorial

refashion-relaxed-waistband-tights-tutorial1

Supplies

  • seam ripper
  • scissors
  • pins
  • measuring tape
  • regular sewing machine
  • elastic
  • tights

refashion-relaxed-waistband-tights-tutorial5

Cut that nasty, too-tight-for-real-humans waistband off your tights. Snip! Snip!

refashion-relaxed-waistband-tights-tutorial6

Measure you’re waist and cut a length of elastic (I used a wide picot elastic, but any comfortable, stretchy elastic will do). Sew the ends together.

Do you see how enormous my true waistband looks compared to the tights waistband? It’s bananapants.

refashion-relaxed-waistband-tights-tutorial7

Pin the elastic on top of the tights in quarters. Split the seam allowance along the back seam of your tights. Now you’ll always have a front and back to your tights, too!

refashion-relaxed-waistband-tights-tutorial8a

Stretch the tights as you sew and sew a generous zig-zag stitch all the way around.

refashion-relaxed-waistband-tights-tutorial3

Guaranteed, it won’t be the prettiest of fixes. At least mine weren’t. We’re going for speed and function here since I never expect anyone to see me wearing  just my tights!

I can’t begin to describe how much more comfortable I felt on Sunday. And I had nice smooth lines under my wiggle skirt. Big win!


Refashioned: Geometric Sweatshirt

16 Comments

Last night was the storm of the year. We woke up to about 3 inches of pure ice. So today I decided to refashion something that I was thinking about saving until next fall/winter. With all this cold, wet weather I know this will get a lot of use.

melissaesplin-refashion-sweater-1-before

Some great friends of ours gave this sweatshirt to Chris. It’s AMAZING. I love the geometric shape. Chris got some use out of it, then he started working out and gained a bunch of weight. The man is a beast, so I stole this from him.

It’s pretty big on me. Mostly the pits and upper arms are the biggest. It’s also too long in the sleeves.

melissaesplin-refashion-sweater-3-after

So, I grabbed my favorite sweater and used it as a template for taking in the sides and shortening the sleeves. Once I pinned and marked the sides, it was a 20 minute fix. It made all the difference in the world.

melissaesplin-refashion-sweater-5-after

I’m pretty stoked about this new sweater, the geometric lines are amazing.

melissaesplin-refashion-sweater-6-after

Outfit details:

  • sweater: hand-me-down, thrifted
  • pants: Anthropologie, refashioned
  • shoes: Eddie Bauer, hand-me-down


Refashioned: Bright Green Outerwear

10 Comments
glassescom-logo-1This post has been brought to you by Glasses.com – your online retailer for outdoor eyewear. Shop our selection of designer eyeglasses, sunglasses, and rx sunglasses and receive free shipping on your order.
For more information, check us out on Facebook!

post-separator

I’ve had this jacket for ages. It’s part of a skirt suit hand-me-down from my mom. Totally 80s, right? It’s amazing, but it was (until now) much too big. Well, sort of. I’m about the same size my mom was when I was her age, minus the chest and hips. And considering that the style of jacket in the 80s was boxy around the shoulders and roomy around the arms, this did not flatter my frame as much as it did my mom’s. I remember seeing my mom wear this on Sundays and thinking, I have the prettiest mom in the chapel. Every child is biased, but I was still right.

melissaesplin-refashion-tailor-sewing-jacket-lining-1

I actually used to wear this jacket out in high school and college on a semi-regular basis and always on St. Patty’s day. Little known fact – I really wish I had had a fashion blog through my college days, particularly my freshman year. My goal was to never go a day wearing just a tee-shirt and jeans. And I never did. I often work skirts and suits to school and work, and rarely did I ever not wear heels. I was always dressed to the nines with layers and accessories. Often times I wish I could remember all those crazy outfits. So despite me wearing this on a regular basis, I have no photos of me wearing this before my alteration. And I have no idea what happened to the before pictures that I took, either. It’s a real shame.

melissaesplin-refashion-tailor-sewing-jacket-lining-2

Taking in this jacket was about as complicated as taking in this rain coat. When I took in that coat, I just removed the lining and never reattached. This time I wanted to keep the lining intact and proper. I separated the lining where it counted, turned it inside out (it looked like an undescipherable mess) and zipped up the sides. It was easy enough, but I quickly realized that I couldn’t take in any at the armpit because it would either look wonky or I would have to completely deconstruct the coat to take anything in at that point. So I tapered off at the pits. It’s a good thing, too, because it seems to fit perfectly that way anyway.

melissaesplin-refashion-tailor-sewing-jacket-lining-3

You can see my small frame much better with this jacket now than before. Oh did I mention I took out the 3 inch thick shoulder pads? Those pads were beastly! Thank you, 80s.

melissaesplin-refashion-tailor-sewing-jacket-lining-4

It’s a little more kelly green than the pantone of the year, but I’d say it still counts as being on trend for 2013. I’m very happy with my “new” jacket. I’ll be getting even more use out of it now.

Have you ever altered anything with a lining? What kinds of tips can you offer if you have?

Outfit details:

  • scarf: Soel Boutique
  • earrings: H&M
  • top: Kohl’s
  • jacket: hand-me-down
  • jeans: PacSun, refashioned
  • shoes: thrifted

Refashioned: Floral Liesl Dress

10 Comments

My sister-in-law gave me this dress over the break and I just finished refashioning it. It was just a bit too short for her and she wouldn’t be taking it with her to Chicago anyway. I happily obliged. The fit wasn’t fantastic and the sleeves were about a mile high. BUT THE PRINT!! Oh that print.

The poor fit and the puffy sleeves combined made me look like I was about to break into song, “I am 16, going on 17. . .” Yikes! I’m not particularly awesome with sleeves, but I thought I would give it a shot. The puffy sleeves provided more than enough fabric for the sleeves I reconstructed. And if I failed, I could at least finish the arm holes nicely and wear it with cardigans.

And the sleeves worked! I’m so excited with how it turned out. It looks and feels so much better. Here’s how I did it:

  • I unpicked the armhole seams and the side seams all the way
  • I laid out the arm hole flat on the ground and traced the hill shape on some swedish tracing paper
  • I cut that out and pinned it to the arm hole seam and adjusted the pattern from there
  • I pinned and sewed carefully
The sleeves have a little bit of gathering at the top, but just enough to coordinate with the hem below and the straight hem of the actual sleeve make it look more grown up. Much better.

It doesn’t look like much of a change, but it took forever and feels completely different! Another piece crossed off my list for my Alt Summit wardrobe.

Outfit details:

  • earrings: Forever 21
  • dress: handmade, thrifted and refashioned
  • Bracelet: c/o Apricot Lane
  • tights: H&M
  • shoes: H&M

Refashion: Polka Dot Shirt

8 Comments

I’m starting to feel better about my sewing with a few successful projects under my belt these days.

Laura sent me this awesome navy polka dot top that needed a slight fit adjustment. It’s made of some sort of polyester knit fabric so it was a little bit slippery, but not as mischievous as the last one.

I didn’t have to take in the shoulders, it just needed shorter sleeves and a narrower bodice. I took it in by about 2 inches on each side, and cut off about 3 inches of sleeve. It’s a fantastic staple shirt that will go well with cardigans this winter, or with flowy skirts this summer.

I love the little keyhole in the back.

I’m pretty excited to party in my new shirt, can you tell?

Outfit details:

  • earrings: etsy
  • top: Laura, refashioned
  • necklace: Forever 21
  • belt: grandma’s hand-me-down
  • pants: Ross
  • boots: thrifted


mobile site