This Thursday (September 15, 2016) I’m holding a craft night at The Write Image! Click here for more info.

We’re going to be exploring flourished brush calligraphy and we’ll be decorating mugs with our fancy skills. Materials and dinner provided.

 |
 |


This Thursday (September 15, 2016) I’m holding a craft night at The Write Image! Click here for more info.
We’re going to be exploring flourished brush calligraphy and we’ll be decorating mugs with our fancy skills. Materials and dinner provided.
For the last couple of months I’ve been pushing myself with flourishes through names. I started off thinking I could do it every day, but it happens a few times a week now. Check out #calligraphynameoftheday to see all the posts. I love taking time to write out someone’s name and discovering the meaning behind it.
Finding a good card stock that comes in fun colors that holds up to various inks and pens isn’t easy. Several months ago a friend mentioned in passing that she could get me some “amazing” card stock. I tried it. I love it. And here it is.

Most scrapbooking card stocks have this obnoxious canvas/linen texture that’s impossible to write on if you have a sharp pen. And it all bleeds. Everything bleeds. Drives me bonkers. This paper rocks. It even works well with bleach!

Until now, it hasn’t been available online. Check out My Mind’s Eye for 2 packs of this awesome paper in 2 different colorways: Tropical and Wildberry. They’ve got loads more colors than the ones I’ve pulled for these packs, so speak up if there’s something you’d like to see!

Looking to get your feet wet with calligraphy? I’d love to teach you how. Check out calligraphy.org for more details.

We have had our fair share of travels these days. Between partying in Vegas with Calligraphy friends, Disneyland with the kids and a Phoenix Calligraphy workshop I’m happy to be home. And I’m tired. One of the many reasons why I haven’t updated this blog in some time.
I hate the silence! Let’s fix that. :)

A couple things I’ve come to obsess with over the last couple of months:

In the above image I used Jacquard’s Lumiere Halo blue gold for the “Local Calligraphy Workshop” lettering. It’s one ink and the golds and blue swirl around to create this fun dance with color.
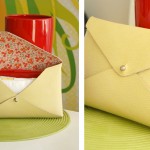
In the envelope below, I did an ombré with dioxazine purple and turquoise blue gouache. It’s more obvious in person, but the gradation is fun. And I also used the lettermate for writing guides on that envelope.

You can subtly see the clear glitter gelly roll pen on the above card. It gives things the subtle hint of shimmer. I like to do swirls, but I don’t worry if they’re perfectly balanced or executed, because you really can’t see them that close when you’re looking at it in person.
In the ‘thank you’ I’m using that jacquard lumiere ink. It’s got to be diluted with water a fair amount. Mix regularly and apply with a brush, but it’s great.
I’m also using little bits of glitter glue for little dots of sparkle. I have one in every color except orange. That needs to change soon. I need ALL the colors!

Here I’m using Jacquard’s Pearlex super bronze powder. It’s hard to convey through a picture alone how bright the metallic is. It’s mirror-like in some lights! I love it! Mix with gum arabic and water to make a useable ink.
I’m using the Lettermate directly on the envelope to write the above envelopes. The top one I letter without ascenders or descenders then I take off the template and pen them in afterward.
With the Scratch envelope I wrote Franky Scratch by hand, let it dry then used the Lettermate for the address below. I added an excessive amount of flourishes between each line when I finished.
What are your favorite calligraphy things right now?
If you have no idea what I’m talking about and would like to get into calligraphy, take my class! I teach year-round at istilllovecalligraphy.com. Purchase the class and starter kit right here.
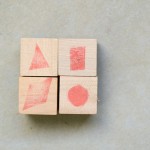
Penelope found my Paper Source catalog last month and basically flipped out when she saw the front cover featuring these little Kitten and Puppy Valentines. It didn’t look like they had pockets, so I thought it would be fun to DIY our own version.

Instead of having 6 parts that need to be assembled, I made it into 3 parts (including googly eyes) with a pocket for a special treat.

This one I made for my sister-in-law who is heading out to Spain soon as a full-time missionary for the Church of Jesus Christ of Latter-Day Saints. I included some stickers, postage (’cause I want mail from her!) and a temporary tattoo.
I didn’t do any calligraphy for Penelope’s handouts. I wanted Penelope to have artistic control over assembling. She ran with it! She decided to give the kittens winky faces. Then she grabbed spare hearts from the kittens to use for eyes. She had fun. And she owned the project!
I used Illustrator, my Silhouette and My Mind’s Eye paper (paper provided by MME) to complete this project. Side note: MME plain cardstock takes ink remarkably well! WIN!
Disclaimer: I don’t pretend to think that all of you are Christians or even like religion. If you are a Christian, you might really enjoy this post and sharing this printable with friends and family. And I sincerely hope you do! If not, please don’t take offense. This is simply a project that I feel in my heart I’ve needed to make and share here in case others may find it impactful for their holiday celebrations.
If celebrating Christ’s birth at this time of year is not your thing, I would love to hear more about your personal beliefs and traditions for this time of year in the comments below*.
![]()
This month has been insane. So many things to do and so little time. I’ve actually had this project completed for weeks, but I haven’t had a chance to photograph and write about it until now. I figure Sunday is the perfect time to publish, since this takes a more spiritual tone.
Unfortunately I haven’t had the chance to do my annual candy box. This project ended up taking its place. I have so many ideas for the candy box, though. I may have to publish a New Year’s or Valentine’s candy box. :)

At church I’m in charge of the activities for our women’s group. We meet at least quarterly for spiritual, service-oriented, social or creative activities. When we were planning I knew I wanted to make a little keepsake/quiet book for adults and children alike to be reminded of the true purpose in Christmas: Christ’s birth. I’m glad I worked on this project. It’s been a busy time of year with a lot of work (a fabulous problem to have, for that I’m humbly grateful!), so carving out time to research symbols of Christmas and coordinating scripture was a great way to get in the spirit.
This printable by no means includes all of the symbols of Christmas (I realized I left out the wreath – oops), the 7 included simply serve as a prompt for discussion and pondering on the other things around us that remind us of Christ and God.
I wanted it to be something that could be enjoyed by kids and adults alike, so I made little calligraphed illustrations that could be colored and kept the design simple to appeal to adults. It’s all small enough that it can easily fit in a purse to be toted around all season long (even though it’s almost at it’s end).
I printed off a few and plan to give them to my grandparents and parents this year. The ones we made for our women’s group activity were a huge hit. We prepped 30 kits and even though we didn’t have 30 in attendance, all were spoken for! It was a thrill to see women take extras to share with others.

The book includes symbols on: The evergreen tree, the star of Bethlehem, the candle, the poinsettia, the candy cane, the stocking and holly berries. At the end there are a couple of pages for thoughts so you could use it as a holiday journal or as a way to write your personal thoughts on the season to give to someone else. Or write in some of your favorite holiday traditions/memories.

Each symbol has a brief explanation and a scripture. Each scripture is taken from the King James version of the Bible. Mostly from the New Testament.

To assemble, you will need:
Download the printable (link at bottom of the post) and print. Print double-sided and DO NOT fit to page (print at 100%).
Cut the paper in half width-wise so that you have 8.5 x 5.5 sheets. Rearrange your papers so they are in order. I like to go by the odd numbers on the bottom right hand side. Use the blank half sheet on the outside of the title page.
Punch holes in the guides on pages 10-11. Center your pages over the leather, mark the holes on the leather and punch.
Thread your needle and sew the book: Start on the outside front cover in the middle hole. Go to the inside of the book and leave a 4 inch tail. Go through the bottom hole, then thread through the top hole and then back through to the middle hole. Your tails will be coming out of the middle of the book. Tie a knot around the string running up the spine and finish with a bow. Fold in half and crease with a bone folder.
Now you’re finished! If you batch these, you can make 10-20 books in about half an hour. They’re great for gift giving! Enjoy!
*This blog is a positive, creative space. Comments that attack any religious faction will not be tolerated or published.
**Leather provided by Leather Hide Store.