


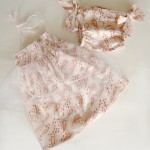
You asked for it, so here it is. I was a little lazy and decided to show this as a refashion instead of making something from scratch. The nice thing about this being a refashion: no inserting sleeves, no hemming necklines, no hemming sleeves and no need for a serger. If you’re constructing a basic tee from scratch, you definitely want one. If you’re adding a peplum? No need.

I just took a simple top from my drawer ($5 at Kohls or something?) and matched it as best I could to fabric I had on-hand. After the fabric mother-load two weeks ago, you better believe I was going to find it in my stash. No fabric shopping for this girl for some time to come!

The refashion was easy enough to pull together. After drafting the pattern, it took just over an hour to complete it. I could’ve finished it faster had I not been distracted by tv shows.
Outfit Details
- top: Kohls, refashioned
- necklace: Forever 21
- pants: Target
- shoes: c/o Blowfish

I think I would prefer the pattern to be reversed, stripes up top and the solid as the peplum, but it’s fun and funky. I’m thinking I may wear this to my 10 year high school reunion on Saturday. Or maybe I’ll sew up something completely new. Wait. What? Ten years has flown by so fast!
Click the button below for the full tutorial!

Peplum Top Refashion

Supplies
- a tight-fitting tee, hugging the waist
- about a yard of matching or coordinating jersey
- pins
- scissors
- seam ripper (just in case)
- ruler
- pencil and paper (large paper, too)
- sewing machine and matching thread

Try your tee on, with a mirror or help of a friend, pin right down the center front where you want the peplum to start. Typically this is right at, or just above the navel. Measure 5/8 inches down from that pin and cut. 5/8 inches is your seam allowance.

use the above formula to draft out the peplum part. You can use a pencil and string to make your circles, or measure along the radius with a ruler every few inches and connect the dots. If you want a full peplum, cut out fabric using the diagram above and skip straight to step 10. If you want a more fitted peplum, continue on.

Cut or fold your semi-circle in half. Add 5/8 inch seam allowance to one side, and have it clearly marked as the seam allowance.
Fold your quarter circle in half, then in half again. Use those fold lines as guides as you cut from the outer edge to the inner circle. Don’t cut all the way. Leave about a 1/2 inch of paper uncut on the inside.

Now overlap each piece by 3/8 to 5/8 inches for each slit. For my top above, I overlapped 5/8 inches. Tape in place and cut out your fabric using the diagram in step 8.
Open up pattern pieces and pin right sides together. Sew each edge, keeping in mind your seam allowance. Press seams.

Turn your cut shirt upside down (right side out) and pin to your peplum, making sure right sides are together. Use the above stitch if you’re not using a serger. A zig zag will be okay, but it won’t lie particularly flat.
You don’t have to hem a knit, but for a more polished look, you can turn the hem under 1/2 inch and use a straight stitch. If you get lazy like me, you can use some handy-dandy no-iron hem tape.


So cute! I think I will try it out – haven’t worn a peplum since I was 10. Maybe it will cover my postpartum squish :)
This is incredible. Thanks so much for sharing. Got to rush off to the fabric store now…..
Wow I like this blog! Found you on the link-up! It is very unique! :)
And to the peplum — Love it ! So in atm
Thank you so much for your sweet comment! I’m glad you like my blog!
this is adorable! you’ve done a fabulous job!! i’m so impressed with your sewing skills. and what a super helpful post for someone who would like to attempt this!
xoxo linds
my style blog :: Ruby Girl
What a fantastic idea. I have been loving the peplum tops. I’m trying to finally make/thrift a decent wardrobe for myself (my closet was getting pretty bare) I’m going to add this idea to my mental list.
The peplum top is really fun! I would never think to combine a stripe and a solid on one top, but it looks great.
How fun is this tutorial. And your graphics/illustrations are on point!
Great tutorial! I made a top using 3 tees that I wasn’t wearing, not bad for a first effort, thank you!
I’d love to see a picture of how your top turned out!
So cute! I have a couple of t-shirts sitting in my refashion pile that would be perfect for this!
I am so happy to have found this I am dying to try this and get it right, I absolutely love peplum
Thanks for the fabulous tutorial! I’ve been wanting to try one. Much appreciated :)
Totally adorable! Thanks for sharing how you did it.
Cheers,
Marie
Substance of Living
Thanks for a wonderful ideas , I just made one peplum top, thanks
[…] 3/4 length and cut the bodice three inches above the waist marking. I made my own peplum from THIS TUTORIAL […]
hi – nice tutorial. But is it not 2x length for skirt radius? bw Inanna
I’m not sure what you’re asking about. All you have to figure out is the radius for the waist, then you add length. That gives you 1/2 of the pattern (1/4 of the total peplum), then you take that all the way around to make the full peplum.
[…] great option is reworking an existing top in your closet. Here is the perfect DIY tutorial […]
have you tried this with a woven fabric? I’d like to, I have so many in my stash that I love :)
I haven’t, but you can easily do it! You’ll have to increase measurements so you can fit into the top. Typical allowance for a woven is 3inches. and you may want to add a zipper up the back.
Beautiful