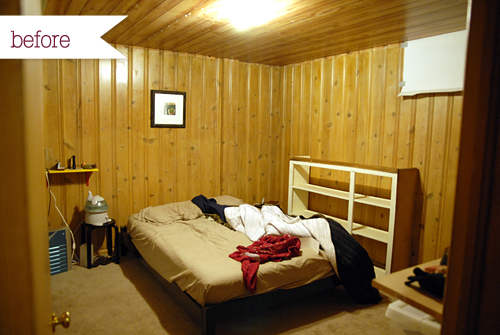
While looking for rentals last year, our place was listed as a two bedroom. Well, it wasn’t really. It has one bedroom upstairs & one downstairs in the unfinished basement. The second bedroom wasn’t really habitable before we moved in. We liked the finished part of the house, so we signed a rental agreement under the condition that the owner would make the second room liveable, i.e. remove the mysterious puddle of water in the middle of the floor, install carpet, paint the walls, install a ceiling and add a rod in the closet to make it functional. You know what they did? They installed the cheapest, ugliest carpet they could find and stapled (YES) faux wood paneling to the ceiling. See. . .
We didn’t have a closet OR a dresser for nearly two months. IT. WAS. AWFUL. Our landlord wasn’t going to do anything about it, either. So, Chris (the awesome husband that he is) installed a metal rod to the ceiling studs of the closet using a bunch of industrial chains. See, we couldn’t just put any rod in because the closet wasn’t/isn’t framed. Yup. The landlord’s grandson was in the process of ripping apart the studs of the closet to refinish the basement when he got accepted to dental school. Our basement was never finished.
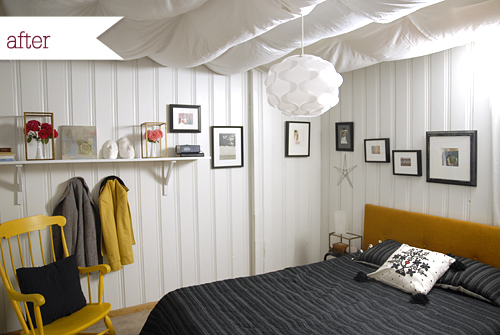
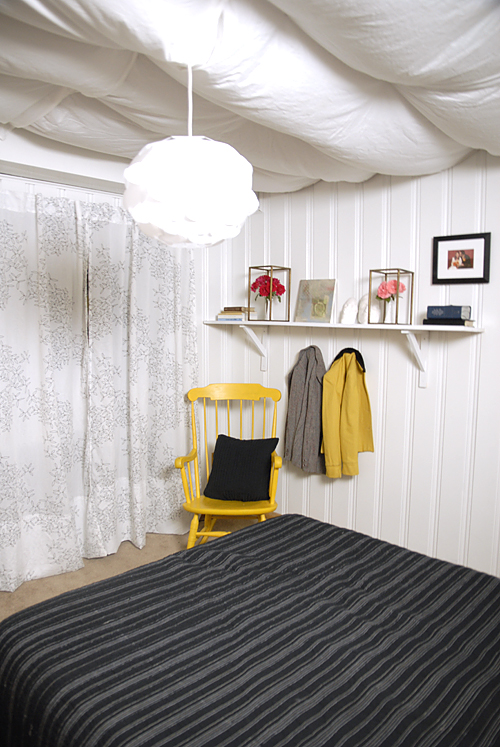
We lived in this dump for about 5 months. I was so sick of sleeping in a dungeon, I made Chris fix it up with me. Now it looks like this. . .
Sigh. This was a much needed improvement. If we actually owned the place I think we would have spent more time & money fixing the carpet, trim, door & closet but considering we may move out of this place any time it was just the right amount of investment. Here’s what we did:
- painted the walls white
- added a new light fixture
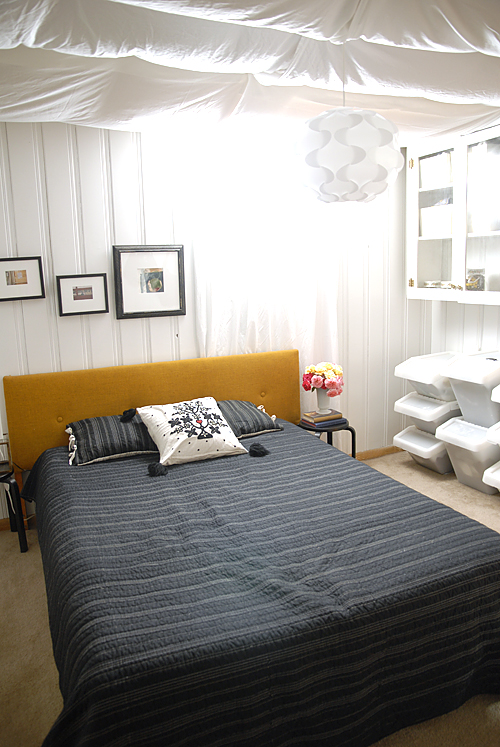
- stapled white bedsheets to the ceiling
- installed old kitchen cabinet to the wall for storage
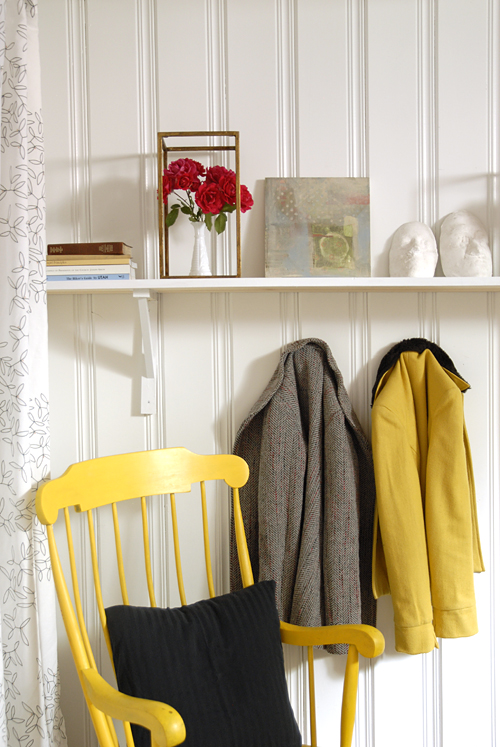
- made a shelf (from scratch! Chris is awesome), installed it & painted it white
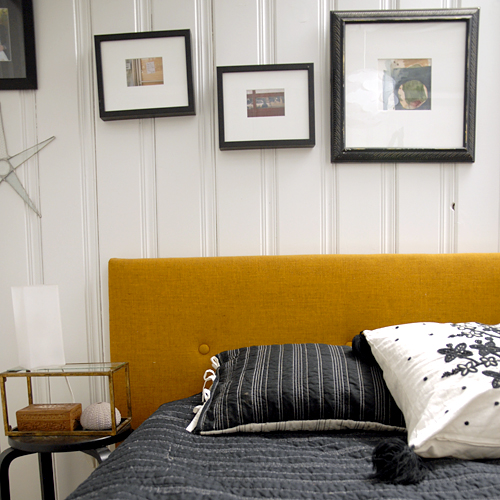
- added a headboard
- hung artwork
- added curtains to hide the closet
- added curtain to the window
Here’s what we spent:
- Paint: $28
- Ikea light fixture: $30
- White bedsheets: $18
- Lumber for shelf: $7
- Headboard: $8
- Milk glass vases: $3
- Brass cages: $1.50
Awesome, right? We managed to give this room a complete face-lift for under $100!
I love my new headboard. Susan pointed it out for me while we were thrift shopping together. I love the simple design & the rich color. Some day I think I’ll recover it with a hounds tooth or chevron pattern. Wouldn’t that look sharp? It works well in this room for now.
Our room is also rather A-symmetrical. Because of the off-kilter window & random raised-wall thingy, we went for an A-symmetrical look with decorating. Certainly not my typical style for decorating, but it works. I’m still not sure how I feel about how the frames are hung. I’ll probably rehang those at some point.
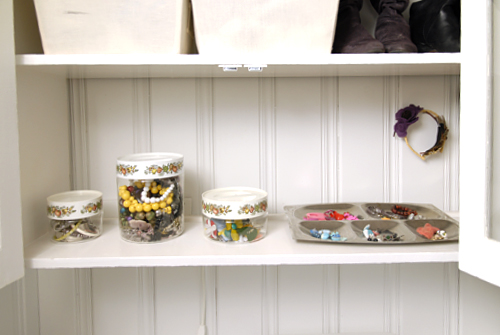
The cabinet (above) was from the previous kitchen & just taking up space in our basement. We painted it white & installed it on the wall. It’s the perfect place for my accessories & shoes. We had an awfully hard time finding a dresser when we moved in, we just opted to buy stackable Ikea bins instead. They’re not as gorgeous as the dresser I have in mind, but they’re cheap & functional. We figured it was better to buy these bins than a dresser we didn’t like. This way, if we find the perfect dresser we’ll just repurpose the bins as storage for my growing mounds of fabric or something.
This shelf was in the kitchen of our last apartment, but works perfectly in this little nook by the bedroom door. We stash our pocket contents here when we come in for the night.
For the longest time we didn’t have anything covering our closet. It’s so nice to finally have something hiding all that chaos.
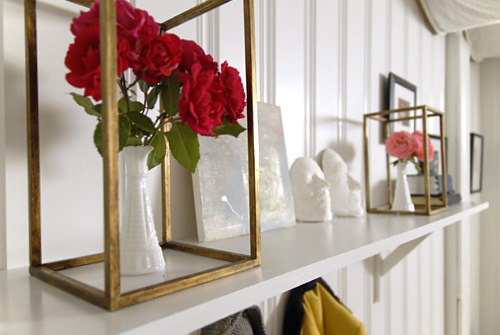
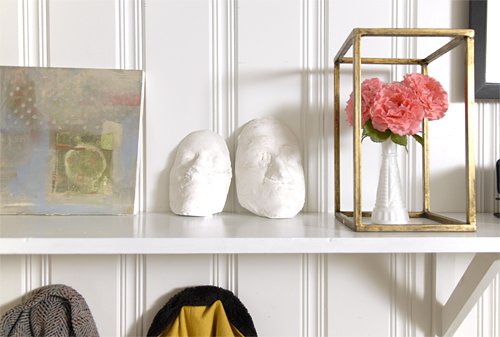
I found these brass cages at the thrift store just last week. Aren’t they fun? I wonder what the original owner used them for.
Here’s my favorite decoration: our death masks. We made those when we were dating. Such a great reminder of our courtship!
There you go. We no longer live in a dungeon. Hip, Hip HOORAY!
Additional Info:
- We got our bedding & shams from Target 4 years ago as a wedding gift.
- We did not paint the ceiling (the reason why I covered it with bedsheets) before attaching the bedsheets.
- We were really lazy & just painted right over the wood paneling. No priming. Next time we’ll prime before we paint, but it doesn’t really matter since we’ll likely move the end of next month.
- Since the house has an unusually tall basement for a home built in the 1930s, stapling the bedsheets to the ceiling makes the room feel cozier, but not smaller.
•I M P O R T A N T•
I’ve received a few emails from concerned readers regarding the code of this bedroom. The shelterpop article was actually a little misleading. There is a window in the room (as evidence by the light in the after photos), it’s just covered by a curtain. The window measures about 2’x3′, which is pretty incredible for a basement window of a house built in the early 1900s. The window is also above ground (nice!). Bottom line, it does count as a room as far as Utah rental laws are concerned. It was just a poor excuse for a room before I got my hands on it. Additionally, we don’t live there anymore. Our current bedroom windows are GIGANTIC! Hooray for loads of natural light!







That is just amazing! Really goes to show that you can do a lot of work on a rental place for not a lot of money! It looks fantastic, and I’m going to use it to try to convince my husband to redo our bedroom…
I was also going to say that this is amazing! Melissa 1, Dungeon 0.
that’s freakin’ amazing! way to go! By the way, I LOVE those brass cages. I have been on the look out for some for some time now. Let me know if you find more! Job well done, very well done.
gorgeous room! You are very creative and made it look like it could be from a design magazine. Love it.
it looks incredible! the sheets from the ceiling?? such a novel idea!
It looks fantastic! So inspiring.
It looks heavenly, Melissa! Reminds me of the ACE in Palm Springs.
LOVE it!!! Way to go!
When I saw the before picture I was thinking it would cost you hundreds to make it livable, and yet you managed to make your cave look (and I’m sure feel) open and airy while of course being thrifty. Kudos to you :)
Wow, what a transformation!! Love it!
jeez you are so talented! is there anything you can’t do???? and that headboard, 8 bucks, i’m so jealous! enjoy your new room :)
Awesome job! It’s so much more livable now!
beautiful! I can’t believe how inexpensive that was!
It looks SO much better!!! I bet its such a relief to be out of the dungeon.
The previous owners of my mom’s house had converted the garage to a living space by laying carpet over the concrete (they didn’t sweep first) and putting real wood panneling over EVERYTHING. We thought about replacing it with sheet rock but after remastering the rest of the house, we were too scared to see what “treasures” (mold, spiders, forgotten action figures) were living behind the paneling. We (and by we I mean she) painted it all white and it looked 84573985203 times better. Mike lives out there now and they have taken the dungeon/garage/storage space and turned it into quite the bachelor pad for him.
wow! what a transformation! i am totally impressed!
This is beautiful and amazing! Nice work. Can you tell us how you made the headboard? I want to make one real bad!!!
I actually bought the headboard at a local thrift store, Deseret Industries for $8. They’re not too terribly hard to make if you have a hand saw & a staple gun. Grace from Design*Sponge shares how she made hers here:
http://www.designspongeonline.com/2009/09/diy-video-graces-upholstered-otomi-headboard.html
Hope that helps!!
I love this so much it hurts. What kills me is that
a} you did it for $100
b} you thrifted most of it
c} you were so creative with the space
d} I worship the way your brain works
I am SO impressed! Way to go, Melissa! This looks amazing…I am worried you might steal my thunder as the interior designer in the family!
I’m not sure I could ever compete with your interior design skills. You work wonders with interiors, Christa!!
Death masks huh? Where are the little breathing holes?
We just held our breath until the plaster was done setting. We’re hard-core like that.
Just kidding.
We actually made plaster face masks using plaster & strips of gauze. We were careful to leave a space for breathing. THEN once the mask was set, we plastered the nose hole in & THEN made the positive from the mask. Am I making any sense? I feel like I’m rambling. I do that sometimes.
Fabulous transformation – can I move in! What a beautiful bedroom it turned out to be.
I love what you’ve done. So inspiring. It’s nice to know other people sometimes have bad luck with apartments too.
Good job!
Wow, amazing! You have quite a talent.
Ok, you are my hero! We live in a rental that I don’t love and I’ve always wanted to redo it. I LOVE the white walls. And that head board! So jealous you found that!
SO gorgeous! so nice to know you can do something when:
1. you’re on a tight budget (awesome finds!)
2. you’re renting (as we are too)
you’re awesome.
Here from design*sponge and… wow. Just… WOW.
wowsers!
here from design sponge and i just can’t get over the terrificness of your redo!
thanks tons for the inspiration!
I saw your makeover at Design Sponge. You did a fantastic job! Enjoy your new room.
I think it looks great — but I’m wondering if your landlord actually gave you permission to do all this?? I know mine will not allow me to do certain things (like paint) on my own even though I think it would substantially improve the place. Since your post sounds like “we just got fed up with waiting for him and did this”, he could take “damages” out of your security deposit if you didn’t get permission…
Ecobabe,
We surely wouldn’t have gone to such lengths to improve our room if it cost me my deposit. Thankfully, the owner likes white as much as we do. I definitely didn’t want to get stuck with any damages, so I made sure everything we did to the place was pretty renter friendly. Too bad about your landlord. Our last landlord was the same way and boy did I hate the flat white paint in that place. Everything shows on that stuff!
I really want to do this! Im renting right now an attic like apartment and the walls and ceiling are dark wood paneling. I have to see if my landlord will let me paint over. Ive been there over a year already. Did you prime the wood first or just paint it white?
Thanks for a great posting, saving it!
Monica,
We didn’t prime, mostly because we’re not going to be here forever and the landlord will be finishing the basement once we move. I would definitely suggest primer, though! It’d help the paint last longer.
the aparment i’m moving into in fall has ugly dungeon wood paneled walls too, and i was trying to think of a good paint color. i was thinking a chalky light blue-gray, but white looks pretty fantastic, and the front of my room is slanted at a slight angle with skylights cut out because its on the top floor so it will feel super bright and light if i did something like this. the room looks splendid :)
I love your gray bedding – where did you find it? The charcoal and mustard combination is wonderful.
What an amazing space!
Just amazing! This definitely inspires me to pick up the pace for finishing my office/guest room… and to find inexpensive ways to do it! Great job and congrats on no longer sleeping in a dungeon!
I LOVE what you’ve done. My boyfriend’s family just bought an old vacation house that has terrible faux wood paneling up on all the walls. Was the paneling in this room real wood or faux? Have you ever had any experience painting over faux wood? Thanks!
Danielle,
The wood paneling on the walls is real, the ceiling is faux. We were afraid to paint the ceiling because we weren’t sure it would stick or not, plus it’s a ceiling. I HATE PAINTING CEILINGS. Anyway, I’m sure you could paint the faux wood paneling just fine if you lightly sanded it & primed it with a high-quality primer like KILZ.
Totally awesome transformation…and for under $100 bucks! Go you!
Wow! I saw this on d*s and had to come over!
This is so amazing- I love the vision you had for that drab old room! The yellow really makes the room, doesn’t it?
Nice job.
Oh, and bonus points for all the thrifted and handmade stuff. I have a high-end taste and a teeny tiny budget. I think that about 90% of everything we have in our house has been picked up at rummage sales or thrift stores or made from things we had. I love resourceful styling!!!
I love the headboard and (for whatever it’s worth) my vote is that you don’t recover it. I love it just the way it is.
Most fantastic makeover on a budget I have ever seen. Hands down.
So excited to be following this blog.
WOW. That’s about all I can say b/c your incredible makeover has left me speechless.
This looks amazing! I’m sure someone already asked, sorry if I missed the answer – but where did you get your charcoal comforter? I LOVE it
The headboard is my favorite part! Great job.
You did an amazing job,really!
But I have to ask if you also painted the ceiling
and if you used the bed sheet design to make
the room feel cozier? I think it is a great way to
make the ceiling feel lower.
Great job
Wow! You did a great job! We have a basement that’s not finished but we put bead board on the walls. We were thinking about stapling sheets to the wall but weren’t sure. Can you tell me how you did that and if there are any tricks I should know before trying it;)?
WOW!! This is BLISS! I love love love it! Awesome job!
This is completely amazing! And very inspirational.
The house my family was renting while I was in high school had some terrible faux wood paneling. My handy uncle plastered the walls and it was wonderful. Not only did I have white walls to enhance the natural light of my small room, it also provided interesting texture.
My basement has that paneling and I have been considering painting it, but wasn’t sure how it would turn out. After seeing this, watch out basement, here I come!
Amazing transformation! I am not really that impressed when people spend big bucks to redo their rooms i.e. hire Candice Olson or something. :) This is the kind of thing that gets me jazzed. How cool is it that you did something like this for less than $100? Beautiful job! You should congratulate yourselves and your landlord should give you a break on your rent for improving his property. You know he’s going to advertise the place by saying it’s been featured on a design website. :) Enjoy your handiwork!
LOVE the bright yellow chair … was kinda disappointed you didn’t mention the yellow paint you selected. I assume you painted the chair and the yellow shelf.
Any chance you could let us know about that color?
Kenny,
For the yellow rocker & shelf, I already had those on hand from decorating our previous apartment, which is why I didn’t talk about them so much. I just went to Home Depot & searched for a true yellow wood stain. Turns out you can have the guys at the paint counter mix custom wood stain colors for you. I just had them mix up a batch of Minwax water-based yellow stain for me. The color is a true yellow, nothin’ special.
Wow, great job! Maybe you should go into business ;)
To a previous poster, my husband and I made a headboard and it’s really easy. Get a piece of plywood (I think you can get it cut down in store), a piece of foam padding from a craft store, and any material you like. We chose a faux suede. Use a staple gun to staple the foam to the edges and then staple the material to the back. We put a frame of painted trim around ours, but it’s just a matter of what your vision is! Simple!
i found you through “clothed much” …. so i’m obsessed with this room. it’s so good it’s crazy! well done!
Great makeover! I’m currently just beginning a “dungeon” basement bedroom remodel, myself (complete with wood paneled walls…), and this was a nice little inspiration. Love the new light fixture and the kitchen cabinets.
OK. All of you doing dungeon makeovers better take pictures and email them to me or add them to the IS•LY Flickr Pool so I can see them! I’m serious!